Monday, February 27, 2006

Chocolate Mint Brownies

Do you like Junior Mints? I do. And I'm sure you've seen recipes for "Junior Mint Brownies" made with Junior Mints. But I like to make everything from scratch so I was excited to find this recipe that seemingly mimicked the Junior Mint recipes without using Junior Mints.

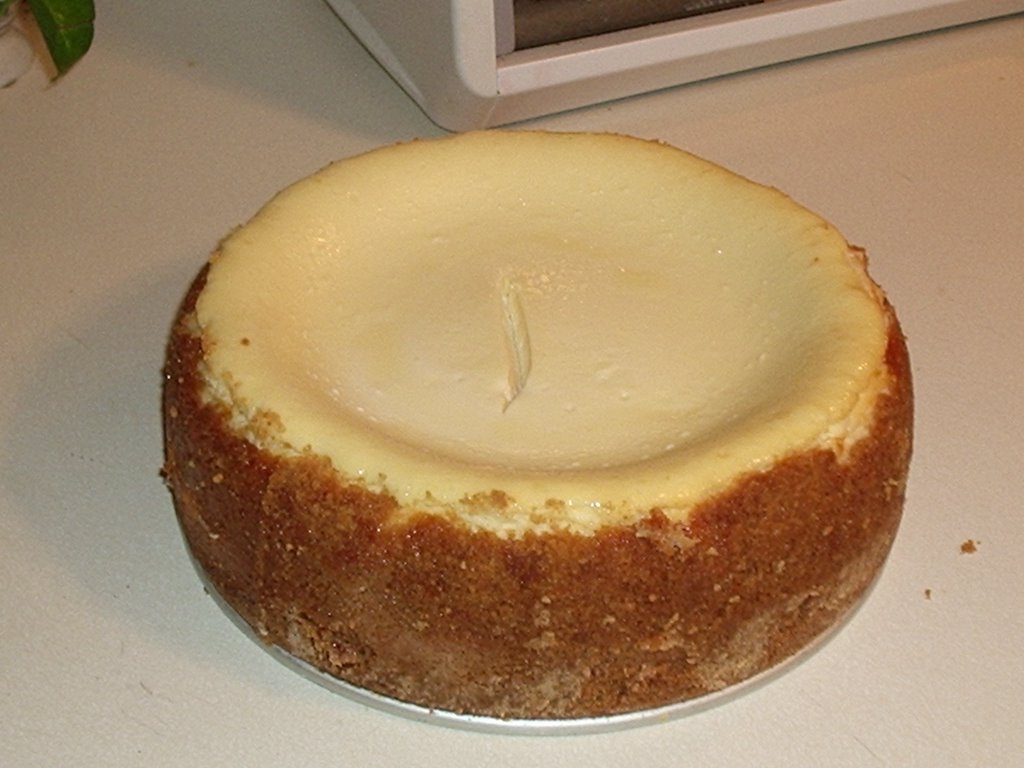
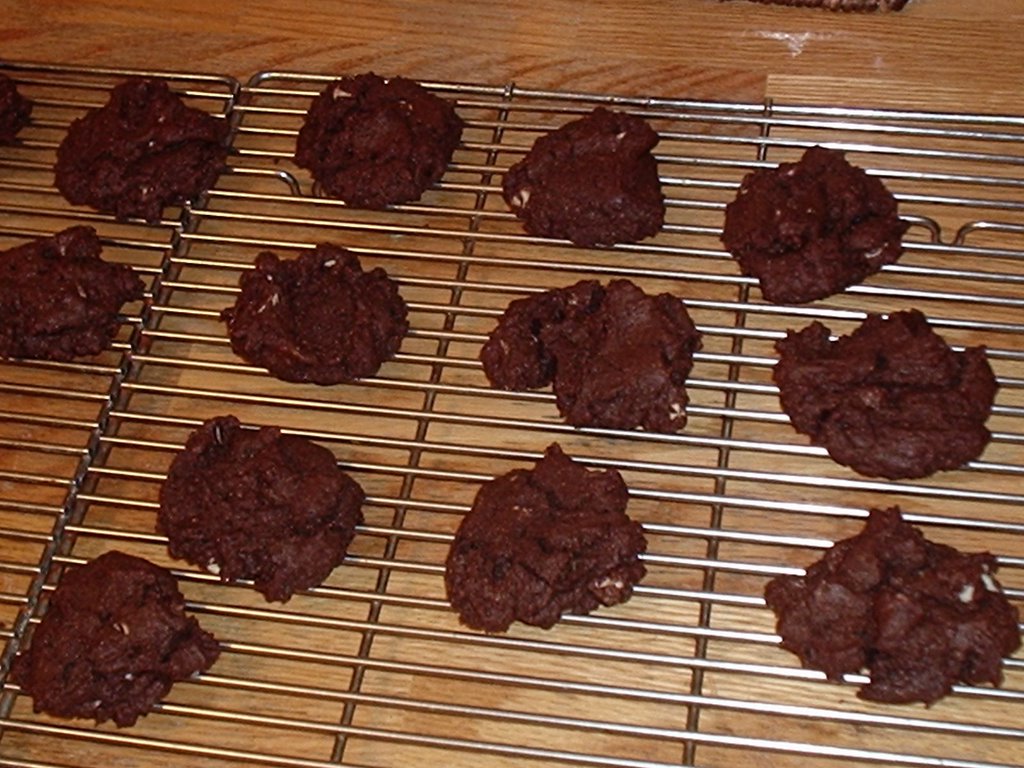
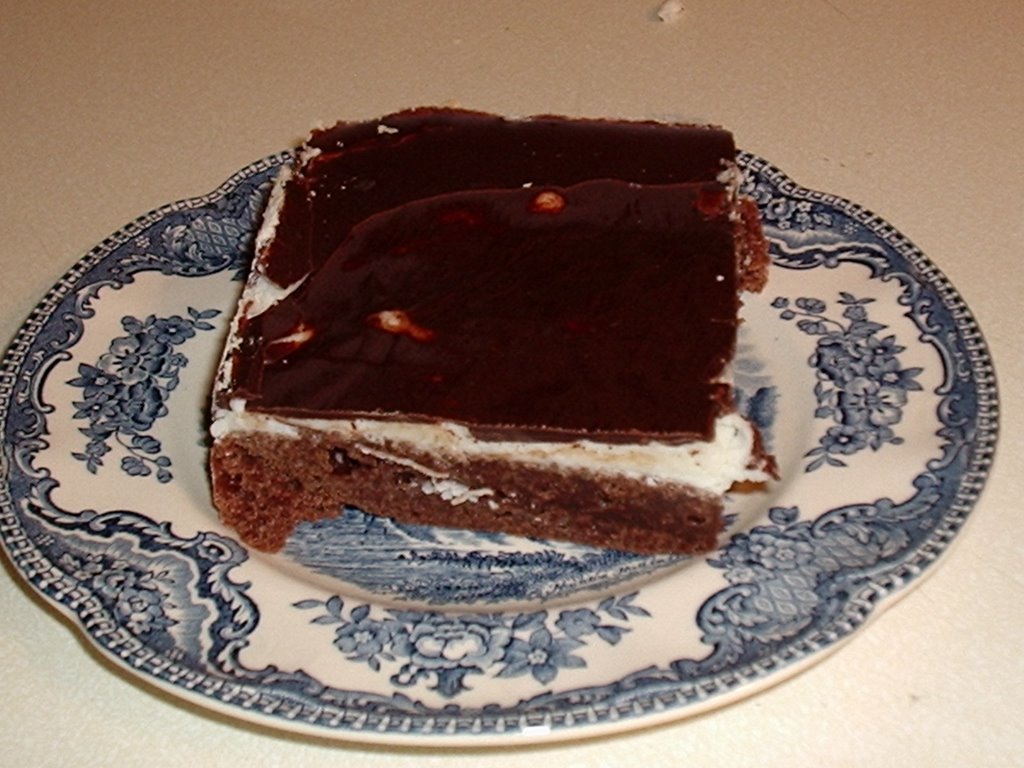
This recipe was nothing but problems. To begin with, I didn't record where I found it and despite numberous internet searches, couldn't locate a source. Scroll down to the recipe and see if you can find another problem. Right you are! There is no oven temperature specified. I used 350F, the temperature used to bake my other favorite brownie recipes. Here's something else I noticed: no baking powder or baking soda. As you can see from the picture, the brownie part stayed flat. Another missing detail: the recipe didn't specify what kind of chocolate to use in the brownie. I opted for unsweetened because of the amount of sugar. I didn't bother with the green food coloring because I didn't have any on hand. The frosting was very stiff and difficult to spread and waaaaaay too minty. It overpowered the chocolate flavors of the brownie and the top chocolate coating. The recipe says to spread the chocolate covering over the frosting. I just poured it on top and then tilted the pan around until most of the frosting was covered. Crude, but it worked. All in all, this recipe was a big disappointment.

Verdict: What were they thinking???

Chocolate Mint Brownies
(Source: Unknown)
Brownies:
2 squares choclate
1/2 cup butter
2 eggs
1 cup sugar
1 cup nuts

Frosting:
1 1/2 cups confectioners sugar
3 tablespoons butter
1 1/2 tablespoons cream
1 teaspoon peppermint extract
2 drops green food coloring

Chocolate covering:
1 square semi-sweet chocolate
1 square unsweetened chocolate
1 1/2 tablespoons butter

Cream 1/2 cup butter with 1 cup sugar. Add eggs and (melted, cooled) chocolate. Add flour and nuts. Mix well. Bake in a greased and floured 9 x 9-inch pan for 20 minutes. Mix frosting ingredients. Allow brownies to cool, frost and place in refrigerator. In double boiler, melt the ingredients for chocolate covering, cool slightly and spread over frosting. When set, cut into squares.

Recycle: peppermint extract bottle, green food coloring bottle

Compost: eggshells

Friday, February 24, 2006

Pizza

I've wanted to make pizza for years but every recipe I've ever come across uses prepared pizza sauce. I want to make my own. I found a promising recipe on the website of Sunset Magazine. I wasn't thrilled with their recipe for the dough. The first sentence was: "Start the dough at least 1 day ahead." Yeah, right. Like that's going to happen. I have enough cookbooks that it should have been easy to find another pizza dough reciep. Surprisingly, it wasn't. I finally found one in a 1996 edition of Betty Crocker (I own several editions). It was quick and easy but I wasn't happy with the taste. Too bland.

The pizza sauce recipe was one of those that sounds delicious on paper, but in reality is just terrible. I'm not a big fan of tomatoes. Tomato sauce, tomato soup, tomato juice are all fine but not tomatoes themselves. The diced tomatoes and tomato paste used in this recipe produced a sauce that was way too "tomato-y" for me. One pound of cheese was also way too much as was the 4 ounces of meat. I ended up using half that much for two pizzas. I opted for pepperoni and mushroom.

Verdict: What were they thinking???

Pizza
(Source: Betty Crocker and Sunset Magazine )


Pizza Dough

1 package regular or quick active dry yeast

1 cup warm water (105F to 115F)

2 1/2 cups all-purpose flour

2 tablespoons olive or vegetable oil

1/2 teaspoon salt

Olive or vegetable oil

Cornmeal

Quick Pizza Sauce

1 can (14 oz., or 1 3/4 cups) chopped or diced tomatoes, undrained

1 can (6 oz.) tomato paste

2 tablespoons chopped fresh basil leaves or 2 teaspoons dried basil

1 1/2 tablespoons extra-virgin olive oil

1 1/2 teaspoons dried oregano

1 1/2 teaspoons sugar

1/2 teaspoon chopped garlic

salt to taste

Toppings

4 cups shredded 100% whole-milk mozzarella cheese (1 lb.)

4 ounces meat such as thinly sliced salami or pepperoni

3 to 4 cups thinly sliced vegetables such as red onions, mushrooms, bell peppers or pitted ripe olives

2 to 4 tablespoons seasonings such as chopped fresh jalapeno chilies or minced garlic (optional)

Dissolve yeast in warm water in medium bowl. Stir in flour, 2 tablespoons oil and the salt. Beat vigorously 20 strokes. Cover and let rest 20 minutes.

Move oven rack to lowest position. Heat oven to 425F. Grease 2 cookie sheets or 12-inch pizza pans with oil. Sprinkle with cornmeal. Divide dough in half; pat each half into 11-inch cicle on cookie sheet with floured fingers. Prick dough thoroughly with fork. Bake about 10 minutes or until crust just begins to brown.

In a bowl, mix sauce ingredients. Spread 3/4 cup sauce over each crust to within 1 inch of edge. Sprinkle with cheese. Top with other ingredients. Bake at 425F about 10 minutes, until cheese is melted and pizzas are bubbly.

Recycle: diced tomato can, tomato paste can, olive oil bottle

Compost: garlic skins

Friday, February 17, 2006

Teriyaki Steak

Always in search of crockpot recipes/beef recipes, I was enticed by this one which fits both bills. Yes! Another Chinese/Japanese recipe. I happen to love teriyaki sauce and this is "make your own"! It seemed like one of those simple recipes that you could just throw into the crockpot without a lot of preparation. It was, but the end result was disappointing. It says to cook on low for 6 to 8 hours. I went with the shorter time because my crockpot tends to run a little hot. I don't know if that was the reason or if it was the recipe itself, but this came out tasting slightly burned. I was very disappointed.

Verdict: Not bad, but I don't think I'll be making this one again.


Teriyaki Steak
(Source: RecipeSource )

2 pounds boneless round steak

1 teaspoon ground ginger

1 tabelspoon sugar

2 tablespoons oil

1/2 cup soy sauce

1 clove garlic, crushed

3 scallions, chopped

1 can Chinese vegetables (optional)

Cut the steak into 1/8 inch slices. Combine the sauce ingredients and scallions in a small bowl. Place the meat in the crockpot and pour sauce over it all. Cover and cook on low for 6 to 8 hours. About 15 minutes before serving, add Chinese vegetables if desired. Serve with rice.

Recycle: oil bottle, soy sauce bottle, Chinese vegetables can

Compost: garlic skin

Monday, February 13, 2006

Best-Ever Chocolate Cake

BHG.com had a slide show on chocolate desserts. One of them was called "Best Ever Chocolate Cake". That sounds like a challenge to me! I looked at the ingredients and couldn't imagine how this recipe could be "Best Ever". First of all, it's made with cocoa. My experience has been that anything made with cocoa is not very "chocolatey". And I LIKE chocolatey. The frosting is made with sour cream! I couldn't even imagine what that must taste like. I accepted the challenge. Hey, it's Valentine's Day. Valentine's Day is all about chocolate!

My problems with this recipe started with the pans. The recipe calls for two 8x8x2-inch square or 9x 1 1/2-inch pans or one 13x9x2-inch pan. The accompanying illustration shows three round layers! Were they three 8-inch layers or three 9-inch layers? I took a look at the frosting recipe and found a clue. It supposedly frosts the tops and sides of two or three 8- or 9-inch cake layers or halve it to frost the top of a 13x9x2-inch cake. I opted for three 8-inch round pans. Turns out that was exactly right! They baked up beautifully.

The frosting was not as beautiful. An 8-ounce carton of sour cream is way too much. The frosting was too runny and much too plentiful for my three layers. I probably could have frosted two three layer cakes with it! It did nothing towards holding the layers together. When I cut the cake, it fell completely apart.

The taste was definitely not "best ever". As I expected, it wasn't chocolatey at all and even worse, it was dry, dry, dry. I like my chocolate cakes to be moist and chocolatey. I didn't care much for the frosting either. I just don't like my frosting to taste of chocolate chips!

Verdict: What were they thinking???

Best-Ever Chocolate Cake
(source: BHG.com )


3/4 cup butter, softened

3 eggs

2 cups all-purpose flour

3/4 cup unsweetened cocoa powder

1 teaspoon baking soda

3/4 teaspoon baking powder

1/2 teaspoon salt

2 cups sugar

2 teaspoons vanilla

1-1/2 cups milk

Chocoalte-Sour Cream Frosting

1. Allow butter and eggs to stand at room temperature for 30 minutes. Meanwhile, lightly grease bottoms of two 8x8x2-inch square or 9x1/2-inch round cake pans. Line bottom of pans with waxed paper. Grease and lightly flour waxed paper and sides of pans. Or grease one 13x9x2-inch baking pan. Set pans aside.

2. In a mixing bowl stir together the flour, cocoa posder, baking soda, baking pwoder; and salt; set aside.

3. In a large mixing bowl beat butter with an electric mixer on medium to high speed for 30 seconds. Gradually add sugar, about 1/4 cup at a time, beating on medium speed until well combined (3 to 4 minutes). Scrape sides of bowl; continue beating on medium speed for 2 minutes. Add eggs, one at a time, beating after each addition (about 1 minute total). Beat in vanilla.

4. Alternately add flour mixture and milk to beaten mixture, beating on low speed just until combined after each addition. Beat on medium to high speed for 20 seconds more. Spread batter evenly into the prepared pan(s).

5. Bake in a 350 degree F oven for 35 to 40 minutes for 8-inch pans and the 13x9x2-inch pan, 30 to 35 minutes for 9-inch pans, or until a wooden toothpick inserted in the center comes out clean. Cool cake layers in pans for 10 minutes. Remove from pans. Peel off waxed paper. Cool thoroughly on wire racks. Or place 13x9x2-inch cake in pan on a wire rack; cool thoroughly. Frost with desired frosting. Makes 12 to 16 servings.

Chocolate-Sour Cream Frosting: In a large saucepan melt 1 12-ounce package (2 cups) semisweet chocoate pieces and 1/2 cup butter over low heat, stirring frequently. Cool for 5 minutes. Stir in 1 8-ounce carton dairy sour cream. Gradually add 4-1/2 cups sifted powdered sugar (about 1 pound), beating with an electric mixer until smooth. This frosts tops and sides of two or three 8- or 9-inch cake layers. (Halve the recipe to frost the top of a 13x9x2-inch cake.) Cover and store frosted cake in the refrigerator.

Recycle: vanilla extract bottle

Compost: eggshells

Sunday, February 12, 2006

OldRoses' Chocolate-Dipped Valentine Heart Cookies

Your wish is my command. Susan requested my "regular" Valentine cookie recipe. It's a two parter. I saw the idea in that same "First Magazine" that I found so many recipes that became staples in my kitchen. This one was from the February 10, 1992 edition. I like to keep things simple, so I eliminated the white chocolate and assorted colored sugars, sprinkles tinted coconut, etc. that were suggested as toppings. I also doubled the amount of chocolate chips and shortening so there would be enough to cover all the cookies. Then I substituted my favorite sugar cookie recipe from my favorite cookbook, Betty Crocker, for the one used in the magazine. That one called for zest from 2 oranges. I wasn't thrilled with the thought of orange-flavored cookies. And I tinted the dough pink in honor of Valentine's Day. No pictures this time. You just have to imagine the Half-Hearted Valentine Cookies in pink!

Verdict: Yum! This one's a keeper.
OldRoses' Chocolate-Dipped Valentine Heart Cookies
(Source: OldRoses)
1 recipe Deluxe Sugar Cookies
Red food coloring
2 cups semi-sweet chocolate chips (12 ounces)
4 tablespoons shortening
Mix cookie dough as directed. Using red food coloring, tint dough pink. Cut out with heart shaped cookie cutters and bake as directed.
Melt chocolate chips and shortening in micro-wave in a deep bowl. Dip 1 side of each cookie into the chocolate and let excess drip off. Scrape bottom edge against bowl to remove last of the excess chocolate. Put on sheets of waxed paper to set.
Deluxe Sugar Cookies
(Source: Betty Crocker Cookbook)
1 cup butter or magarine, softened
1 1/2 cups confectioners' sugar
1 egg
1 teaspoon vanilla
1/2 teaspoon almond extract
2 1/2 cups all-purpose flour
1 teaspoon soda
1 teaspoon cream of tartar
Mix thoroughly butter, confectioners' sugar, egg, vanilla and almond extract. Blend in flour, soda and cream of tartar. Cover, chill 2 to 3 hours or overnight.
Heat oven to 375F. Divide dough in half. Roll each half 3/16 inch thick on lightly floured pastry cloth. Cut into desired shapes. Place on lightly greased baking sheet. Bake 7 to 8 minutes or until light brown on edge.
About 5 dozen 2 to 2 1/2 inch cookies
Recycle: vanilla extract bottle, almond extract bottle, food coloring bottle
Compost: eggshell

Friday, February 10, 2006

Sweet, Hot, and Sour Meatballs

I have to stop trying recipes that use prepared mustard. All I taste is the mustard. And there are just certain things that should never be eaten with mustard. Meatballs definitely fall into that category. I was intrigued by this recipe because of the unique combination of ingredients. Uniquely awful, as it turns out. What was I thinking? Mustard and apple juice and apple jelly? I have absolutely nothing good to say about this dish. The sooner I can get this posted and begin forgetting I ever made it or tasted it, the happier I will be.

Verdict: What were they thinking???


Sweet, Hot, and Sour Meatballs
(Source: BHG.com )
1/2 cup refrigerated or frozen egg product, thawed
1/2 cup fine dry bread crumbs
1/2 cup finely chopped onion
1/4 cup milk
1/2 teaspoon salt
1/2 teaspoon black pepper
1 pound bulk pork sausage
1 pound ground beef
3/4 cup apple jelly
1/3 cup spicy brown mustard
1/3 cup whiskey or apple jiuce
1-1/2 teaspoon Worcestershire sauce
Few dashes bottled hot pepper sauce
1. In a large bowl combine egg product, bread crumbs, onion, milk, salt, and pepper. Add sausage and beef; mix well. Shape into 48 meatballs. Place meatballs in a shallow baking pan. Bake, uncovered, in a 375 degree F oven about 30 minutes or until done (160 degree F). Remove from oven; drain.
2. Meanwhile, in a large saucepan stir together jelly, mustard, whiskey, Worcestershire sauce, and bottled hot pepper sauce. Heat and stir until jelly melts and mixture bubbles. Add meatballs, stirring gently to coat. Cook for 3 to 5 minutes or until sauce thickens slightly and meatballs are coated.
Makes 24 servings (48 meatballs)
Recycle: jelly jar, mustard jar, whiskey or apple juice bottle, Worcestershire sauce bottle
Compost: onion skins

Monday, February 06, 2006

Half-Hearted Valentine Cookies

I have a recipe for Valentine cookies that I have used for years. It's just a sugar cookie recipe that I tint pink, cut out with a heart-shaped cookies cutter and dip in a chocolate glaze. But I'm always on the lookout for new recipes and this one seemed an interesting variation. I was a bit leery of the peppermint extract and the plain color didn't appear terribly appetizing. I forged ahead anyways.

The cookie part of the recipe went fine other than the strong smell of peppermint. I ran into trouble with the glaze. The glaze I normally make is chocolate chips and shortening. This one is chocolate chips and butter. Richer (which is good!) but also thicker, which as it turns out, was not good. I broke a few cookies trying to scrape off the excess off of the back of them. I also ran out of glaze before I was halfway through because it was so thick. The thinner glaze that I normally use goes much further. I made another batch of glaze and soldiered on.

These cookies have to be refrigerated for the chocolate to set correctly. To accomplish this feat you need three to four cookie sheets covered with waxed paper and a nearly empty refrigerator. I'm fortunate. I live alone so my refrigerator is pretty empty most of the time. I can't imagine how a normal family with a full refrigerator could possibly fit that many cookie sheets in without emptying it out.

In the end, I felt it wasn't worth the effort. I just didn't care for peppermint cookies although the glaze was pretty good. I was rushing to finish these because I wanted to bring them to a meeting. I forgot to take pictures before I left. No matter, I could take pictures there. But I forgot my camera. No problem, I could take pictures of the leftovers when I got home. But there were no leftovers. Some of the attendees liked the cookies so much, they eagerly took home all of the leftovers. One woman even requested the recipe! I found the picture below on the Lane O Lakes website. I also noticed that they have changed the recipe for the glaze from butter to shortening.

Verdict: I didn't care for them, but other people loved them.

Half-Hearted Valentine Cookies
(Source: Favorite Brand Name Cookie Collection)

Cookies

3/4 cup sugar

1 cup Land O Lakes butter, softened

1 package (3 ounces) cream cheese, softened

1 egg

1 teaspoon peppermint extract

3 cups all-purpose flour

Glaze

1 cup semi-sweet real chocolate chips

1/4 cup Land O Lakes butter

For Cookies, in large mixer bowl, combine sugar, butter, cream cheese, egg and peppermint extract. Beat at medium speed, scraping bowl often, until light and fluffy. Add flour; beat until mixed. Divide dough into halves. Wrap in waxed paper. Refrigerate until firm, at least 2 hours.

Preheat oven to 375F. Roll out dough on lightly floured surface to 1/4-inch thickness. Cut out with floured heart-shaped cutters. Place 1 inch apart on ungreased cookie sheets. Bake for 7 to 10 minutes, or until edges are very lightly browned. Remove immediately; cool completely on wire racks.

For Glaze, in small saucepan, melt chocolate and butter, stirring occasionally, over low heat until melted, 4 to 6 minutes. Dip half of each heart into chocolate. Refrigerate on waxed paper-lined cookie sheet until chocolate is firm. Store, covered, in refrigerator.

Makes about 3 1/2 dozen cookies

Recycle: peppermint extract bottle

Compost: eggshell

Friday, February 03, 2006

Kung Pao Chicken

I seem to be making a lot of Chinese recipes lately. Not only do I like the flavors, but also the veggies. I'm not a big cooked veggie eater. Another leftover from my mother who couldn't cook. Her idea of making vegetables was to open a can, pour it into a pan and then boil it to death. Imagine my surprise years later to discover that veggies aren't supposed to be mushy and tasteless. I like them best raw now. My second favorite is steamed or stir-fried. This recipe calls for broccoli, not one of my favorites but with a good sauce, even broccoli can be tasty.

Szechuan is spicy and I love spicy. Crushed red pepper . . . yum! I tried substituting grated ginger from my frozen stock, but that didn't work well so I resorted to the dried. And I left out the peanuts. But it was still fantastic! I can't wait for shrimp to go on special at my grocery store. I think this would be even better made with shrimp instead of chicken.

Verdict: Yum! This one's a keeper.


Kung Pao Chicken
(Source: Cooking Light, December 2005)
1 tablespoon canola oil, divided
4 cups broccoli florets
1 tablespoon ground fresh ginger, divided
2 tablespoons water
1/2 teaspoon crushed red pepper
1 pound skinless, boneless chicken breasts, cut into 1/4-inch strips
1/2 cup fat-free, less-sodium chicken broth
2 tablespoons hoisin sauce
2 tablespoons rice wine vinegar
2 tablespoons low-sodium soy suace
1 teaspoon cornstarch
4 garlic cloves, minced
1 tablespoons coarsely chopped salted peanuts
Heat 1 teaspoon oil in a large nonstick skillet over medium-high heat. Add broccoli and 2 teaspoons ginger to pan; saute 1 minute. Add water. Cover; cook 2 minutes or until broccoli is crisp-tender. Remove broccoli from pan; keep warm.
Heat remaining 2 teaspoons oil in pan; add remaining 1 teaspoon ginger, crushed red pepper, and chicken. Cook 4 minutes or until chicken is lightly browned, stirring frequently.
Combine broth and next 5 ingredients (through garlic) in a small bowl, and stir with a whisk. Add broth mixture to pan; cook 1 minute or until mixture thickens, stirring constantly. Return broccoli mixture to pan; toss to coat. Sprinkle with peanuts.
Yield: 4 servings
Recycle: hoisin sauce bottle, rice wine vinegar bottle, soy sauce bottle
Compost: broccoli stem, garlic skins

Monday, January 30, 2006

Cheesecake Sampler

Cream cheese went on special this week so it was time to try out a cheesecake recipe from the free "Little Book of Cheesecakes" that I ordered a new cookbook to get. There are two recipes for New York style cheesecakes in it. One is a cheesecake sampler, i.e. each piece has a different topping, and the other is plain. They are made in different size pans which was the deciding factor for me. The plain one requires a 7" springform pan. My springform pan is a standard 9" one as required by the sampler recipe. So that's the one I made sans the myriad toppings.

This one is definitely an adventure. I don't think I've ever made anything that required 7 eggs and 3 containers of sour cream. Nor have I ever baked anything that had to sit in an unheated oven for 4 hours. It is also probably the heaviest baked good I have ever made. But in the end, it was all worth it. This is by far the best cheesecake recipe I have ever made and comes very close to being the best cheesecake I have ever tasted.

Verdict: Yum! This one's a keeper.

Cheesecake Sampler
(Source: Southern Living Little Book of Cheesecakes)


2 cups graham cracker crumbs
1/2 cup butter or margarine, melted
2 tablespoons sugar
4 (8-ounce) packages cream cheese, softened
1 3/4 cups sugar
7 large eggs
3 (8-ounce) containers sour cream
1 tablespoon vanilla extract


Combine first 3 ingredients; stir well. Press mixture firmly into bottom and up sides of a lightly greased 9-inch springform pan. Chill thoroughly.

Beat cream cheese at high speed with a heavy-duty electric mixer until fluffy. Gradually add 1 3/4 cups sugar, beating well. Add egs, 1 at a time, beating well after each addition. Add sour cream and vanilla; beat at low speed until smooth. Pour into prepared pan. Bake at 300 degrees for 1 hour and 25 minutes. Turn off oven, and leave cheesecake in oven 4 hours. (Do not open oven door.)

Remove cheesecake from oven; cool completely on a wire rack. Cover and chill 8 hours. Gently run a knife around edge of cheesecake to relese sides of pan; carefully remove pan; transfer cheesecake to a serving platter. Cut into 8 wedges; top each slice with desired Cheesecake Toppings.

Recycle: vanilla extract bottle

Compost: eggshells


Friday, January 27, 2006

Stromboli

I started my career working in Manhattan. Having grown up surrounded by orchards and dairy farms, I was drawn to the bright lights of the big city like a moth to a flame. I couldn't get enough of the energy and excitement. I spent my weekends in the City also. One my favorite activities were the street fairs. I adored the different kinds of people, merchandise and especially the food. I had to try everything. I don't know how I managed to stay thin.
My mother couldn't cook. Seriously couldn't cook. She either boiled things to death or charred them to a crisp. I didn't know that food was supposed to taste good until I moved downstate and was introduced to a whole universe of foods I never knew existed. The best thing about street fairs was that I could literally eat for blocks and never taste the same thing twice.
I recently came across a recipe for stromboli that transported me back to those heady days. I was a bit intimidated at first but the urge to recapture some of the tastes of my youth spurred me on. Turns out this recipe is surprisingly easy to make. Ten minutes is exactly the right amount of time to knead the dough into the right consistency. It rose with no problem, rolled out into a rectangle with no problem and after layering the meats and cheeses, rolled up again with no problem. One warning - layer the meats first and then the cheese. I did it the opposite way and the cheeses oozed out of the slits!
The author also offers some advice: "One hint, however, the more veggies you use, the more liquid they'll release, so too many veggies can make a somewhat soggy strombolil. Use as many different fillings as you like, but it's important to not layer them too thickly, as this will make it difficult to roll the stromboli".
Verdict: Yum! This one's a keeper.
Stromboli
(Source: MomsMenu.com )

Dough
1 1/4 cups warm water (105 F - 115 F)
1 tablespoon yeast
1 teaspoon sugar
2 tablespoons olive oil
2 teaspoons salt
3 1/2 to 4 cups flour

Fillings (mix and match as you like)
about 1/2 lb. thinly sliced meats such as ham, slami, turkey, pepperoni, etc.
about 1/4 lb. sliced cheese such as mozzarella, provolone, etc.
1/4 cup grated Parmesan cheese

Other Options
thinly sliced tomatoes
thinly sliced onions
thinly sliced bell peppers or roasted bell peppers
chopped black or green olives
roasted garlic
fresh basil

1 egg, beaten
2 teaspoons sesame seeds or poppy seeds (optional)

Makes about 16 slices

Combine 1/4 cup warm water, yeast and sugar in a large bowl and stir to dissolve. Let stand until foamy, about 5 minutes. Stir in remaining warm water, olive oil and salt. Gradually add 1 1/2 to 2 cups flour, mixing until smooth. Gradually add enough remaining flour until you have a smooth dough that comes away from the bowl. Turn dough out onto a lightly floured surface and knead 10 minutes, working in more flour as needed. Shape into a ball, place in a greased bowl and cover with a clean kitchen towel. Let dough rise until doubled, about 1 hour.

Preheat oven to 375F and grease a large baking sheet (if you have a pizza or bread stone in your oven you can forego the baking sheet and bake the stromboli directly on the stone).

Punch dough down and cut in half. On a lightly floured surface, roll each dough half into a rectangle about 10" x 8". Arrange fillings over dough, finishing with a sprinkling of Parmesan. Roll the dough much like you would if you were making a jelly roll. Pinch the edges of the seam and tuck the ends under.

Cut long diagonal slashes, about 1/2 inch deep, along the top of the loaf every 3 inches or so. Brush top of loaf with beaten egg, avoiding the area in the slashes. Sprinkle with poppy or sesame seeds if desired. Bake for about 30 minutes or until bread is golden brown. Cool slightly before cutting and serving, or if you prefer to eat your stromboli cold, cool completely on a wire rack before wrapping and refrigerating.

Monday, January 23, 2006

Choc-Oat-Chip Cookies

I always check the recipes on the backs of the chocolate chip bags when I buy one (or two or three or however many my coupon is for!). Usually, it's the same old recipes but occasionally they surprise me with a new one. What intrigued me about this recipe is that it calls for milk. Whoever heard of using milk to make oatmeal cookies? I've heard of drinking milk with oatmeal cookies or dunking oatmeal cookies in a glass of milk, but actually using milk to make oatmeal cookies was a first for me.

Unlike the Chocolate-Studded Dream Cookies that I made a few weeks ago, this batter was not incredibly stiff and the cookies baked into nice rounded shapes. The flavor was unlike the usual oatmeal cookies. It was more like oatmeal cookies dipped in milk. Gee, I wonder why??? Kinda bland sums it up. I think I'll stick to just adding chocolate chips to regular oatmeal cookies.

Verdict: Not bad, but I don't think I'll be making these again.

Choc-Oat-Chip Cookies
(source: Back of the chips bag)


1 3/4 cups all-purpose flour
1 tsp. baking soda
1/2 tsp. salt (optional)
1 1/4 cups packed brown sugar
1 cup (2 sticks) buter or margarine, softened
1/2 cup granulated sugar
2 large eggs
2 tbsp. milk
2 tsp. vanilla extract
2 1/2 ups quick or old-fashioned oats
2 cups (12-oz. pkg.) Nestle Toll House Semi-Sweet Chocolate Morsels
1 cup coarsely chopped nuts (optional)

Preheat oven to 375 degrees F.

Combine flour, baking soda and salt in small bowl. Beat brown sugar, butter and granulated sugar in large mixer bowl until creamy. Beat in eggs, milk and vanilla extract. Gradually beat in flour mixture. Stir in oats, morsels and nuts; mix well. Drop by rounded tablespoons onto ungreased baking sheets.

Bake for 9 to 10 minutes for chewy cookies or 12 to 13 minutes for crispy cookies. Cool on baking sheets for 1 minute; remove to wire racks to cool completely.

Makes about 4 dozen cookies

Recycle: vanilla extract bottle

Compost: eggshells

Friday, January 20, 2006

White Wine-Tomato-and-Clam Pasta

I'm still revelling in the fact that I can cook ANYTHING I WANT! Even seafood. And not just tuna fish. I love linguine and clam sauce so a White Wine-Tomato-and-Clam pasta dish sounded delicious. I admit I had some reservations about this recipe. There didn't appear to be enough sugar to offset the acidity of the tomatoes and the lack of tomato sauce or paste made me wonder how "saucy" it was going to be.
As the Aussies say, no worries mate. The tomatoes weren't too acidic and the clams weren't too clammy (if that's a word). I had two major problems with this recipe. The first was that after 20 minutes, the "sauce" hadn't thickened at all. The second was the part where you have to toss the pasta. How does one "toss" pasta? I know how to toss a salad , but the spaghetti very nearly defeated me. Hint: large bowl, large fork.
This recipe is a variation of a Red Wine-Tomato Pasta. To make that, just substitute dry red wine for the dry white wine and omit the clams. I'm definitely going to. This could easily become my new favorite spaghetti sauce. I've been looking for a recipe for a good spaghetti sauce for years.
Verdict: Yum! This one's a keeper.
White Wine-Tomato-and-Clam pasta
(Source: Southern Living 2005 Annual Recipes)

1 1/2 teaspons minced fresh garlic
2 tablespoons olive oil
1/2 cup dry white wine
2 (14 1/2-ounce) cans petite diced tomatoes, undreained
2 tablespoon chopped fresh or 1 teasponn dried basil
1 tablespoon chopped fresh or 1/2 teaspoon dried oregano
1 teaspoon sugar
1/4 teaspoon freshly ground black pepper
1 (6.5-ounce) cans chopped clams, drained
12 ounces uncooked thin spaghetti
1 (4-ounce) block mozzarella cheese, shredded
1/3 cup freshly grated Parmesan cheese
Toppings: chopped fresh basil, freshly grated Parmesan cheese


Saute garlic in hot oil in a large skillet over medium heat 1 minute or until lightly browned. Carefully stir in wine and next 5 ingredients; bring to a boil. Reduce heat to medium-low, and simmer, stirring occasionally, 20 minutes or until thickened.

Cook pasta according to package directions; drain. Stir together hot pasta, mozzarella cheese, and 1/3 cup Parmesan cheese in a large serving bowl, tossing to coat until cheeses start to melt. Stir clams into tomato sauce and pour over pasta mixture. Toss to combine. Serve immediately with desired toppings.

Makes 6 servings.

Recycle: olive oil bottle, wine bottle

Compost: garlic skins

Monday, January 16, 2006

Blueberry Muffins

Blueberries are on special this week. Okay, maybe $2.00 for 4.4 ounces isn't terribly "special", but it is the middle of winter and they came all the way from Chile. They are wonderful berries, not a single rotten one, no stems even. I felt a sudden urge for blueberry muffins.

The recipe I use is from my trusty Betty Crocker cookbook. It's the blueberry variation of the sweet muffin recipe. I prefer that one not just because it is sweet but because it also has a lighter texture than the regular muffin recipe. I strongly advise greasing the bottoms of the muffin cups with Crisco or whatever shortening you normally use or use paper cups. My muffins came out with a weird metallic taste. After giving it some thought, I realized that I had tried a "shortcut" and used a cooking spray. A quick check of the ingredients confirmed my suspicions. It claims to be all-natural. I suppose grain alcohol is natural but I'm not so sure about "propellant". Honest, that's what it says. Just one word. No explanation of what it consists of. Just propellant. I'm definitely going to think twice about using this spray again. I'm not sure I want to be eating propellant.

Verdict: Yum! This one's a keeper.


Blueberry Muffins
( Source: Betty Crocker Cookbook)


1 egg
1/2 cup milk
1/4 cup salad oil
1 1/2 cups all-purpose flour
1/2 cup sugar
2 teaspoons baking powder
1/2 teaspoon salt
1 cup fresh blueberries or 3/4 cup well-drained frozen blueberries (thawed)


Heat oven to 400 degrees. Grease bottoms of 12 medium muffin cups (2 3/4 inches in diameter). Beat egg; stir in milk and oil. Mix in remaining ingredients except blueberries just until flour is moistened. Batter should be lumpy. Fold blueberries into batter.

Fill muffin cups 2/3 full. Bake 20 to 25 minutes or until golden brown. Immediately remove from pan.

12 muffins

Recycle: salad oil bottle

Compost: eggshell

Friday, January 13, 2006

Sloppy Jose Sandwiches with Cilantro Slaw

I have completely lost my mind. I bought a new cookbook. I already have dozens of cookbooks. I have newletters full of recipes arriving in my emailbox daily. I have access to the internet with its myriad recipe sites. And I bought "Southern Living 2005 Annual Recipes" (over 900 recipes!) anyways. What I really wanted was the free "Little Book of Cheesecakes" that came with it (Remember, I am still searching for the perfect cheesecake recipe). The plan was to keep the free cheesecake cookbook and return the 900 recipe cookbook before the end of the thirty day trial period. But, of course, I started looking through it, saw a bunch of recipes I wanted to try and gave up and mailed in my check. It's hopeless. I'm a recipe addict.

I'm always on the lookout for Sloppy Joe recipes that don't involve ketchup. Have you ever read the ingredients list on ketchup? High fructose corn syrup meaing all it is is tomato flavored sugar syrup. I was a little concerned about this recipe because it involved tomato sauce with nothing to cut the acid. And I was right. It was good, but too acidic for my tastes. The cole slaw was also good. The mustard made it nice and spicy. I went to two different grocery stores but couldn't find broccoli slaw mix. That was very disappointing. It sounds delicious.

Verdict: Not bad, but I don't think I'll be making this one again.

Sloppy Jose Sandwiches with Cilantro Slaw
(Source: Southern Living 2005 Annual Recipes)

1 medium onion, finely chopped
1 tablespoon Enova Oil
1 pound lean ground beef
2 (8-ounce) cans no-salt-added tomato sauce
1 tablespoon ground cumin
1 tablespoon dried oregano
1/2 teaspoon pepper
1/4 teaspoon salt
4 Nature's Own Honey Wheat hamburger buns
cilantro Slaw

Cook onion in hot oil in a cast-iron or large skillet over medium heat about 4 minutes or until onion is soft and tender. Stir in ground beef and next 6 ingredients, and cook, stirring occasionally, 15 minutes or until beef crumbles and is no longer pink.

Spoon beef mixture on bottom halves of toasted buns; top each with about 3 tablespoons Cilantro Slaw and remaining bun halves. Serve with remaining Cilantro Slaw.

Makes 4 servings.

Cilantro Slaw:

1/4 cup finely chopped fresh cilantro
1/4 cup Dijon mustard
3 tablespoons Hellmann's or Best Foods Real Mayonnaise
1 tablespoon white wine vinegar
1 (12-ounce) package broccoli slaw mix

Whisk together first 4 ingredients in a large bowl; add broccoli slaw, tossing to coat.

Makes 4 cups.

Recycle: tomato sauce cans, mustard bottles, mayonnaise bottle, vinegar bottle

Compost: onion skins

Monday, January 09, 2006

Chocolate-Studded Dream Cookies

I think I have mentioned before that I am now on the mailing list for Nestle's site,
VeryBestBaking.com . In addition to recipes, they also offer coupons as inducements to try their products. When you print out a coupon, a recipe accompanies it. In this case, it was a recipe for cookies using the Swirled Semi-Sweet and White Cocolate Morsels. It was chocolate. I had to try it!

The batter for theses cookies comes out really, really stiff. I use a KitchenAid to mix my batters and it was laboring. You are supposed to divide the morsels putting half in the batter and the other half sprinkled on top of the cookies before putting them in the oven. These are drop cookies. I couldn't figure out a good way to top them with morsels so I put all of the morsels in the batter. They are supposed to be baked for 11 to 13 minutes but I found that wasn't enough and baked them for 15 minutes. When they came out of the oven, they were by far some of the ugliest cookies I have ever seen! They didn't bake into nice rounded cookies. Instead, they maintained their lumpy shapes.

Despite all the problems, they were delicious. I took them to a committee meeting. It was fun to watch people say they were just going to "try one" and then all through the meeting surreptitiously help themselves to more when they thought no one was looking. The bolder ones continued to help themselves as I made my way out the door at the end of the meeting! There weren't very many cookies left to bring home.

Verdict: Yum! This one's a keeper.


Chocolate-Studded Dream Cookies

2 cups all-purpose flour
3/4 cup Nestle Toll House Baking Cocoa
1 teaspoon baking soda
1/2 teaspoon salt
1 cup (2 sticks) butter or margarine, softened
2/3 cup granulated sugar
2/3 cup packed brown sugar
1 teaspoon vanilla extract
2 large eggs
1 2/3 cups (10-oz pkg.) Nestle Toll House Swirled Real Semi-Sweet & White Chocolate Morsels, divided

Preheat oven to 325F.

Combine flour, cocoa, baking soda and salt in small bowl. Beat butter, granulated sugar, brown sugar and vanilla extract in large mixer bowl until creamy. Add eggs, one at a time, beating well after each addition. Gradually beat in flour mixture. Stir in 1 cup Swirled Morsels. Drop by well-rounded teaspoon onto ungreased baking sheets. Top with remaining Swirled Morsels.

Bake for 11 to 13 minutes or until cookies are puffed and centers are set. Cool on baking sheets for 2 minutes; remove to wire racks to cool completely.

Recycle: vanilla extract bottle

Compost: eggshells

Friday, January 06, 2006

Ham and Swiss Casserole

Despite the ham and swiss quiche fiasco, I continue to be attracted to ham and swiss recipes. I have nothing bad to say about this one, other than that it is incredibly bland. Probably why the cook who submitted it to Allrecipes.com said: "This is one of the only casseroles that my picky husband will eat". Picky eaters notoriously prefer bland food. I, on the other hand, love spicy food. So why do I like ham and swiss so much? After much thought, I realized that when I make a ham and swiss sandwich, I use plenty of SPICY mustard. I love reubens which have corned beef (SPICY) and sauerkraut (SPICY). So this will probably be my last ham and swiss recipe unless I find one with SPICY ingredients!

This was very fast and easy to make. I diced the ham, cheese and onions while the noodles cooked so all I had to do was saute the onion and then mix it all. I'm not sure what the purpose of the milk and eggs is. They don't add anything in the way of taste or texture. This dish would be fine without them.

Verdict: Not bad, but I probably won't be making this one again.

Ham and Swiss Casserole
(Source: Allrecipes.com )


2 cups egg noodles
2 tablespoons vegetable oil
1 cup chopped onions
1 (6 ounce) can mushrooms, drained
1 cup diced cooked ham
1 cup diced Swiss cheese
1 teaspoon salt
1/2 teaspoon ground black pepper
2 eggs
1/4 cup milk
1/4 cup grated Parmesan cheese

Bring a large pot of lightly salted water to a boil. Add egg noodles and cook for 8 to 10 minutes or until al dente; drain.

Preheat oven to 400 degrees F (200 degrees C).

Toss drained noodles with 2 teaspoons of the oil. Heat remaining oil in a skillet and saute onion over medium heat until soft. Combine noodles, onion, mushrooms, ham, Swiss cheese, salt and pepper. Transfer to a greased 3 quart casserole dish. In a bowl mix together egg and milk; pour over noodle mixture. Sprinkle with Parmesan cheese.

Bake in a preheated oven for 30 minutes.

Recycle: vegetable oil bottle

Compost: onion skins, eggshells

Monday, January 02, 2006

Bacardi Rum Cake

Do you believe in ghosts? I do. Strange things happen to me. For instance, last summer when it was way too hot to cook, I suddenly started thinking about a Christmas years and years ago that I spent with my elderly great aunt (one of my grandmother's sisters). I had found a recipe in a magazine for rum cake that I wanted to try. We felt very wicked as we soaked the cake in a glaze that had actual rum, not rum flavoring in it. I hadn't thought about that cake in decades. It was very weird. About a week after that, I was half-heartedly straightening up my basement, more in an effort to escape the heat than for cleanliness when I found a magazine from 1980 and on the back of it was the recipe for rum cake. Are you getting goosebumps? I did.

Aunt E passed away in 1988. I made the cake this holiday season in her memory. The original recipe uses a yellow cake mix. I no longer make cake mix cakes so I substituted a yellow cake recipe that closely approximated it. I added an egg to bring it up to 4 eggs and used milk instead of water and Crisco instead of oil. It is supposed to bake for 1 hour but it was overdone after 50 minutes. The resulting crust made it difficult to soak in the glaze. It was well worth the effort though. Thank you, Aunt E for reminding me of this wonderful cake and that wonderful holiday we spent together.

A word of caution. If you are like me and like to lick the beaters and/or the bowl, be careful. This is made with rum. It is possible to get a buzz from cake batter!

Verdict: Yum! This one's a keeper.

Bacardi Rum Cake
(Source: Woman's Day Great Holiday Baking Ideas, December 1980)


Cake:
1 cup chopped pecans or walnuts
1 18 1/2 oz. pkg. yellow cake mix*
1 3 3/4 oz. pkg. Jell-O Vanilla Instant Pudding and Pie Filling
4 eggs
1/2 cup cold water
1/2 cup Wesson oil
1/2 cup Bacardi dark rum (80 proof)

*If using yellow cake mix with pudding already in the mix: omit instant pudding, use 3 eggs instead of 4, 1/3 cup oil instead of 1/2.

Glaze:
1/4 lb. butter
1/4 cup water
1 cup granulated sugar
1/2 cup Bacardi dark rum (80 proof)

Preheat oven to 325F. Grease and flour 10" tube or 12-cup Bundt pan. Sprinkle nuts over bottom of pan. Mix all cake ingredients together. Pour batter over nuts. Bake 1 hour. Cool. Invert on serving plate. Prick top. Spoon and brush glaze evenly over top and sides. Allow cake to absorb glaze. Repeat till glaze is used up.

Glaze: Melt butter in saucepan. Stir in water and sugar. Boil 5 minutes, stirring constantly. Remove from heat. Stir in rum.

Optional: Decorate with border of sugar frosting or whipped cream.

Recycle: rum bottle

Compost: eggshells

Friday, December 30, 2005

Crockpot Beef Sandwiches

I'm a little behind in my email. June, to be exact. So the recipe newsletter I was reading from one of my all time favorite sites, Old Fashioned Living , was offering crockpot dinners for hot summer evenings that didn't heat up the kitchen. Not having air conditioning myself, I like that idea very much. I decided to give the beef sandwiches a try.

The recipe calls for a 3 to 4 pound beef roast. I bought a cheap pot roast. Probably not one of my better ideas. The meat ended up being very tough. It also calls for seasoned salt, not something I have on hand. I used regular salt. It was still delicious. I'm going to be making this one again, just with a different cut of meat. I think this could be an all-season dish. Add a nice cup of hot soup and it would make a lovely, warm meal for colder weather also.

Verdict: Yum! This one's a keeper.


Crockpot Beef Sandwiches


3-4 pound beef roast
1 tsp. seasoned salt
1 tsp. ground black pepper
1/2 tbsp. dry mustard
1 tbsp. Worcestershire sauce
1/2 tbsp. garlic powder or granules
1 large sweet onion, very thinly sliced and halved
1/4 cup beef broth
French bread or submarine buns

Put first 8 ingredients in crock pot, cover and cook on low for 8-10 hours or high for 4-5. Remove the beef to cut or shred and return to the crock pot. Stir and serve on the bread or buns. Add mayonnaise, lettuce, and tomato if you wish.

Recycle: Worcestershire sauce bottle

Compost: onion skins

Monday, December 26, 2005

Sticky Buns

Christmas mornings at my grandmother's house were a very regimented affair. We children had to wait until the adults got up before we could leave our bedroom. Then we were allowed to "open" our stockings. Next was breakfast and then, finally we could dive into Santa's bounty. Looking back now, I can understand that the adults got up much earlier than usual, allowed us into our stockings to mollify us long enough so that they could have breakfast and much needed coffee before getting down to the business of opening gifts.

Those long ago breakfasts were a real treat for me because it was the only time I got to indulge in sticky buns. There was an excellent bakery near my grandmother's house thanks to which I was able to sample "exotic" baked goods such as apple kuchen and sticky buns, a far cry from the Hostess cupcakes and Twinkies served in my parents' house. Once I began baking myself, I searched and searched for a recipe similar to the sticky buns at my grandmother's house. I finally found one that was even better in First magazine, the same source for the chicken pot pies I posted earlier.

The problem I have found with most recipes for sticky buns is that the "bun" part is just too heavy. The "bun" part of this recipe is buttery and light. The sticky part is just heavenly. Again, the taste and texture is superior to other recipes. I thought I used a 9-inch pan as called for in the recipe, but I must have grabbed one of my 8-inch ones by accident because they overflowed the pan. So please don't be put off by the picture. They taste wonderful. To me, they taste like Christmas.

Verdict: Yum! This one's a keeper.

Sticky Buns
(Source: First magazine, 3/9/92)
12 Tbs. butter
1 pkg. (2 3/4 tsp.) active dry yeast
3/4 cup granulated sugar
3/4 tsp. salt
3 egg yolks
1/2 cup milk
3 to 3 1/2 cups flour
3/4 + 1/3 cup light-brown sugar
2 Tbs. corn syrup 3/4 cup pecan halves
1/2 tsp. cinnamon
Melt 6 Tbs. of the butter and let cool. Dissolve yeast in 1/4 cup lukewarm water. Stir in granulated sugar, salt, yolks, milk, 4 Tbs. of the cooled butter and 2 1/2 cups of the flour.
Turn out onto a lightly floured work surface. Knead until dough is smooth and elastic, about 5 minutes, working in enough of the remaining flour so that the dough is no longer sticky.
Put in a buttered bowl, cover with plastic wrap and let rise until doubled in bulk, about 45 minutes. To test, press dough with your finger tips. If an imprint remains, the dough has doubled.
Butter a 9" baking pan. In a saucepan, combine 6 Tbs. butter, 3/4 cup brown sugar and the corn syrup. Stir over low heat until smooth. Pour into prepared pan and strew 1/2 cup of the pecan halves on top.
Combine the 1/3 cup brown sugar with the cinnamon. Chop remaining 1/4 cup pecans.
Punch dough down. On a lightly floured work surface, shape into an approximately 18' x 9" rectangle. Brush with the remaining 2 Tbs. melted butter. Sprinkle with the brown sugar and cinnamon and the chopped pecans. Roll up dough starting with a long side.
Cut into 9 slices and put in the prepared pan. Cover and let rise until doubled, about 40 minutes.
Heat oven to 375F. Bake until browned and bubbly, 30 to 35 minutes. Let cool in the pan 5 minutes. Invert onto a serving plate and let stand about 30 seconds before removing pan. Cool slightly before serving.
Compost: eggshells

Friday, December 23, 2005

Wild Basmati Pilaf

There are some real advantages to being an empty-nester. After I clean, my house actually stays clean. I don't have to fight for time on the computer. And I can cook whatever I want. Cooking for a picky eater is no fun. Every new recipe has to have the ingredients vetted to make sure none of them are on the list of things the picky eater won't eat which is much longer than the list of things that she will eat. Best of all, once the recipe is made, I don't have to coax anyone to eat it. "Just try a little bit. It has mushrooms in it. You like mushrooms".

Now I can look at a recipe and say "Hmmm . . . brown basmati rice. Never heard of it. Should be fun to try". Or "Vegetable broth! I've never used that. I wonder what's in it?". Even if in the end I don't like it, I can "play" with it and see if I can come up with a version that I do like. As in this case. I didn't read this recipe closely. The rice takes over an hour to cook (!). Secondly, it has way too many reductions. I don't like recipes that have lots of complicated steps. Ideally, I want to be able to walk into the kitchen at 5:00 PM and have dinner on the table in time for the news at 6:00 PM.

After all that effort, I just didn't like the way it tasted. But I think I can fix it! I didn't like the vegetable broth and all that parsley. And reducing onions and garlic in water is way too bland for me. I want to make this again with chicken broth instead of the vegetable broth, use butter to cook the onions and garlic, no reductions please, and leave out the celery and parsley. I loved the combination of the thyme, marjoram, black pepper and salt. It's the only thing that saved this recipe for me.

Verdict: Not bad, but I don't think I'll be making this one again (as written).


Wild Basmati Pilaf

1/4 cup wild rice
1 - 15 oz. can Swanson's vegetable broth
3/4 cup brown basmati rice
1 onion, finely chopped
3 garlic cloves, minced
2 cups thinly sliced mushrooms
2 stalks celery, thinly sliced
1/2 teaspoon thyme
1/2 teaspoon marjoram
1/4 teaspoon black pepper
1/4 teaspoon salt
1/3 cup finely chopped parsley
Rinse wild rice and place it in a saucepan with the vegetable broth and 1/2 cup water. Stir to mix, then cover & simmer for 20 minutes. At the end of this time, add the basmati rice. Cover and continue cooking until both varieties of rice are tender, about 50 minutes. Heat 1/2 cup water in a large pot or skillet. Add onion and garlic & cook until all the water has evaporated and browned bits of onion begin to stick to the pan. Add another 1/4 cup water, scrape the pan, and cook until the onions begin to stick again. Repeat this process of adding water and cooking the onion until they are nicely browned. This will take about 15 minutes. Stir in the mushrooms, celery, & seasonings. Cook, stirring frequently, for 5 minutes, then add the cooked rice and finely chopped parsley. Cook over low heat, turning gently, until the mixture is very hot.
Serves 6.
Recycle: broth can
Compost: garlic skins