Tuesday, December 26, 2006

Toasted Coconut-Chocolate Chunk Pecan Pie

I wanted to do a completely different Christmas menu this year. I've made roast beef, onion soup and cheesecake for years. This year I wanted to spread my wings a little. I bought one of those spiral cut hams and made an intriguing dessert from a recipe card I received in the mail as part of an offer for Christmas with Southern Living 2006. I was disappointed with another Southern Living cookbook that I had ordered so I threw out everything except the two recipe cards that interested me.

I was going to buy a deep dish pie plate, not solely for this recipe, but also to have on hand for other deep dish recipes. For some reason, I couldn't find one. Not just one I liked. At all. Does no one bake any more? I guess not. So I resorted to a foil pan from the grocery store which made it extremely difficult to maneuver this pie in and out of the oven. The foil pan kept bending. I needed three hands, two for the pie and one to open and close the oven door and slide the rack in and out.

I skipped the purchased pie crust and made my own. I have no idea why they shielded the crust at the end of the baking time. I went with my tried and true method of shielding the crust until the last 15 minutes of baking time. I imagine their way results in a burned or overdone crust. If you try their method, please let me know how it turned out. I'm really curious.

I didn't toast the coconut. I'm not sure if that makes a big difference in taste and/or texture. I was surprised that the morsels went in whole rather than pre-melted. My guess is that 1 1/4 hours in the oven are supposed to be sufficient to melt them. It wasn't. They just softened a little. Nor was it long enough to cook the pie all the way through. The center was still runny when I took it out. It looked good and it tasted good, it just didn't cook right.

Verdict: What were they thinking???

Toasted Coconut-Chocolate Chunk Pecan Pie


1 (15-ounce) package refrigerated pie crusts
1/3 cup butter or margarine, melted
1 cup sugar
1 cup light corn syrup
4 large eggs, lightly beaten
1 teaspoon vanilla extract
1/4 teaspoon salt
1 1/2 cups pecan halves
1 cup sweetened flaked coconut, toasted
3/4 cup semi-sweet chocolate chunks or morsels

Unroll 1 piecrust, and place on a lightly floured surface; lightly brush top crust with water. Unroll remaining crust, and place over bottom crust; gently roll into a 10" circle. Fit into a 9" deep-dish pieplate; fold edges under, and crimp.

Stir together butter and next 5 ingredients in as large bowl, stir well. Stir in pecans and remaining ingredients. Pour filling into piecrust.

Bake at 325 degrees F for 1 hour and 15 minutes or until set, shielding crust after 45 minutes with aluminum foil, if necessary. Cool completely on a wire rack. Yield: 8 to 10 servings.

Recycle: corn syrup bottle, vanilla extract bottle

Compost: eggshells
Sunday, December 17, 2006

Homemade Shake-and- Bake Chicken

I was recently invited to participate in a recipe swap. The stipulations were that the recipe I submitted should be easy to make and not have a lot of ingredients. That should be easy. I don't like recipes that have a lot of steps. As I went through my collection, I was amazed to see how many of my favorite recipes involved a lot of ingredients and quite a few steps. Then I came upon the easiest recipe I make: Homemade Shake-and-Bake Chicken.

There are only eight ingredients, counting the chicken and all you have to do is mix the flour and seasonings in a plastic bag, dip the chicken in milk and then shake it in the bag and bake. While the chicken is baking, you make your other dishes. An easy, delicious dinner.

Verdict: Yum!! This one's a keeper!!


Homemade Shake-and-Bake Chicken
1/2 cup flour
1 teaspoon paprika
1/2 teaspoon salt
1/2 teaspoon garlic powder
1/2 teaspoon dried thyme
1/4 teaspoon freshly ground pepper
4 chicken legs and thighs
1/2 cup milk
Preheat oven to 375 degrees F. Combine flour, paprika, salt, garlic powder, thyme, and pepper in a plastic bag.
Dip chicken legs in milk, shake off excess. Add to bag and shake to coat evenly. Place chicken on a greased baking sheet. Bake 40 minutes, until chicken is tender and coating crisp.

Friday, December 15, 2006

Cocktail Meatballs

My department at work had its annual Christmas party tonight. Originally I had planned on making my version of the Bacardi Rum Cake because it tastes better if made a day or two ahead and I had to cover a couple of nightshifts this week and wouldn't have a lot of time to bake. That idea got nixed by the organizers. They said they had enough deserts. Could I please make an entree? Swedish Meatballs were suggested. I loathe Swedish Meatballs, but I was willing to make them. Then I suggested Cocktail Meatballs. This idea appealed to me for a couple of reasons. I actually like cocktail meatballs. They are quick and easy to make. And best of all, I've never made them so I could try out a new recipe! I spent about an hour surfing the internet looking for a recipe that had the fewest ingredients and steps since I would be cooking on a few hours worth of sleep. I found the perfect recipe that was originally published in a women's magazine in the sixties.

My first challenge was mincing the onions. I have difficulty cutting onions into tiny pieces. These meatballs had to be 1" in diameter so I couldn't have huge chunks of onions in them. I threw the onion into the food processor which proceeded to shred them. At least it was in tiny "pieces". My next challenge was making 4 to 5 dozen meatballs. The meatball recipe I use makes 2 dozen meatballs so I used that as a guide and made 4 dozen meatballs. They looked small until I cooked them. Then I realized that they were an awkward size. A little large for just one bite but two small to be eaten in two bites. I have yet to perfect the art of cooking round meatballs. No matter how hard I try, the side that is cooking always gets flat so that I end up with a meatball with several flat sides rather than a nice round sphere.

The sauce was easy and after adding the meatballs, did thicken nicely. Surprisingly, the end result was quite tasty. One of my co-workers has requested the recipe.

Verdict: Yum!! This one's a keeper!!


Cocktail Meatballs
(Source: allrecipes.com)
Meatballs
1 pound ground beef
1/2 cup fine dry breadcrumbs
1/3 cup onion, minced
1/4 cup milk
1 egg, beaten
1 tablespoon fresh parsely, minced
1 teaspoon salt
1/2 teaspoon black pepper
2 tablespoons Worcestershire sauce
1/4 cup Crisco vegetable shortening
Sauce
1 12oz. bottle chili sauce
1 10 oz. jar grape jelly
Combine the first 9 ingredients, mixing well. Shape into 1" meatballs. Cook in an electric skillet in hot shortening over medium heat for 10-15 minutes or until browned. Cool meatballs by draining on paper towels. Discard grease.
Combine chili sauce and grape jelly in a medium saucepan (or same electric skillet); stir well until jelly is melted. Add meatballs and simmer UNCOVERED on low for 30 minutes (to thicken the sauce), stirring occasionally. Serve hot meatballs with toothpicks out of the skillet or a crockpot or chafing dish set on low to keep warm.
Makes about 4 to 5 dozen meatballs, depending on size.
Recycle: Worcestershire sauce bottle, chili sauce bottle, jelly bottle
Compost: onion skins, eggshell

Tuesday, December 12, 2006

Frosty Snowballs

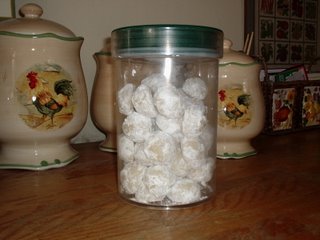
Little pieces of heaven. I should leave it at that. They are that good. Really. Taste them for yourself.

I'm always on the lookout for non-chocolate recipes to bake. This one looked and sounded good. The picture showed little pastel colored balls. Reality was flat-bottomed hemispheres. But they were still absolutely delicious. I decided to forgo the colored sugar in favor of plain powdered sugar because I didn't want too much crunch going on.

The recipe calls for chopped pecans. The ones I bought on the grocery store looked more like chunked pecans. There was no way I was going to be able to make 1 inch balls with them so I ran them through the food processor until the pecans were the texture one normally associates with nut toppings.

For a few moments, I didn't think this dough was going to come together. I added all of the dry ingredients at once instead of a little at a time. It just spun in the mixer. Just as I was about to add more liquid, it jelled and became viable cookie dough. My other concern was that the dough might be too sticky to form easily into little balls. Not to worry, it was not too sticky. Twenty minutes was just perfect to bake them into the most delicious cookies I have ever made.

I took them to my monthly Master Gardener meeting and they were a huge hit. In fact, when the sign-up sheet for dishes to bring to our next big event came my way, everyone agreed I should make these cookies again!

Verdict: Yum! This one's a keeper!

Frosty Snowballs
(Source: BHG.com)


1 cup butter, softened
1/3 cup granulated sugar
1 tablespoon water
1 teaspoon vanilla
2-1/4 cups all-purpose flour
1 cup chopped pecans
1 cup sifted powdered sugar
Green, pink, and purple edible cake sparkles or colored sugar

1. In a large mixing bowl beat butter with an electric mixer on medium to high speed for 30 seconds. Add the granulated sugar; beat until combined, scraping sides of bowl occasionally. Beat in water and vanilla until combined. Beat in as much of the flour as you can with the mixer. Using a wooden spoon, stir in any remaining floru and the copped pecans.

2. Shape dough into 1-inch balls. Place 1 inch apart on an ungreased cookie sheet.

3. Bake in a 325 degree F oven 20 minutes or until bottoms are light brown. Transfer cookies to a wire rack; cool completely.

4. In each of three bowls place 1/3 cup of the sifted powdered sugar. Add a different color of edible cake sparkles or colored sugar to each bowl. Gently roll and shake cooled cookies in desired powdered sugar.

Recycle: vanilla bottle

Sunday, December 10, 2006

ISTEP+ Muffins

This recipe came to me all the way from Indiana via my good friend, A, who frequently appears in my garden blog. She got it from a friend of a friend. The originator of the recipe named it after the state standardized tests in Indiana because she makes these muffins for her children when they take the tests. I think that's a great idea! Breakfast is the most important meal of the day. And a healthy breakfast is much better than sugary cereal. A characterized these muffins as "...very moist, in fact almost too moist. They're not overly pumpkin-y". After making them myself, I agree with the moist, but disagree with the pumpkin-y. Perhaps because A makes them with the applesauce. I don't have applesauce in the house, so I skipped it. I'm not a big fan of the squash family. The cinnamon in this recipe wasn't enough to mask the pumpkin flavor. I would want to add more of the usual pumpkin pie spices to this. Maybe adding the raisins would also help.

The recipe says to "beat" the batter. Muffins are usually stirred with a wooden spoon. I threw caution to the wind and got out my KitchenAid. I don't know if it was that or the recipe itself, but the muffins came out very light, not the usual heavy, dense texture. I definitely want to try this recipe again with a few adjustments.

Verdict: Yum! This one's a keeper.

ISTEP+ Muffins
(Source: Anonymous)


3 cups all-pupose flour
1 tbsp cinnamon
2 tsp baking powder
2 tsp baking soda
1 tsp salt
4 eggs
2 cups sugar
1 1/2 cups oil (OR 3/4 cup oil and 3/4 cup applesauce)
1 3/4 cups pumpkin (1 small can)
2 cups raisins (optional)
brown sugar (optional)

Preheat oven to 375 degrees F. Combine flour, cinnamon, baking powder, baking soda and salt and set aside. Beat eggs slightly. Add sugar, oil and pumpkin and beat thoroughly. Add dry ingredients and mix until smooth. Stir in raisins (optional). Fill greased muffin cups 2/3 full and, optionally, sprinkle tops with brown sugar. Bake for 15-20 minutes for regular mufins; about 10 minutes for mini-muffins.

Makes approx. 3 dozen regular muffins or 7 to 8 dozen mini-muffins.

Recycle: pumpkin can, vegetable oil bottle, applesauce bottle

Compost: eggshells