Friday, September 30, 2005

Chef Bill's Beef-Barley Soup

The weather and the calendar finally agree that it's fall. The cooler weather has put me in the mind for soup. Good thing too, because BHG.com recently featured a recipe for beef barley soup that sounded yummy.

You do have to put aside plenty of time to make this soup. There are a lot of veggies to chop. Don't be afraid of the 12 cloves of garlic. I guarantee you won't taste it because the coriander is overwhelming. You really can't taste anything except the coriander which is too bad. There are a lot of wonderful flavors in this soup: the veggies, the wine, the thyme, the barley and the fresh parsley and basil.

Despite what the recipe says, you shouldn't eat this soup right away. After it cooks for the specified 20 to 25 minutes, it's still too watery. I was making this ahead of time and so put it in the fridge for about 8 hours. When I took it out again, the barley had absorbed nearly all of the liquid making for a thick, hearty soup. Just what I was looking for. Too bad the taste was spoiled by the overpowering coriander.

Verdict: What were they thinking???


Chef Bill's Beef-Barley Soup

(Source: BHG.com )


1 pound beef tenderloin roast, cut into 3/4-inch cubes
1/4 cup olive oil
2 cups chopped carrot
1 cup finely chopped celery
1 cup finely chopped onion
2 tablespoons minced garlic (12 cloves)
6 cups beef stock or beef broth
1/2 cup tomato puree
1/4 cup Cabernet Sauvignon or dry red wine
1 tablepoon snipped fresh thyme or 1 teaspoon dried thyme, crushed
1-1/2 teaspoons ground coriander
1 teaspoon freshly ground black pepper
1/2 teaspoon salt
1 cup quick-cooking barley
1/4 cup snipped fresh flat-leaf parsley
2 tablespoons snipped fresh basil

1. In a 4-quart Dutch oven, brown half of the meat in hot oil over medium-high heat; remove meat from Dutch oven. Add remaining meat, carrot, celery, onion, and garlic to Dutch oven. Cook and stir until meat is brown and onion is tender. Return all meat to Dutch oven.

2. Stir in beef stock, tomato puree, wine, dried thyme, if using, coriander, black pepper, and salt. Bring to boiling; stir in barley. Reduce heat. Cook, covered, for 20 to 25 minutes or until meat and vegetables are tender. Stir in parsley, basil, and fresh thyme, if using. Makes 8 servings (10 cups).

Recycle: wine and olive oil bottles, tomato puree can

Compost: carrot peels, celery leaves, onion and garlic skins, parsley stems
Friday, September 23, 2005

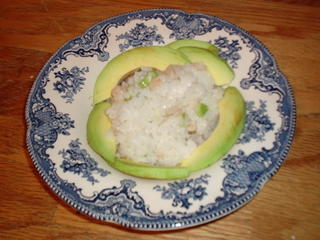
East Meets West Sushi Salad

The second hottest summer on record has been followed by the warmest September on record. We haven't had a single day below 80F. Not too warm to cook, but I'm definitely in the mood for something light. The sushi salad recipe on the back of the Nishiki Rice package sounded like it would fill the bill nicely.

I had a problem with this recipe before I even got into the kitchen. It calls for a medium avocado. All the avocadoes at my local grocery store were the same size. I've never cooked with an avocado before so I have no idea what a "medium" avocado looks like. My next problem is obvious in the picture. 1/2 pound of shrimp is not nearly enough. Fortunately my last problem turned out not to be a problem at all. When I added the vinegar, the smell was overpowering. I was sure it was too much. It's not. It's just perfect.

This recipe is lacking something. I can't put my finger on it. It does suggest you serve it with toasted sesame seeds and wasabi powder, neither of which I had on hand. Both of those ingredients would add more flavor, but more texture is needed also.

Verdict: Not bad, but I probably won't be making this one again

East Meets West Sushi Salad
(Source: the back of the Nishiki Rice package)

3 cups cooked, cooled Nishiki Rice*

3/4 cup thinly sliced celery

1/2 pound small, shelled, cooked shrimp

1/4 cup chopped green onions & tops

1/4 cup Marukan Seasoned Gourmet Rice Vinegar

5 large butter head or other leaf lettuce leaves

1 medium avocado

Combine rice, celery, shrimp, green onions & tops and vinegar. Regrigerate until ready to serve. To serve, arrange a lettuce leaf on each of 5 individual serving plates. Top with about 3/4 cup rice mixture. Remove peel and seed from avocado. Thinly slice avocado and divide among the 5 plates. Sprinkle lightly with toasted sesame seeds and serve with Hime Japanese Horseradish Powder (Wasabi), prepared, if desired. Makes 4 to 5 servings.

*Combine 1-1/4 cups Nishiki Rice and 1-3/4 cups water in medium saucepan. Bring to a soft boil. Reduce heat to low. Cover and simmer 20 minutes, or until liquid is absorbed. Remove from heat. Let stand covered, 10 minutes. Makes about 3 cups cooked rice.

Recycle: vinegar bottle

Compost: celery leaves and avocado peel

Monday, September 19, 2005

Deluxe Devil's Food Cake

I had most of a quart of buttermilk left over after making the Blackberry Jam cake. I hate wasting anything so I went in search of a recipe that used buttermilk. The answer was already in my baking cupboard on the back of the Softasilk Cake Flour box. Deluxe Devil's Food Cake. I had made this recipe once already. The cake part was delicious but while the almond extract was perfect with the chocolate, it was completely overwhelming in the buttercream frosting. I wanted to try it again minus the almond extract in the frosting.

Mindful of the fiasco with the icing for the Blackberry Jam cake, when 4 tablespoons of milk wasn't enough, I only added one more. That still made it a little runny. Hence, the cake is not a thing of beauty as you can see in the picture. I should have increased the amount of vanilla. All I could taste was the sugar, no butter, no vanilla.

I know that most people look down on Betty Crocker recipes but you have to give them credit. Those recipes always work. You really have to try to mess them up. I've been making her buttercream frostings literally since I was a child and, other than learning early on not to frost cakes in very hot weather, I have never had the problems with Betty Crocker frostings that I have experienced with other frostings. I keep trying other recipes but always go back to Betty Crocker both for taste and because they are foolproof.

Verdict: split decision. Cake: Yum! This one's a keeper. Frosting: Not bad, but I don't think I'll be making this one again.

Deluxe Devil's Food Cake

(Source: the back of the Softasilk Cake Flour box)


2 cups sugar
1 cup (2 sticks) butter or margaine, softened
1 teaspoon vanilla
3/4 teaspoon almond extract
2 eggs
2 1/2 cups Softasilk Cake Flour
1 cup baking cocoa
2 teaspoons baking soda
1/2 teaspoon salt
2 1/4 cups buttermilk
Buttercream Frosting (below)
Chocolate curls, if desired
White chocolate curls, if desired

Heat oven to 350F. Grease and flour three 9-inch round cake pans.

Beat sugar, butter, vanilla and almond extract in large bowl with electric mixer on medium speed until light and fluffy. Beat in eggs, one at a time. Mix cake flour, cocoa, baking soda and salt; beat into sugar micture alternately with buttermilk on medium speed. Beat 1 minute longer. Pour into pans.

Bake 30 to 35 minutes or until toothpick inseted in center comes out clean. Cool 10 minutes; remove from pans to wire rack. Cool completely. Fill layers and frost cake with Buttercream Frosting. Garnish with chocolate curls.

Buttercream Frosting
6 cups powdered sugar
1 cup (2 sticks) butter or margarine, softened
4 to 6 tablespoons milk
1 1/2 teaspoons vanilla
3/4 teaspoon almond extract

Beat all ingredients on medium speed until light and fluffy.

Here's how to assemble a three-layer cake:

1. Brush any loose crumbs from cooled layers. Place first layer, rounded side down, on plate. Spread with filling or frosting to within 1/4 inch of edge.
2. Top with second layer, rounded side down. Spread with filling or frosting.
3. Top with third layer, rounded side up. Coat side of cake with very thin layer of frosting to seal in crumbs. Frost side and top of cake.

Recycle: vanilla and almond extract bottles, cardboard cake flour box

Compost: eggshells

Friday, September 16, 2005

Rustic Garlic Chicken

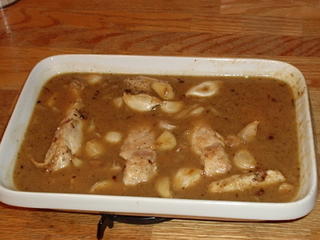
I love garlic. I love spicy food in general, but anything with lots of garlic in it has my vote. So you can imagine my delight when I happened upon a recipe that called for three heads of garlic. Here's the description: "Yes, three heads of garlic. You don't have to peel the cloves first. They soften during cooking and take on a subtle sweetness. Each person squeezes the garlic out of its skin onto the plate to eat with the chicken". Sounds like heaven to me!

This is supposed to be made in a Dutch oven. I don't own a Dutch oven. Truthfully, I have no idea what a Dutch oven is. I used my favorite sauce pan for the stovetop cooking and transferred the chicken and garlic to my favorite baking dish for the oven cooking. The recipe calls for moving the chicken in and out of the Dutch oven so you would end up using two pots anyways.

The only significant change I made was to use boneless, skinless chicken breasts instead of the whole chicken cut into 8 pieces it called for. Chicken breasts were on special today. This recipe was very easy to make. Every step happened exactly as described, but I was disappointed with the taste. I like my garlic to bite back. This was too mellow for me. If you prefer your garlic to be mild, I would definitely recommend this recipe.

Verdict: not bad, but I probably won't be making this again.

Rustic Garlic Chicken


2 tablespoons cooking oil
1 chicken (about 3 to 3 1/2 pounds), cut into 8 pieces
1 teaspoon salt
1/4 teaspoon fresh-ground black pepper
3 heads garlic, cloves separated
2 tablespoons flour
1 cup dry white wine
1 cup canned low-sodium chickn broth or homemade stock
2 tablespoons butter
2 tablespoons chopped fresh parsley

1. Heat the oven to 400F. In a Dutch oven, heat the oil over moderately high heat. Sprinkle the chicken with 1/2 teaspoon of the salt and the pepper. Cook the chicken until well browned, turning, about 8 minutes in all, and remove from the pot. Reduce the heat to moderate, add the garlic, and saute until it is starting to brown, about 3 minutes. Sprinkle the flour over the garlic and stir until combined. Return the chicken to the pot, cover, and bake for 15 minutes.

2. Remove the pot from the oven and put it on a burner. Remove the chicken pieces from the pot. Over moderately high heat, whisk in the wine and simmer for 1 minute. Whisk in the broth and the remaining 1/2 teaspoon salt and simmer until starting to thicken, about 3 minutes. Turn the heat off, whisk in the butter, and pour the sauce over the chicken. Sprinkle with the parsley.

Recycle: wine bottle

Compost: garlic core and excess skin

Monday, September 12, 2005

Blackberry Jam Cake

It's not enough that I have literally dozens of cookbooks or that I have access to untold numbers of recipe sites on the internet, I also subscribe to several email newletters featuring recipes. All summer as the various berries came into season, delicious-sounding recipes landed in my mailbox. We were also experiencing the second hottest summer on record and I don't have air conditioning so there was no way I was going to turn on my stove and try out any of the recipes. I could only gaze longingly at the gorgeous berries when I did my weekly grocery shopping.

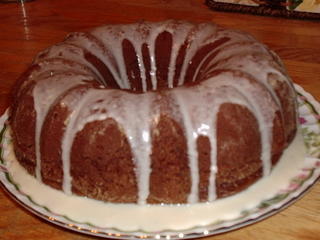
One recipe did catch my eye and get saved in my "Recipes to Try" folder, Blackberry Jam Cake. I can buy blackberry jam year-round. Which I did this week and baked the cake. Thanks to the cocoa and spices, the batter was initially a pleasant tan color. Then I added the jam and it turned lavender. Uh, oh. When you bake anything lavender, it becomes gray. I popped it into the oven with much trepidation.

The fragrance while it was baking was absolutely wonderful. Then it came out of the oven a lovely brown, not gray. I was also glad to see that it cooked all the way through. After last week's quiche fiasco, I was concerned that maybe my oven was too hot. The only problem I had with this recipe was the icing. It calls for 1 to 2 tablespoons of milk. One tablespoon was too little and two tablespoons was too much. It became runny as you can see in the picture. Nevertheless, both the icing and the cake are delicious.

Verdict: Yum! This one's a keeper.

Blackberry Jam Cake
(Source: MomsMenu.com )


1/4 cup butter or margarine

1 cup white sugar

2 egg yolks

1 teaspoon baking soda

1 cup buttermilk

2 cups all-purpose flour

1 teaspoon baking powder

1/2 teaspoon salt

1 teaspoon cocoa

1 teaspoon ground cinnamon

1/2 teaspoon allspice

1 cup blackberry jam

1 cup sifted confectioners sugar

1 to 2 tablespoons milk

1 tablespoon butter or margarine, softened

1/2 teaspoon vanilla extract

Combine flour, baking powder, salt, cocoa, cinnamon, and allspice. Dissolve soda in buttermilk, stirring well. Cream butter or margarine and sugar, beating well. Add egg yolks, beating mixture well. Mix flour mixture into the creamed mixture alternately with the buttermilk mixture, beginning and ending with flour mixture. Fold in blackberry jam. Pour batter into a greased and floured 10 inch Bundt pan. Bake at 350 degrees for 45 to 50 minutes, or until cake tests done. Cool in pan for 15 minutes. Remove from pan, and cool completely. Combine confectioners sugar, milk, butter or margarine, and vanilla. Beat until mixture is smooth. Spoon over cooled cake.

Recycle: jam and vanilla extract bottles

Compost: eggshells

Friday, September 09, 2005

Ham and Swiss Quiche

Remember when quiche was popular? I ate a lot of really bad quiche served by well-meaning home cooks following the latest trend. I never ate it in restaurants or made it at home because I don't like being trendy. Fortunately, quiche has gone the way of fondue and jello molds and it is safe for me to eat out again. I came across this recipe one day and decided to try making quiche, just for giggles. I'm a sucker for ham and swiss and thyme is one of my favorite seasonings.

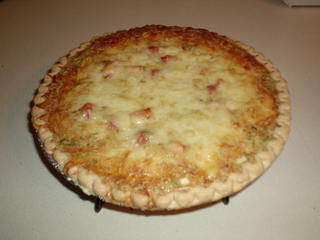
Everything was going well until I poured it into the pie crust and it overflowed. I thought maybe I had put in too much ham. I didn't measure it, I just threw in as much as I had on hand. I put a pan under it in the oven to catch the overflow as it cooked. I didn't test for "doneness" as recommended because after 50 minutes, it looked done (see photo). If I cooked it any longer, it was going to burn. It was cooked on the outside, but when I cut into it, it was an ooey-gooey mess inside. Too much liquid. It didn't solidify correctly.

What else was wrong with it? I used a ready-made crust because I don't have a deep pie dish. I don't recommend this for anything other than desserts because the crust was sweet. The green onions were probably used for color. They tasted terrible. I would use regular onions. There was too much thyme and too much salt. I don't use a lot of salt so the salt in the cheese and the ham would probably have been enough for me.

Recipes like this leave me scratching my head and wondering if anyone actually tested them before publishing.

Verdict: What were they thinking???


Ham and Swiss Quiche
(Source: AllRecipes.com )


1 (9 inch) unbaked (4-cup volume) deep-dish pie shell
1 (12 fluid ounce) can Nestle Carnation Evaporated Milk
3 large eggs
1/4 cup all-purpose flour
1 cup shredded Swiss cheese
1/2 cup cubed cooked ham
1/4 cup sliced green onions
1/2 teaspoon dried thyme
1/4 teaspoon salt
1/8 teaspoon ground black pepper

PREHEAT oven to 350 F
WHISK together evaporated milk, eggs and flour in large bowl. Stir in 1/2 cup cheese, ham, green onions, thyme, salt and pepper. Pour mixture into pie shell; sprinkle with remaining cheese.
BAKE for 45 to 50 minutes or until knife inserted near center comes out clean. Cool on wire rack for 5 to 7 minutes before serving.
VARIATION. For a lattice top quiche, use ready-made pie pastry for single crust pie. Cut pastry into 1/2-inch-wide strips. Lay pastry strips over filling in lattice-fashion, turning pastry over outside edge of dish. Bake as directed above.

Recycle: evaporated milk can

Compost: eggshells and tops of green onions

Monday, September 05, 2005

Swirled Turtle Brownies

I noticed a new product the other day in the baking aisle of my local grocery store. Nestle Swirled Milk Chocolate & Caramel Morsels. I automatically checked the package for recipes. There was the standard Tollhouse cookie recipe using these morsels instead of the usual semi-sweet chocolate morsels and a recipe for Swirled Turtle Brownies. It called for caramel sauce. I love caramel almost as much as I love chocolate so I grabbed a bag of Swirled Milk Chocolate & Caramel morsels and a jar of caramel sauce and headed home to bake.
At first, I thought this was going to be one of those recipes that doesn't work. The batter was so stiff, it was virtually impossible to spread it in the pan. I resorted to using a knife dipped in water. With a lot of effort, I managed to spread the batter more or less evenly in the pan. When it came out of the oven, the brownie portion appeared to have cooked perfectly.
Then I tried to "drizzle" the caramel sauce artistically. It all ran together forming a caramel glaze. The recipe on the package said to drizzle before cutting. When I checked the website (Nestle VeryBestBaking.com), it said you could drizzle the caramel sauce either before or after cutting. I was pleased to see that their picture looked no more appetizing than mine.
The taste, however, is wonderful despite the brownie portion being a bit dry for my tastes. I think the next time I make this, I will use my very own "OldRoses Melt In Your Mouth Brownies" recipe.
Verdict: Yum! This one's a keeper.
Swirled Turtle Brownies
(Source: the back of the morsels package)

1 1/3 cups all-purpose flour

3/4 cup Nestle Toll House Baking Cocoa

1/2 tsp baking soda

1/4 tsp salt

3/4 cup ( 1 1/2 sticks) butter, softened

1 1/2 cups packed brown sugar

2 tsp vanilla extract

2 large eggs

1 2/3 cups (10-oz pkg) Nestle Toll House Swirled Milk Chocolate & Caramel Morsels, divided

1 cup chopped pecans, divided

1/3 cup caramel sauce

Preheat oven to 325F. Grease 13 x 9-inch baking pan.

Combine flour, cocoa, baking soda and salt in small bowl. Beat butter, sugar and vanilla extract in large mixer bowl until creamy. Add eggs, one at a time, beating well after each addition. Gradually beat in flour mixture. Stir in 3/4 cup Swirled Morsels and 1/2 cup nuts. Spread into prepared baking pan. Sprinkle remaining Swirled Morsels and remaining nuts over top.

Bake for 25 to 30 minutes or until toothpick inserted 2 inches from outer edge comes out clean. Cool completely in pan on wire rack. Drizzle with caramel sauce before cutting into squares.

Makes 20 brownies

Recycle: vanilla extract bottle

Compost: eggshells

Friday, September 02, 2005

Mushroom and Chicken Teriyaki

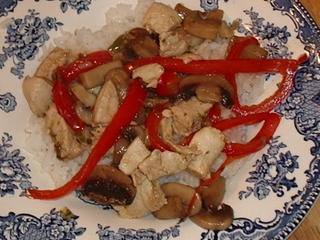
The thermometer has dipped below 90 degrees and the kitchen is now open. I can finally try the recipes I have been collecting all summer in my "Recipes To Try" folder. Whenever I find a good recipe on the internet or in a newsletter, I save it in that folder on my computer. I found this recipe one day when I was searching the internet for recipes using teriyaki sauce. I was attracted to this particular one because it calls for two types of mushrooms. Unfortunately, my local grocery store didn't have shiitake mushrooms today, so I was only able to use one kind. Rather than the thin strips as directed in the recipe, I cut the chicken up into bite-sized pieces to make it easier to eat and served it on rice rather than the Chinese cabbage or bok choy. Two things stand out: it takes longer than 5 minutes for the mushroom liquid to evaporate and I found the sauce too sweet probably from all the ginger.

Verdict: Not bad, but I probably won't be making this one again.

Mushroom and Chicken Teriyaki
1/4 cup teriyaki sauce
1 teaspoon cornstarch
1 teaspoon ground ginger
2 teaspoons vegetable oil
12 ounces of fresh white mushrooms sliced (about 4 1/2 cups)
4 ounces of fresh shiitake mushrooms, stems removed and sliced (about 1 1/2 cups)
1 large sweet red bell pepper, thinly sliced (about 1 cup)
4 green onions (scallions), sliced (about 1/3 cup)
2 teaspoons sliced garlic
1 1/2 cups cooked chicken, cut in thin strips (about 6 ounces)
4 Chinese cabbage or bok choy leaves
In a small bowl, combine teriyaki sauce, cornstarch, ginger and 1/2 cup water; set aside. In a large skillet, over medium-high heat, heat oil. Add mushrooms; cook and stir until they release their liquid, about 3 minutes. Add bell pepper, green onions and garlic; cook and stir until mushroom liquid evaporates and garlic begins to brown, about 5 minutes. Add chicken. Stir teriyaki mixture and add to the skillet mixture; cook and stir until slightly thickened, about 3 minutes. Arrange cabbage leaves on four plates; spoon mushroom-chicken mixture on top, dividing evenly.
Yield: 4 servings
Recycle: Glass teriyaki jar
Compost: tops of green onions, garlic skins, membranes and seeds from bell pepper

Thursday, September 01, 2005

My Own Collection of Recipes

These are links to recipes that have been reviewed on this blog that I cook regularly, sometimes for decades. If you don't see what you are looking for, email me . If I have a recipe for the dish you are seeking, I will post it. If I don't have a recipe, I'll look for one to trial. Recipes that are designated "OldRoses" recipes are either my own invention or have been altered significantly and become my own.

Blueberry Muffins

Golden Crescents

Sticky Buns

Cream of Mushroom Soup

French Onion Soup

Potato Soup

Marinated Artichoke Hearts

Blue Cheese Dressing

Blackened Chicken

Chicken Marsala with Mushrooms

Chicken Pot Pies

Chicken Fried Rice

Rosemary Chicken and Vegetables

Homemade Shake-and-Bake Chicken

Chicken Stir Fry

Meatballs

Fettuccine Alfredo

Macaroni and Cheese

Meat Filled Jumbo Shells

Brownies

Ultimate Chocolate Brownies

Bonnie Butter Cake with French Silk Frosting

Dinette Cake

Special Dark Picnic Cake

Bacardi Rum Cake

Chocolate Butter Frosting

Apple Pie

Blueberry Pie

Pumpkin Pie

Oatmeal Scotchies

Valentine Cookies