Friday, December 30, 2005

Crockpot Beef Sandwiches

I'm a little behind in my email. June, to be exact. So the recipe newsletter I was reading from one of my all time favorite sites, Old Fashioned Living , was offering crockpot dinners for hot summer evenings that didn't heat up the kitchen. Not having air conditioning myself, I like that idea very much. I decided to give the beef sandwiches a try.

The recipe calls for a 3 to 4 pound beef roast. I bought a cheap pot roast. Probably not one of my better ideas. The meat ended up being very tough. It also calls for seasoned salt, not something I have on hand. I used regular salt. It was still delicious. I'm going to be making this one again, just with a different cut of meat. I think this could be an all-season dish. Add a nice cup of hot soup and it would make a lovely, warm meal for colder weather also.

Verdict: Yum! This one's a keeper.


Crockpot Beef Sandwiches


3-4 pound beef roast
1 tsp. seasoned salt
1 tsp. ground black pepper
1/2 tbsp. dry mustard
1 tbsp. Worcestershire sauce
1/2 tbsp. garlic powder or granules
1 large sweet onion, very thinly sliced and halved
1/4 cup beef broth
French bread or submarine buns

Put first 8 ingredients in crock pot, cover and cook on low for 8-10 hours or high for 4-5. Remove the beef to cut or shred and return to the crock pot. Stir and serve on the bread or buns. Add mayonnaise, lettuce, and tomato if you wish.

Recycle: Worcestershire sauce bottle

Compost: onion skins

Monday, December 26, 2005

Sticky Buns

Christmas mornings at my grandmother's house were a very regimented affair. We children had to wait until the adults got up before we could leave our bedroom. Then we were allowed to "open" our stockings. Next was breakfast and then, finally we could dive into Santa's bounty. Looking back now, I can understand that the adults got up much earlier than usual, allowed us into our stockings to mollify us long enough so that they could have breakfast and much needed coffee before getting down to the business of opening gifts.

Those long ago breakfasts were a real treat for me because it was the only time I got to indulge in sticky buns. There was an excellent bakery near my grandmother's house thanks to which I was able to sample "exotic" baked goods such as apple kuchen and sticky buns, a far cry from the Hostess cupcakes and Twinkies served in my parents' house. Once I began baking myself, I searched and searched for a recipe similar to the sticky buns at my grandmother's house. I finally found one that was even better in First magazine, the same source for the chicken pot pies I posted earlier.

The problem I have found with most recipes for sticky buns is that the "bun" part is just too heavy. The "bun" part of this recipe is buttery and light. The sticky part is just heavenly. Again, the taste and texture is superior to other recipes. I thought I used a 9-inch pan as called for in the recipe, but I must have grabbed one of my 8-inch ones by accident because they overflowed the pan. So please don't be put off by the picture. They taste wonderful. To me, they taste like Christmas.

Verdict: Yum! This one's a keeper.

Sticky Buns
(Source: First magazine, 3/9/92)
12 Tbs. butter
1 pkg. (2 3/4 tsp.) active dry yeast
3/4 cup granulated sugar
3/4 tsp. salt
3 egg yolks
1/2 cup milk
3 to 3 1/2 cups flour
3/4 + 1/3 cup light-brown sugar
2 Tbs. corn syrup 3/4 cup pecan halves
1/2 tsp. cinnamon
Melt 6 Tbs. of the butter and let cool. Dissolve yeast in 1/4 cup lukewarm water. Stir in granulated sugar, salt, yolks, milk, 4 Tbs. of the cooled butter and 2 1/2 cups of the flour.
Turn out onto a lightly floured work surface. Knead until dough is smooth and elastic, about 5 minutes, working in enough of the remaining flour so that the dough is no longer sticky.
Put in a buttered bowl, cover with plastic wrap and let rise until doubled in bulk, about 45 minutes. To test, press dough with your finger tips. If an imprint remains, the dough has doubled.
Butter a 9" baking pan. In a saucepan, combine 6 Tbs. butter, 3/4 cup brown sugar and the corn syrup. Stir over low heat until smooth. Pour into prepared pan and strew 1/2 cup of the pecan halves on top.
Combine the 1/3 cup brown sugar with the cinnamon. Chop remaining 1/4 cup pecans.
Punch dough down. On a lightly floured work surface, shape into an approximately 18' x 9" rectangle. Brush with the remaining 2 Tbs. melted butter. Sprinkle with the brown sugar and cinnamon and the chopped pecans. Roll up dough starting with a long side.
Cut into 9 slices and put in the prepared pan. Cover and let rise until doubled, about 40 minutes.
Heat oven to 375F. Bake until browned and bubbly, 30 to 35 minutes. Let cool in the pan 5 minutes. Invert onto a serving plate and let stand about 30 seconds before removing pan. Cool slightly before serving.
Compost: eggshells

Friday, December 23, 2005

Wild Basmati Pilaf

There are some real advantages to being an empty-nester. After I clean, my house actually stays clean. I don't have to fight for time on the computer. And I can cook whatever I want. Cooking for a picky eater is no fun. Every new recipe has to have the ingredients vetted to make sure none of them are on the list of things the picky eater won't eat which is much longer than the list of things that she will eat. Best of all, once the recipe is made, I don't have to coax anyone to eat it. "Just try a little bit. It has mushrooms in it. You like mushrooms".

Now I can look at a recipe and say "Hmmm . . . brown basmati rice. Never heard of it. Should be fun to try". Or "Vegetable broth! I've never used that. I wonder what's in it?". Even if in the end I don't like it, I can "play" with it and see if I can come up with a version that I do like. As in this case. I didn't read this recipe closely. The rice takes over an hour to cook (!). Secondly, it has way too many reductions. I don't like recipes that have lots of complicated steps. Ideally, I want to be able to walk into the kitchen at 5:00 PM and have dinner on the table in time for the news at 6:00 PM.

After all that effort, I just didn't like the way it tasted. But I think I can fix it! I didn't like the vegetable broth and all that parsley. And reducing onions and garlic in water is way too bland for me. I want to make this again with chicken broth instead of the vegetable broth, use butter to cook the onions and garlic, no reductions please, and leave out the celery and parsley. I loved the combination of the thyme, marjoram, black pepper and salt. It's the only thing that saved this recipe for me.

Verdict: Not bad, but I don't think I'll be making this one again (as written).


Wild Basmati Pilaf

1/4 cup wild rice
1 - 15 oz. can Swanson's vegetable broth
3/4 cup brown basmati rice
1 onion, finely chopped
3 garlic cloves, minced
2 cups thinly sliced mushrooms
2 stalks celery, thinly sliced
1/2 teaspoon thyme
1/2 teaspoon marjoram
1/4 teaspoon black pepper
1/4 teaspoon salt
1/3 cup finely chopped parsley
Rinse wild rice and place it in a saucepan with the vegetable broth and 1/2 cup water. Stir to mix, then cover & simmer for 20 minutes. At the end of this time, add the basmati rice. Cover and continue cooking until both varieties of rice are tender, about 50 minutes. Heat 1/2 cup water in a large pot or skillet. Add onion and garlic & cook until all the water has evaporated and browned bits of onion begin to stick to the pan. Add another 1/4 cup water, scrape the pan, and cook until the onions begin to stick again. Repeat this process of adding water and cooking the onion until they are nicely browned. This will take about 15 minutes. Stir in the mushrooms, celery, & seasonings. Cook, stirring frequently, for 5 minutes, then add the cooked rice and finely chopped parsley. Cook over low heat, turning gently, until the mixture is very hot.
Serves 6.
Recycle: broth can
Compost: garlic skins

Monday, December 19, 2005

Gingersnaps

I have loved spicy food since I was a child. A very small child. As a toddler, I'm told my favorite foods were salami sandwiches and gingersnaps. There is also an anecdote, perhaps apocryphal, that at one point I ate so many gingersnaps that I developed an allergy to them and broke out in hives. Apocryphal or not, I still love gingersnaps and have spent years looking for a good recipe for them.

Everyone has a website these days. Even the spice makers, McCormick, have a website. And on that website they have recipes. One of them, not surprisingly, is for gingersnaps. I decided to give it a try but I didn't think anything this simple could be any good. Wrong! They are simple to make and delicious. And very, very spicy.

For the record, I still love salami.

Verdict: Yum! This one's a keeper.

Gingersnaps


3/4 cup shortening
1 cup sugar
1/4 cup molasses
1 egg
2 cups all-purpose flour
2 teaspoons baking soda
1/2 teaspoon salt
1 tablespoon McCormick Ground Ginger
1 teaspoon McCormick Ground Cinnamon
Sugar for rolling

Preheat oven to 350F. Place shortening and sugar in large mixer bowl and cream until light and fluffy. Add molasses and egg and beat well.

Combine flour, baking soda, salt, and spices. Gradually add to shortening mixture and mix well.

Shape dough into 1-inch balls and roll in sugar. Place 2 inches apart on ungreased cookie sheets. Bake 12 minutes.

Remove from cookie sheets and place cookies on wire racks to cool.

Recycle: molasses bottle

Compost: eggshell

Friday, December 16, 2005

Quick Chicken Moo Shu

I think this recipe should take some kind of prize for longest gestation. I cut it out of the newspaper last spring. I had planned on setting it aside until fall when I would get to the Asian food market for hoisin sauce. Over the summer, I found hoisin sauce in my local grocery store. I bought it and put it aside because it was too hot to cook. When I was at the Asian food market in November buying tofu for the turkey stir fry I spotted frozen moo shu pancakes. I bought them and stuck them in the freezer. Here it is December and I'm finally getting around to making it! I'm happy to report that it was worth the wait.

This recipe calls for fresh ginger. Instead of substituting ground ginger as I normally would, I have decided to try out an idea I have heard from other cooks. If you don't use a lot of fresh ginger, I'm told that you can freeze it and just break off a piece when you need it. I'll let you know how that works out. It also calls for shredded cabbage. I didn't have time or energy to shred cabbage, so I cheated and bought a cole slaw mix. You only need one cup, but in the future, I will definitely be doubling that. This recipe is excellent but could use more "crunch". I will also be substituting flour tortillas for the moo shu pancakes. I don't know if it is the particular ones I bought or if frozen ones are not a good idea, but they just didn't work out for me. They didn't taste good and they were too stiff to wrap around the chicken.

Verdict: Yum! This one's a keeper.

Quick Chicken Moo Shu
(Source: The Star Ledger )

2 tablespoons vegetable or peanut oil
1 tablespoon fresh ginger, minced
1 teaspoon garlic, minced
1 bunch scallions, trimmed and cut into 1/2-inch lengths
1 cup cabbage, shredded
4 cups cooked chicken, shredded
1 tablespoon sesame oil
1 cup hoisin sauce
8 to 12 small, soft flour tortillas

In a wok or large saute pan over high heat, heat oil until hot and stir-fry ginger, garlic, scallions and cabbage, about 90 seconds. Add chicken and stir-fry until hot.

Remove from heat and drizzle sesame oil and hoisin sauce over stir-fry mixture. Toss to coat with glaze of oil and hoisin.

Serve immediately with warm, soft tortillas or steamed Mandarin pancakes, additional hoisin suce and chopped scallions, if desired.

Recycle: oil bottles, hoisin sauce bottle

Compost: ginger and garlic skins, unused parts of scallions and cabbage

Monday, December 12, 2005

Ultimate Chocolate Brownies

There were a few raised eyebrows in my office when I baked brownies for our Hamburg office. I had to remind my co-workers that I bake for the office Christmas party so they shouldn't feel slighted. In an effort to mollify them, I promised to make better brownies for them than I did for Hamburg.

I work in an IT department. My fellow employees come from many different countries and backgrounds. For the Christmas party each year, everyone is encouraged to bring a dish that is traditional in their country/culture/family and an ornament for the departmental Christmas tree. And their families too! The kids have a blast decorating the tree while the parents enjoy the incredible buffet. The Scottish Shortbread that I baked last year was a a big hit and I had been racking my brains trying to figure out how to equal or surpass it this year. Ultimate Chocolate Brownies were the perfect answer.

I only make these brownies when I have to bring a dish to an event. I don't particularly like them. I think it's the cocoa I find objectionable. And I don't care for the combination with the chocolate chips. About the only thing I like about this recipe is the frosting! Everyone else seems to like them, so I keep making them.

Here are two things you might want to do when you make these brownies. I've never actually tried this, but I've read in several places that if you want your brownies to come out of the pan looking as perfect as in photos, line the pan with aluminum foil. After they are baked, you lift the brownies out in the aluminum foil rather than trying to pry them out with a knife. The second idea is one I do use. The recipe calls for 1 cup of chocolate chips. I always buy the 12 oz package which yields 2 cups of chips. One cup I add to the batter as directed and the remaining chips I sprinkle on top of the frosting.

Picture Credit: For the party, I arranged the brownies on a holiday platter with doilies. They were very pretty but I was in such a rush that I forgot to take pictures so you will have to settle for a photo I stole from the Hershey's website. My brownies didn't look this perfect, but my presentation was better! Further Note: Apparently Blogger didn't like the picture either and is refusing to allow me to post it. Please use your imagination instead.

Verdict: Yum! This one's a keeper.

Ultimate Chocolate Brownies
(Source: Favorite Brand Name Cookie Collection)
3/4 cup Hershey's Cocoa
1/2 teaspoon baking soda
2/3 cup butter or magarine, melted and divided
1/2 cup boiling water
2 cups sugar
2 eggs
1-1/3 cups all-purpose flour
1 teaspoon vanilla extract
1/4 teaspoon salt
1 cup Hershey's Semi-Sweet Chocolate Chips
One-Bowl Buttercream Frosting (recipe follows)
Heat oven to 350F. Grease 13x9x2-inch baking pan or two 8-inch square pans.
Stir together cocoa and baking soda in large bowl; stir in 1/3 cup butter. Add boiling water; stir until mixture thickens. Stir in sugar, eggs and remaining 1/3 cup butter; stir until smooth. Add flour, vanilla and salt; blend completely. Stir in chocolate chips. Pour into prepared pan.
Bake 35 to 40 minutes for rectangular pan, 30 to 35 minutes for square pans or until brownies begin to pull away from sides of pan. Cool completely in pan on wire rack. Frost with One-Bowl Buttercream Frosting. Cut into squares. About 36 brownies.
One-Bowl Buttercream Frosting
6 tablespoons butter or margarine, softened
2-2/3 cups powdered sugar
1/2 cup Hershey's Cocoa
1/3 cup milk
1 teaspoon vanilla extract
Beat butter in medium bowl. Add powdered sugar and cocoa alternately with milk, beating to spreading consistency (additional milk may be needed). Stir in vanilla. About 2 cups frosting.
Recycle: vanilla extract bottle
Compost: eggshells

Friday, December 09, 2005

Reuben Casserole

I haven't posted in a while because I've been studying for an exam for my Master Gardeners' class. I didn't do as well as I wanted but I'm pretty sure I at least passed. In the meantime, I have been cooking. I will try to post a recipe every day until I'm caught up.

This one is a real departure for me. I saw it in a newsletter from BettyCrocker.com . It uses instant mashed potatoes, something I normally abhor. But I've always been a sucker for reuben sandwiches and I was curious as to how this would taste with mashed potatoes rather than the usual rye bread.

It was very easy to make. The only problem I had was with the canned sauerkraut. I rinsed and drained it in a colander but it was still too wet. I should have mashed it down good to get all of the liquid out of it. The resulting casserole was surprisingly good even with the instant mashed potatoes. I especially liked the caraway seed on the top. If you like reubens and don't mind instant mashed potatoes, give this one a try.

Verdict: Not bad, but I probably won't be making this one again.

Reuben Casserole
(Source: BettyCrocker.com )


3 cups hot water
1 cup milk
1/4 cup margarine or butter
1 tablespoon yellow mustard
1 package (7.2 ounces) Betty Crocker roasted garlic mashed potatoes
1 package (6 ounces) sliced corned beef, cut into 1/2-inch pieces
1 can (14 1/2 ounces) sauerkraut, rinsed well and drained
2 cups shredded Swiss cheese (8 ounces)
1 tablespoon caraway seed, if desired

Heat oven to 350F. Grease square baking dish, 8x8x2 inches.

Heat hot water, milk and margarine to rapid boil in 3-quart saucepan; remove from heat. Stir in mustard. Stir in 2 pouches Potatoes and Seasoning just until moistened. Let stand about 1 minute or until liquid is absorbed. Whip with fork until smooth.

Spread 1 1/2 cups of the potatoes in baking dish. Top with corned beef. Spread sauerkraut over corned beef. Spoon remaining potatoes over top; spread gently. Sprinkle potatoes with cheese and caraway seed.

Bake uncovered about 20 minutes or until cheese is golden brown.

Recycle: mustard bottle, sauerkraut can

Monday, December 05, 2005

Date Bars

I have a "three-strike" rule. I like to try things three times before I give up on them. In my garden, that means planting something in three different places before deciding I just can't grow it. With cookbooks, it means trying three different recipes before consigning them (permanently) to the bookshelf. So, despite the crumb cake fiasco, I wanted to try another recipe from the Nestle VeryBestBaking Holiday 2005 leaflet that I received in the mail.

I've had my eye on the Date Bars recipe for a while. I've never made date bars. I thought it would be something different for me. Being a confirmed chocoholic, I have a very bad tendency to only make chocolate cakes/cookies/bars etc. I try to force myself to try other flavors.

My first problem with this recipe was that my grocery store doesn't sell chopped dates. I had to buy whole ones and chop them myself, a rather sticky business. Then I made the crust. Uh, oh. Not enough liquid. It didn't come together. At all. I literally spooned the "crust" into the pan, carefully poured the filling over it and then spooned the rest of the "crust" over the top. Even as I put the pan in the oven, I knew this was going to be a disaster.

It smelled great while it baked. It didn't look too bad coming out of the oven. It was difficult getting a piece out of the pan. Then I tasted it. It was delicious. Beyond delicious. It was almost better than chocolate. I'm ordering you to drop everything, buy dates and make this. NOW. Try increasing the butter to 3/4 cup. That's what I'm going to do when I make this again. And again. And again.

Verdict: Yum! This one's a keeper.

Date Bars
(Source: Nestle VeryBestBaking Holiday 2005 leaflet)


1 pkg. (8 oz.) chopped dates
3/4 cup Nestle Carnation Evaporated Milk
2 tablespoons granulated sugar
1 teaspoon vanilla extract
1/2 cup (1 stick) butter or margarine, softened
1/2 cup packed light brown sugar
1 cup all-purpose flour
3/4 cup quick-cooking oats
1/2 teaspoon salt
1/2 teaspoon ground cinnamon

Preheat oven to 400F. Grease 8-inch-square baking pan.

Combine dates, evaporated milk, sugar and vanilla extract in medium saucepan. Cook, over medium-low heat, stirring occasionally, for 8 to 10 minutes or until thickened. Remove from heat.

Beat butter and brown sugar in large mixer bowl until creamy. Beat in flour, oats, baking soda, salt and cinnamon. With floured fingers, press half of crust mixture onto bottom of prepared baking pan. Spread date filling over crust. Top with remaining crust.

Bake for 20 to 25 minutes or until golden. Serve warm. Cut into bars.

Recycle: evaporated milk can, vanilla extract bottle

Friday, December 02, 2005

Crockpot Chinese Beef and Pea Pods

Crazygramma posted an SOS on her garden blog alerting me to a beef crockpot recipe she had posted on her new recipe site, Family Food Favorites . If you haven't already done so, I urge you to visit this site. Do it when you have some time. There are so many incredible recipes posted by Crazygramma and other fabulous cooks that you'll want to linger.

Like her other recipes that I have tried, this one is simple and delicious. I cheated and bought beef already cut into strips rather than cutting my own. And I used fresh pea pods but cooked them for only 5 minutes because I like my veggies crisp and lightly cooked.

Crazygramma notes "I also add mushrooms and bean sprouts in and use low sodium soy sauce and consomme as I found the original recipe too salty for my taste." I didn't find it too salty but I will add the mushrooms and bean sprouts next time. Finally! A crockpot recipe that I actually like. Thanks Crazygramma for another fantastic recipe.

Verdict: Yum! This one's a keeper.


Crockpot Chinese Beef and Pea Pods

1 ( 1 to 1 1/2 pound) flank steak
1 (10 1/2 oz) can beef consomme
1/4 cup soy sauce
1/4 tsp. ground ginger
1 bunch green onion, sliced
2 tbs. cornstarch
2 tbs. cold water
1 (7 oz) package frozen Chinese peas partially thawed, or fresh ones

Thinly slice flank steak diagonally across the grain. Combine strips in crock-pot with consomme, soy sauce, ginger and onions. cover and cook on low for 5-7 hours.

Turn crockpot to high, stir in cornstarch that has been dissolved in the cold water. Cook on high for 10 minutes.

Drop in pea pods the last 5 minutes, longer if using fresh peas.

Serve over hot rice.

Donate: Campbell soup labels to your local school

Recycle: soup can

Compost: unused portion of green onions, strings from pea pods

Monday, November 28, 2005

Holiday Spritz Cookies

I don't normally make Christmas cookies. Holiday baking was never a tradition in the house I grew up in. Yet, somehow I acquired a cookie press. It has been in the back of one of my cupboards for the longest time. I can't remember how it got there. It must have been a gift from someone. I do remember using it once. I tried out a pressed cookie recipe from my old reliable, Betty Crocker. The cookies tasted like, well, pressed cookies, nothing to get excited about and certainly not good enough to become part of the holiday traditions in my own home.

Also lost in the mists of time is the origin of a pressed cookie recipe that has been in my "Recipes to Try" folder for the longest time. Today I finally decided to give it a whirl. Big mistake! While the dough and the resulting cookies taste great, the dough is much too stiff to use in the cookie press. The one I have even has a trigger, making it easier to use and easier to control the amount of dough for each cookie. It is also easy on my arthritic hands. Nonetheless, none of the tips I tried resulted in an actual shaped cookie and some of them were impossible to squeeze any dough through. I finally hit on the idea of using the bar shape and made ribbon cookies. At last I was able to actually squeeze out the dough fairly easily and into a recognizable shape. This is another one of those recipes that leaves me scratching my head and wondering if anyone actually tried it out before publishing it?

Verdict: What were they thinking???

Holiday Spritz Cookies
(Source: Unknown)


2 1/2 cups sifted flour
1/2 tsp. baking powder
1 cup softened unsalted butter
3/4 cup sugar
dash of salt
1 egg
1 tsp. vanilla extract

Sift together flour and baking powder. Cream butter, sugar and salt; add egg and vanilla. Beat flour into butter mixture. Add food coloring if desired. Press through cookie press with a star tip and place on a cold, ungreased cookie sheet. Bake 10-12 minutes in a 350 degree oven.

Makes 45 cookies.

Recycle: vanilla extract bottle

Compost: eggshell

Friday, November 25, 2005

Old-fashioned Chicken Pies

Many years ago, a woman I worked with used to buy First magazine. She was generous enough to allow me to photocopy any recipes I saw that appealed to me. Some them turned out to be quite good and I am still cooking them. One such recipe is for chicken pot pies. I have loved them since I was a child. Swanson Chicken Pot Pies were my idea of heaven.

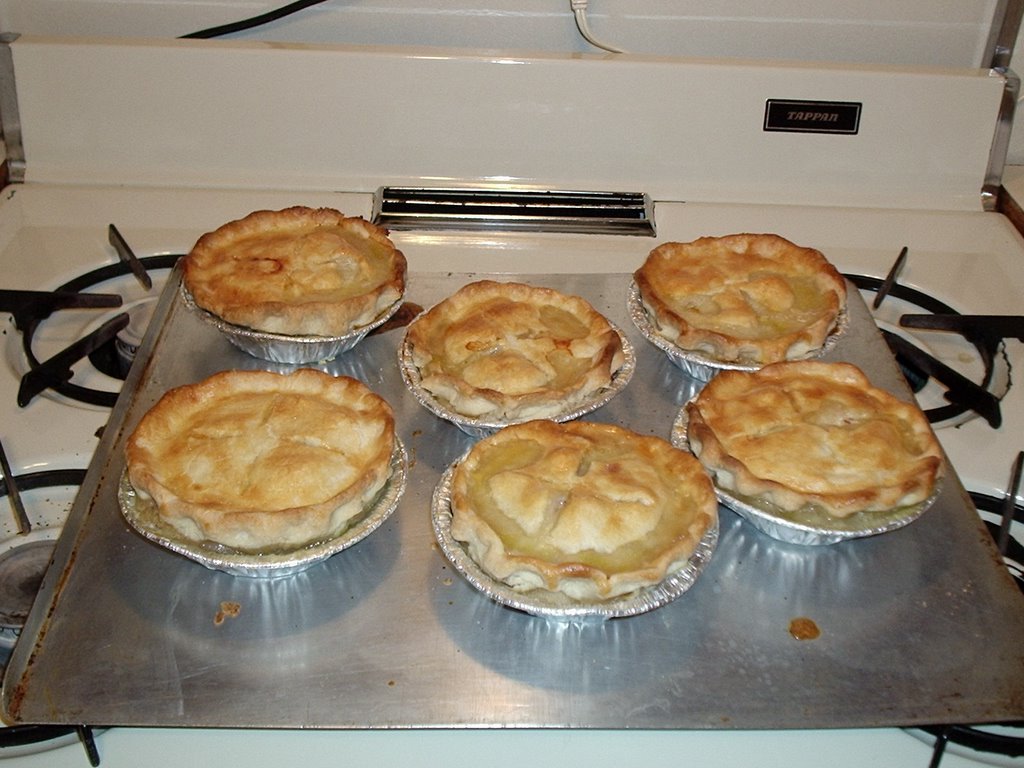
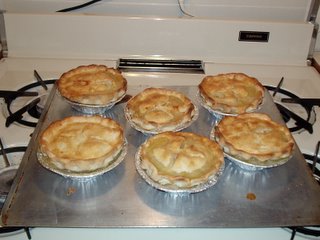
The problem with most pot pie recipes is that they make one large pie and involve frozen vegetables. This recipe appealed to me because it makes six individual pies and uses only fresh ingredients. The day after Thanksgiving, I use leftover turkey to make them instead of chicken. As you can see from the date of the magazine, these pot pies have been a holiday tradition in my house for over a decade.

Chicken stock is not something I ordinarily have hanging around the house. Canned broth is fine, but I prefer using ingredients I already have in the house. I substitute chicken bouillon for the stock/broth using a ratio of one cube per cup of water. In this case, I use 2 cubes in 1 3/4 cups water. Ditto for the light cream called for. Since I have Half & Half for my coffee, I use that instead.

I don't ordinarily like recipes that involve a lot of steps and use a lot of bowls and pans. And I will be the first to admit that rolling out pastry for six pies is a royal pain but I just love the buttery crust. They can be made ahead of time, refrigerated and then reheated in the microwave or even frozen and then thawed and reheated. This recipe takes a lot of time and effort but it is one of the very few that I feel is worth the trouble.

Verdict: Yum! This one's a keeper.

Old-fashioned Chicken Pies
(Source: First magazine, 2/10/92)

1 lb. boneless chicken breasts
1 3/4 cups chicken stock or canned broth
2 3/4 cups flour
salt & pepper
6 oz. butter, chilled
1/3 cup vegetable shortening
3 carrots
1/2 lb. mushrooms
1/2 teaspoon dried thyme
1 cup light cream
2 scallions
1 tablepoons chopped fresh parsley
1 egg

Put the chicken breasts in a frying pan with 1/2 cup stock. Cover and bring to a simmer. Reduce heat and continue simmering, turning once, until chicken is just cooked through, about 5 minutes. Remove chicken, let cool and tear into pieces. Strain broth and reserve.

Combine 2 1/2 cups of the flour and 3/4 teaspoon salt. Cut in 1/4 lb. of the butter and the shortening until the mixture resembles coarse meal.

Toss in 7 to 8 tablesppons cold water, a tablespoon at a time. When the ingredients begin to clump together, press into a ball, wrap and refrigerate.

Cut carrots in half lengthwise and then into approximately 1/4" slices. Bring to a boil in a large pot of salted water and cook until tender, about 5 minutes. Drain. Slice mushrooms. In a large saucepan, melt remaining 4 tablespoons butter over medium heat. Add mushrooms, thyme, 1 teaspoon salt and 1/2 teaspoon pepper. Cook until tender, about 5 minutes.

Stir in remaining 1/4 cup flour and cook 1 minute. Gradually stir in reserved chicken-cooking liquid, remaining 1 1/4 cups stock and the cream. Bring to a boil and cook 1 minute, stirring all the while. Remove from heat, pour off 1 1/2 cups sauce and reserve. Chop scallions, stir chicken, carrots, scallions and parsley into the remaining sauce.

Heat oven to 425F. Beat the egg with 1 tablespoon water. Divide the dough into 12 pieces. On a lightly-floured work surface, roll 6 of them and fit into 5" pie pans. Fill with the chicken mixture. Roll remaining dough, top pies and flute edges. Cut vents in the top crusts.

Brush tops lightly with egg mixture. Put pies on a cookie sheet and bake until golden brown, about 35 minutes. Brush tops of pies again with egg mixture after 15 minutes.

Recycle: chicken broth can

Compost: carrot parings, unused portions of scallions and eggshell

Monday, November 21, 2005

OldRoses' Melt In Your Mouth Brownies

There was a big IT conference at my company this weekend. They brought in the IT staff from all of our offices in Europe and North America for two days of meetings. For some of these people, it was their first time in the US. One of them was a gentleman from the Hamburg office of our parent company. He had also been given the task of bringing back chocolate for his (female) co-workers. Specifically, they asked if he could please buy brownies. Apparently brownies are not available in Germany. He had never had them and was curious to taste the ones served at the lunch that was brought in during the meetings.

I'm sure you've tasted these so-called brownies. They are gooey and flat with a horrible chemical aftertaste. I told him these were not "real" brownies. Since he wasn't leaving immediately after the conference, I had time to bake authentic brownies for him to take back to his office.

The recipe I use is extremely simple. It was a Betty Crocker recipe. I merely substituted butter or margarine for the vegetable shortening called for in the original recipe. The resulting brownies are extremely rich and do literally melt in your mouth. I added a cup of chopped nuts (also included in the original recipe) to the brownies that are currently on their way to Hamburg to give the recipients the "authentic" brownies experience but I don't use nuts when I make them for myself. I am not a big fan of nuts in my cakes and cookies. This is a one-bowl recipe, always popular with me, and I have found that a whisk is the best thing to stir the ingredients with. The batter will be stiff. Stirring it will give you a good workout!

Verdict: Yum! This one's a keeper.


OldRoses' Melt In Your Mouth Brownies
(Source: OldRoses )

4 ounces unsweetened chocolate
2/3 cup butter or margarine
2 cups sugar
4 eggs
1 teaspoon vanilla
1 1/4 cups all-purpose flour
1 teaspoon baking powder
1 teaspoon salt

Heat oven to 35oF. Grease baking pan, 13x9x2 inches. Melt chocolate and butter in the microwave for 2 minutes. Stir until completely melted. Mix in sugar, eggs and vanilla. Stir in remaining ingredients. Spread in pan.

Bake 30 minutes or until brownies start to pull away from sides of pan. Do not over bake. Cool slightly before cutting.

Recycle: vanilla bottle

Compost: eggshells

Friday, November 18, 2005

OldRoses' Better Than The Blue Box Macaroni & Cheese

The weather has finally turned cold. The kind of cold that gets into your bones and makes you long for comfort food. The ultimate comfort food for me is macaroni and cheese. When my daughter was young, she loved Kraft macaroni and cheese. I was delighted, both because she was a very picky eater and because she could prepare it herself. One day I checked the ingredients on the box. I was appalled. This wasn't food. This was a chemistry experiment. I instituted a new rule: "If you can't pronounce it, you shouldn't be eating it". I also started looking for a recipe for macaroni and cheese.

We ate a lot of really bad macaroni and cheese for months as I tried recipe after recipe. Finally I threw in the towel and decided to invent my own recipe. I started by combining the best parts of two recipes. It turned out so well, my daughter pronounced it "better than the Blue Box". I quit while I was ahead.

A few things you should bear in mind when making this recipe. First, it calls for Rotelle, but you can use the traditional elbow pasta or your favorite pasta. We tried a few different kinds of pasta and decided that we liked the Rotelle best. Secondly, be sure to get the sharp process American cheese. If you get the regular American cheese, it will be bland. Unless you prefer it that way! And last, but not least, you must, must, must grease the casserole dish. This recipe doesn't just stick to the casserole, it fuses to it. It becomes one with the casserole dish.

Verdict: Yum! This one's a keeper.


OldRoses' Better Than The Blue Box
Macaroni & Cheese
(Source: OldRoses )

16 ounces Rotelle
2 tablespoons butter or margarine
2 tablespoons flour
1/2 teaspoon salt
1/4 teaspoon pepper
2 cups milk
16 ounces sharp process American cheese

Heat oven to 375F. Cook Rotelle in boiling salted water for 15 minutes. While the pasta is cooking, melt butter in saucepan over low heat. Blend in flour, salt and pepper. Cook over low heat, stirring until mixture is smooth and bubbly. Remove from heat. Stir in milk. Heat to boiling, stirring constantly Boil and stir until thickened. Add cheese and stir until completely melted. Grease 2-quart casserole. Combine macaroni and cheese mixture in casserole. Cover; bake 30 minutes. Uncover; bake 15 minutes longer.

6 to 8 servings

Monday, November 14, 2005

Toll House Crumbcake

Somehow when I signed up up Nestle's VeryBestBaking.com site, I gave them my snail mail address because they are sending me recipes and coupons at home. Which is not such a bad thing. I now have a very nice leaflet with lots of new baking recipes. I decided to use the coupon for chocolate chips and try the crumbcake recipe. I have always loved crumbcake and coffee. What could be better than crumbcake, chocolate and coffee?

Unlike the last recipe I tried, this one very clearly says to grease the pan. The cake part of the recipe combined beautifully. The topping, however, came up short. Very short. There just wasn't enough of it to cover the entire pan. And it is added before baking which means that it bakes into the cake. In my opinion, a crumbcake topping should be added after the cake is baked so that it is "crumbs", not part of the cake. Chocoholic that I am, I thought I would never find myself saying that there are just too much chocolate chips. I would prefer more cake and fewer chips. The cake itself is nothing special so it is completely overpowered by the chocolate. This recipe was very disappointing.

Verdict: Not bad, but I don't think I will be making this one again.

Toll House Crumbcake
(Source: Nestle VeryBestBaking Holiday 2005 leaflet)


Ingredients Topping

1/3 cup packed brown sugar

1 tablespoon all-purpose flour

2 tablespoons butter or margarine, softened

1/2 cup chopped nuts

2 cups (12-oz. pkg.) Nestle Toll House Semi-Sweet Chocolate Mini Morsels, divided

Cake

1 3/4 cups all-purpose flour

1 teaspoon baking powder

1 teaspoon baking soda

1/4 teaspoon salt

3/4 cup granulated sugar

1/2 cup (1 stick) butter or margarine, softened

1 teaspoon vanilla extract

3 large eggs

1 cup sour cream

Directions

Preheat oven to 350F. Grease 13 x 9-inch baking pan.

Combine brown sugar, flour and butter in small bowl with pastry blender or two knives until crumbly. Stir in nuts and 1/2 cup morsels.

Combine flour, baking powder, baking soda and salt in small bowl. Beat granulated sugar, butter and vanilla extract in large mixer bowl until creamy. Add eggs, one at a time, beating well after each addition. Gradually add flour mixture alternately with sour cream. Fold in remaining morsels. Spread into prepared baking pan; sprinkle with topping.

Bake for 25 to 35 minutes or until wooden pick inserted in center comes out clean. Cool in pan on wire rack.

Recycle: vanilla extract bottle, plastic sour cream container

Compost: eggshells

Friday, November 11, 2005

Poppy Seed Bread

Are you as sick of lemon poppy seed as I am? So when I saw a recipe without the word "lemon" in it, I gave it a second look. Hmmm...almond extract. Now that sounds good! Baked in a bundt or tube pan. Wait a sec. Is this a cake or a bread? I had to make it and find out.

I had a couple of problems with this recipe right off the bat. It says to pour the batter into the pan with no mention of the usual grease and/or flour. I know there is a cup of butter in it, but I wasn't comfortable just pouring the batter into an ungreased pan. I gave the bundt pan I was using a light coating of cooking spray. I did have trouble coaxing the final product out of the pan. But when it did finally decide to come out, it came out in one piece. The other issue I had was with the butter. The recipe calls for 1 cup of butter or margarine. It doesn't say soften or melt it before adding it to the batter. I couldn't see how it could be combined with the other ingredients and then whipped into a light and fluffy concoction unless it was at least softened first which is what I did.

The final product looked gorgeous. It's definitely sweet, more like a cake than a tea bread. The almond flavoring is overwhelming though. 1 1/2 teaspoons of almond extract is much too much. I would want to at least cut it in half. I think just a hint of almond flavoring is more palatable.

Verdict: Not bad, but I probably won't be making this again.


Poppy Seed Bread
(Source: MomsMenu.com )


1 1/2 cups sugar

1 cup butter or margarine

3 eggs

1 1/2 tsp. almond extract

1 1/2 tsp. vanilla

3 cups flour

1 1/2 cups milk

1 tablespoon poppy seeds

1 1/2 tsp. baking powder

1 1/2 tsp. salt

Preheat 350 degree oven. Combine sugar, butter, eggs, and extracts. Mix on medium speed, scrape bowl often until light and fluffy, 2-3 minutes. Add remaining ingredients. Beat 1-2 minutes more until mixed. Pour into bundt or tube pan. Bake 50-65 minutes until done. Cool 10 minutes. Sprinkle with powdered sugar. Slice into medium thin pieces and place on serving plate for guests.

Recycle: almond extract and vanilla extract bottles

Compost: eggshells

Monday, November 07, 2005

Crockpot Chicken Stew

I've noticed that I seem to be trying only poultry recipes. That's because I haven't found any recipes featuring beef or pork that attract me. Maybe I should post a few of my own recipes just for variety sake.

As you can see, I am still trying to find a good crockpot recipe. This one sounded good as well as easy. I work nights so I usually arrive home exhausted and just wanting to sleep in the mornings. There's not a lot of preparation involved with this recipe so I was able to just slice the onion, cube the potatoes, mix the seasonings and throw everything into the crockpot before heading off to bed. What a treat to get up to a wonderful aroma and a freshly cooked meal.

Unfortunately, it didn't live up to its billing. There is not enough liquid in this recipe. When I think of stew, I think of gravy. There is none here. I don't know which is worse, the dry chicken or the dry veggies. The chicken was well seasoned because the instructions are to sprinkle the spices over the chicken but none of it made it to the veggies or what little liquid there was so both were pretty tasteless. I'm adding this one to the ever growing pile of failed crockpot recipes.

Verdict: What were they thinking???

Crockpot Chicken Stew


1 whole, cut-up chicken, fat removed
1 pound baby carrots
3 large potatoes, cubed
1 large sweet onion, very thinly sliced
ground pepper
1/4 tsp. thyme
1/4 tsp. basil
1/4 tsp. oregano
1 can lowfat cream of chicken soup
1 tbsp. Worcestershire sauce (optional)

Place half of the vegetables in the crockpot, then add the chicken pieces. Mix the spices and sprinkle evenly over the chicken. Add the remainder of the vegetables and top with the soup. Cover and cook on low for 8 to 10 hours, or until chicken is tender and the vegetables are done. Remove the chicken with a slotted spoon and remove from bones. Replace the chicken back and stir, then serve.

Notes: You can also substitute boneless chicken, about 3 pounds. Then just cut it up for shred at the end. Thighs or breasts will work also.

Donate: Campbell soup labels to your local school

Recycle: soup can

Compost: onion skins

Friday, November 04, 2005

"Art" Lee the Real Estate Gourmet Chef's Ground Turkey and Tofu Stir Fry

I know that I have mentioned before that gardeners love to share recipes. I'm currently attending a class to become certified as a Master Gardener and one of my classmates has been sharing his recipes with his fellow students. According to his website he is a gardener, an artist a linguist, and an entrepreneur. Truly a Renaissance man. I can vouch for the fact that he is a darned good cook also!

His latest recipe intrigued me because of its flexibility. You can tailor it to your family's tastes by varying the ingredients and amounts of seasonings. And it only uses one pan, a very important consideration for cooks like me with no dishwasher. I was able to prepare it and cook it in the time that it took to cook the rice. Don't you just love it when everything finishes cooking at once? I loved it made with ground turkey and kale. I'll definitely be trying his suggested variations also.

Verdict: Yum! This one's a keeper.


"Art" Lee the Real Estate Gourmet Chef's
Ground Turkey and Tofu Stir Fry


1 12 to 16 oz container tofu, drained (reserve liquid)

1 lb ground turkey (may substitute beef, lamb, chicken or pork or omit if vegetarian)

1 tablespoon cooking oil

1 medium onion - diced

1 teaspoon miso paste (omit if you can't get it or don't like it)

Handful of kale (or greens of your choice such as mustard, spinach, green onions, etc.) rough chopped

Garlic (fresh or powdered), soy, ground black pepper, ginger to taste (as strong as you want)

1/8 cup white wine (optional)

1. Slice tofu into 1 inch thick slices. Pan fry in cooking oil until brown on both sides. Remove from pan.

2. In same pan that you cooked tofu, cook diced oniion for 3 minutes.

3. Add ground turkey to onions, stir, and cook until brown over medium heat.

4. Mix in bowl miso, garlic, soy, black pepper, ginger, wine and reserved tofu liquid (optional). Pour over turkey and onions.

5. Add kale.

6. Add browned tofu slices.

7. continue cooking for 5 - 7 minutes.

8. Serve over rice (may substitute mashed potatoes or pasta).

Recycle: cooking oil bottle, wine bottle

Cmpost: onion skin, kale stems, garlic skins

Monday, October 31, 2005

Pumpkin and White-Chocolate Muffins

Our local newspaper, The Star Ledger , sends out a supplement every Friday. I have no idea what's in it because I never get farther than the front page which features a weekly recipe. I have cut out and saved a few but never felt motivated to actually try them until I saw this one for Pumpkin and White-Chocolate Muffins. It was the white chocolate chips that piqued my interest. Most muffin recipes call for semisweet chocolate or milk chocolate chips.

While I was making these, I had my doubts that this recipe was going to work. It specifically calls for 12 muffins. There was so much batter that it filled the 12 muffin cups to the top. I'm sure we've all had the unpleasant experience of overflowing muffins when we have filled the muffin cups more than the usual 2/3 full. Thankfully the small amount of baking powder meant that these muffins did not rise much at all so aside from a couple of overly large ones, they came out surprisingly well. I have to admit I omitted the nuts. I don't know if an additional 1/2 cup of walnuts would have been too much for only 12 muffins.

The taste was absolutely delicious. They were even better the second day but I just didn't care for the white chocolate chips in them. I honestly think that this recipe would be much better if it were made with semi-sweet chocolate chips. My preference would be for the mini chips rather than full sized ones.

Verdict: Not bad, but I don't think I will be making these again.

Pumpkin and White-Chocolate Muffins

(Source: The Star Ledger )


1 2/3 cups flour

3/4 cup sugar

1/2 teaspoon baking powder

1 teaspoon cinnamon

1 teaspoon powdered ginger

Pinch nutmeg

2 eggs, lightly beaten

8 tablespoons melted butter

1 cup pumpkin puree

1 cup white chocolate chips

1/2 cup walnuts, chopped

Blend together flour, sugar, baking powder and soda, cinnamon, ginger and nutmeg. Make well in middle of dry ingredients. Place eggs, melted butter and pumpkin in well. Blend together well. Stir in chips and nuts. Spoon batter into 12 muffin tins fitted with paper muffin liners. Bake at 350 degrees for 25 minutes. Remove to wire rack.

Yields 12 muffins.

Recycle: pumpkin puree can

Compost: eggshells

Friday, October 28, 2005

Crazygramma's Apple Betty

When I moved into my current home ten years ago, I received a slow cooker as a house warming gift. I was thrilled. As the single mother of a young child, I thought it would be a time saving way to prepare nutritious, home cooked meals. Alas, it was not to be. I have found very few slow cooker recipes that I actually like. I have to admit, though, that I have never looked at dessert recipes using the slow cooker. Crazygramma's Apple Betty recipe sounded too good to pass up, especially after her corn bread recipe became an instant favorite.

She says you can use any type of apple. She is partial to Spartans, but usually uses whatever is on sale. I am partial to MacIntoshes and they are in season right now. The only change I made was to use a whisk instead of a spoon to combine the topping ingredients. My whisk is my second favorite kitchen gadget so it gets used a lot. The aroma while it was cooking was wonderful. The perfect autumn smell. My entire house was filled with a delicious apple-cinnamon fragrance. Oops! Just like baking, if you can smell it that much then you have left it in too long. Sure enough, I burned it! Just around the edges, though. Even overcooked, it was delicious. I'm definitely going to be making this again but cooking it closer to three hours rather than four.

Verdict: Yum! This one's a keeper.

Crazygramma's Apple Betty
(Source: Garden Freak )


6 large apples, peeled and sliced
2 tablespoons sugar
1 teaspoon cinnamon

Topping
1/2 cup softened butter
1 cup lightly packed brown sugar
3/4 cup all-purpose flour

1) In large bowl, toss together apples, sugar and cinnamon. Place in slow cooker.

2) In bowl combine butter and brown sugar. Add flour and mix together with a spoon until mixture is crumbly. Sprinkle over apples and pat firmly into a crust.

3) Cover and cook on high for 3 to 4 hours or until apples are tender and sauce is bubbly.

Recycle: cinnamon bottle

Compost: apple cores and skins

Monday, October 24, 2005

Chocolate & Peanut Butter Cheesecake Bars

After the resounding success of the Swirled Turtle Brownies I looked in the baking aisle to see if Nestle is making other kinds of swirled morsels. Indeed they do. There are white chocolate swirled morsels that have a recipe for something involving raspberry. I'm not a big fan of raspberry so I decided to pass on that one. And there are milk chocolate and peanut butter swirled morsels. I'm a real sucker for Reese's Peanut Butter cups. Even better, the recipe on that package involves cheesecake. Someday I will have to devote an entire post to my love of cheesecake and (so far) futile search for the perfect cheesecake recipe. I scooped up a package and tucked it away in my freezer while waiting for cream cheese to go on special.

In case you've never tried it, morsels freeze really well. It's especially good when there's a sale or you get one of those coupons for cents off some absurd number of packages. I just freeze any that I can't use right away. Sure enough, my local grocery store had a twofer sale on cream cheese recently. That's exactly what I needed: 2 8-ounce packages of cream cheese. The morsels came out of the freezer and I got to work. For some reason, the grocery store didn't have graham cracker crumbs that day. I don't know why it is so hit or miss with this item. I just went to the cookie and cracker aisle and picked up a package of graham crackers which I then crushed using my food processor.

The rest went easily. There were no problems until I took the pan out of the oven. The cheesecake portion just wouldn't set. Even after I put it in the fridge, it wouldn't set properly. But that wasn't the biggest problem. The biggest problem was the lack of taste. Even the next day when most homemade baked goods taste better, there was no taste at all. I was left wondering if anyone actually tried eating these before they published the recipe?

Verdict: What were they thinking???

Chocolate & Peanut Butter Cheesecake Bars
(Source: the back of the morsels package)

2 1/2 cups graham cracker crumbs
3/4 cup (1 1/2 sticks) butter, melted
3/4 cup granulated sugar, divided
1 2/3 cups (10-oz. pkg.) Nestle Toll House Swirled Milk Chocolate & Peanut Butter morsels, divided
2 pkgs. (8 oz. each) cream cheese, softened
1/4 cup all-purpose flour
1 Tbsp. vanilla extract
4 large eggs

Preheat oven to 325F
Combine crumbs, butter and 1/4 cup sugar in medium bowl. Remove 1 cup mixture and reserve for topping. Press remaining mixture onto bottom of ungreased 13 x 9-inch baking pan. Sprinkle 3/4 cup Swirled Morsels over crust.
Beat cream cheese, remaining sugar, flour and vanilla extract in large mixer bowl until smooth. Add eggs, one at a time, beating until smooth. Pour over crust and morsels in pan. sprinkle with reserved crumb topping and remaining Swirled Morsels.
Bake for 25 to 30 miutes or until set. Cool completely in pan on wire rack. Refrigerate intil firm. Cut into bars.

Recycle: vanilla extract bottle

Compost: eggshells