Monday, October 31, 2005

Pumpkin and White-Chocolate Muffins

Our local newspaper, The Star Ledger , sends out a supplement every Friday. I have no idea what's in it because I never get farther than the front page which features a weekly recipe. I have cut out and saved a few but never felt motivated to actually try them until I saw this one for Pumpkin and White-Chocolate Muffins. It was the white chocolate chips that piqued my interest. Most muffin recipes call for semisweet chocolate or milk chocolate chips.

While I was making these, I had my doubts that this recipe was going to work. It specifically calls for 12 muffins. There was so much batter that it filled the 12 muffin cups to the top. I'm sure we've all had the unpleasant experience of overflowing muffins when we have filled the muffin cups more than the usual 2/3 full. Thankfully the small amount of baking powder meant that these muffins did not rise much at all so aside from a couple of overly large ones, they came out surprisingly well. I have to admit I omitted the nuts. I don't know if an additional 1/2 cup of walnuts would have been too much for only 12 muffins.

The taste was absolutely delicious. They were even better the second day but I just didn't care for the white chocolate chips in them. I honestly think that this recipe would be much better if it were made with semi-sweet chocolate chips. My preference would be for the mini chips rather than full sized ones.

Verdict: Not bad, but I don't think I will be making these again.

Pumpkin and White-Chocolate Muffins

(Source: The Star Ledger )


1 2/3 cups flour

3/4 cup sugar

1/2 teaspoon baking powder

1 teaspoon cinnamon

1 teaspoon powdered ginger

Pinch nutmeg

2 eggs, lightly beaten

8 tablespoons melted butter

1 cup pumpkin puree

1 cup white chocolate chips

1/2 cup walnuts, chopped

Blend together flour, sugar, baking powder and soda, cinnamon, ginger and nutmeg. Make well in middle of dry ingredients. Place eggs, melted butter and pumpkin in well. Blend together well. Stir in chips and nuts. Spoon batter into 12 muffin tins fitted with paper muffin liners. Bake at 350 degrees for 25 minutes. Remove to wire rack.

Yields 12 muffins.

Recycle: pumpkin puree can

Compost: eggshells

Friday, October 28, 2005

Crazygramma's Apple Betty

When I moved into my current home ten years ago, I received a slow cooker as a house warming gift. I was thrilled. As the single mother of a young child, I thought it would be a time saving way to prepare nutritious, home cooked meals. Alas, it was not to be. I have found very few slow cooker recipes that I actually like. I have to admit, though, that I have never looked at dessert recipes using the slow cooker. Crazygramma's Apple Betty recipe sounded too good to pass up, especially after her corn bread recipe became an instant favorite.

She says you can use any type of apple. She is partial to Spartans, but usually uses whatever is on sale. I am partial to MacIntoshes and they are in season right now. The only change I made was to use a whisk instead of a spoon to combine the topping ingredients. My whisk is my second favorite kitchen gadget so it gets used a lot. The aroma while it was cooking was wonderful. The perfect autumn smell. My entire house was filled with a delicious apple-cinnamon fragrance. Oops! Just like baking, if you can smell it that much then you have left it in too long. Sure enough, I burned it! Just around the edges, though. Even overcooked, it was delicious. I'm definitely going to be making this again but cooking it closer to three hours rather than four.

Verdict: Yum! This one's a keeper.

Crazygramma's Apple Betty
(Source: Garden Freak )


6 large apples, peeled and sliced
2 tablespoons sugar
1 teaspoon cinnamon

Topping
1/2 cup softened butter
1 cup lightly packed brown sugar
3/4 cup all-purpose flour

1) In large bowl, toss together apples, sugar and cinnamon. Place in slow cooker.

2) In bowl combine butter and brown sugar. Add flour and mix together with a spoon until mixture is crumbly. Sprinkle over apples and pat firmly into a crust.

3) Cover and cook on high for 3 to 4 hours or until apples are tender and sauce is bubbly.

Recycle: cinnamon bottle

Compost: apple cores and skins

Monday, October 24, 2005

Chocolate & Peanut Butter Cheesecake Bars

After the resounding success of the Swirled Turtle Brownies I looked in the baking aisle to see if Nestle is making other kinds of swirled morsels. Indeed they do. There are white chocolate swirled morsels that have a recipe for something involving raspberry. I'm not a big fan of raspberry so I decided to pass on that one. And there are milk chocolate and peanut butter swirled morsels. I'm a real sucker for Reese's Peanut Butter cups. Even better, the recipe on that package involves cheesecake. Someday I will have to devote an entire post to my love of cheesecake and (so far) futile search for the perfect cheesecake recipe. I scooped up a package and tucked it away in my freezer while waiting for cream cheese to go on special.

In case you've never tried it, morsels freeze really well. It's especially good when there's a sale or you get one of those coupons for cents off some absurd number of packages. I just freeze any that I can't use right away. Sure enough, my local grocery store had a twofer sale on cream cheese recently. That's exactly what I needed: 2 8-ounce packages of cream cheese. The morsels came out of the freezer and I got to work. For some reason, the grocery store didn't have graham cracker crumbs that day. I don't know why it is so hit or miss with this item. I just went to the cookie and cracker aisle and picked up a package of graham crackers which I then crushed using my food processor.

The rest went easily. There were no problems until I took the pan out of the oven. The cheesecake portion just wouldn't set. Even after I put it in the fridge, it wouldn't set properly. But that wasn't the biggest problem. The biggest problem was the lack of taste. Even the next day when most homemade baked goods taste better, there was no taste at all. I was left wondering if anyone actually tried eating these before they published the recipe?

Verdict: What were they thinking???

Chocolate & Peanut Butter Cheesecake Bars
(Source: the back of the morsels package)

2 1/2 cups graham cracker crumbs
3/4 cup (1 1/2 sticks) butter, melted
3/4 cup granulated sugar, divided
1 2/3 cups (10-oz. pkg.) Nestle Toll House Swirled Milk Chocolate & Peanut Butter morsels, divided
2 pkgs. (8 oz. each) cream cheese, softened
1/4 cup all-purpose flour
1 Tbsp. vanilla extract
4 large eggs

Preheat oven to 325F
Combine crumbs, butter and 1/4 cup sugar in medium bowl. Remove 1 cup mixture and reserve for topping. Press remaining mixture onto bottom of ungreased 13 x 9-inch baking pan. Sprinkle 3/4 cup Swirled Morsels over crust.
Beat cream cheese, remaining sugar, flour and vanilla extract in large mixer bowl until smooth. Add eggs, one at a time, beating until smooth. Pour over crust and morsels in pan. sprinkle with reserved crumb topping and remaining Swirled Morsels.
Bake for 25 to 30 miutes or until set. Cool completely in pan on wire rack. Refrigerate intil firm. Cut into bars.

Recycle: vanilla extract bottle

Compost: eggshells

Friday, October 21, 2005

Crazygramma's Corn Bread

I've been on a liquid diet all week thanks to root canal surgery. I suppose I could have used this time to try some new soup recipes but I just wasn't up to a lot of effort. Opening cans has been all I can manage. Fortunately, I did some cooking last week so I do have recipes to post.

I find recipes to try all over. Cookbooks, magazines, newspapers, packaging, the internet and blogs. Believe it or not one of the best places to find recipes is gardening blogs. Gardeners love to share their recipes for the produce they raise in their gardens. Crazygramma , a gardener in British Columbia, Canada shared some of her Thanksgiving recipes. Her recipe for corn bread caught my eye. I have been on the lookout for a good corn bread recipe for a long time. My problems with most of the ones out there is that they are either too dry or not sweet enough or both. Crazygramma's recipe is moist and sweet and melt-in-your-mouth. In fact, it is the only solid food I have been able to eat all week!

Another huge plus for cooks like me who have no dishwasher is that this is a one bowl recipe. Everything goes into one bowl and can be combined using my all-time favorite kitchen gadget, a wooden spoon. No need to get out the mixer. Fast, easy and absolutely delicious.

Verdict: Yum! This one's a keeper.


Crazygramma's Corn Bread
(Source: Garden Freak )


1 cup corn meal

1 cup flour

1 tablespoon baking powder

1/2 teaspoon salt

2-4 tablespoons of sugar (she uses 4)

1 cup milk

1 egg

1/4 cup vegetable oil

Heat oven to 425. Grease 8 inch square baking pan. In medium bowl, combine corn meal, flour, baking powder, salt and sugar. Add milk, egg and oil mixing just until smooth. Pour into prepared pan. Bake for 20 - 25 minutes.

Variation - To make cheese cornbread, use 2 eggs and add 1 1/2 cups shredded cheese.

Recycle: vegetable oil bottle

Compost: egg shell

Friday, October 14, 2005

French Onion Soup

Some friends took me out to lunch to celebrate my birthday last weekend. Two of them ordered French Onion Soup. I asked T, who is an excellent cook, if she makes French Onion Soup. When she said no, I offered to share my recipe with her. The one I use is nothing special. It's from Betty Crocker's International Cookbook published in 1980, to give you an idea of how long I've been using it. But like all Betty Crocker recipes, it's simple and delicious.

The only change I have made to the recipe is that I use my toaster oven to toast the bread rather than the broiler. Toasting under the broiler seems like overkill to me. The toaster oven is so much easier.

There are two important things to remember when making this recipe. The first is that you must use ovenproof bowls or individual casseroles because the soup is placed under the broiler for a few minutes to cook the cheese. I splurged and bought some cute little crocks. The other thing to remember is if you use Campbell's Condensed Beef Broth, contact your local school before throwing away the labels. Some schools do collect Campbell's soup labels to earn important school supplies like computer equipment.

Verdict: Yum! This one's a keeper.

French Onion Soup
(Source: Betty Crocker's International Cookbook)


4 medium onions, sliced

2 tablepoons margarine or butter

2 cans (10 1/2 ounces each) condensed beef broth

1 1/2 cups water

1 bay leaf

1/8 teaspoon pepper

1/8 teaspoon dried thyme leaves

4 slices French bread, 3/4 to 1 inch thick

1 cup shredded Swiss cheese (about 4 ounces)

1/4 cup grated Parmesan cheese

Cover and cook onion in margarine in 3-quart saucepan over low heat, stirring occasionally, until tender, 20 to 30 minutes. Add beef broth, water, bay leaf, pepper and thyme. Heat to boiling; reduce heat. Cover and simmer 15 minutes.

Set oven control to broil and/or 550F. Place bread slices on cookie sheet. Broil with tops about 5 inches from heat until golden brown, about 1 minute. Turn; broil until golden brown. Place bread in 4 ovenproof bowls or individual casseroles. Add broth; top with Swiss cheese. Sprinkle with Parmesan chees.

Place bowls on cookie sheet. Broil with cheese about 5 inches from heat just until cheese is melted and golden brown, 1 to 2 minutes. Serve with additional French bread or rolls if desired.

Donate: Campbell's soup labels to your local schools

Recycle: soup cans

Compost: onion skins

Monday, October 10, 2005

Garlic Clove Chicken

Thanks to Beverly over at Yum Yum Goodies , I have discovered a new recipe site, Taste of Home . So now I have yet another recipe newsletter cluttering up my emailbox. While exploring this site, I came across another garlic chicken recipe. This one intrigued me because I can't quite figure out what, if any role, the garlic plays in flavoring the chicken and also because of the other wonderful seasonings.

Supposedly, this recipe only requires 10 minutes of preparation time. Peeling 40 cloves of garlic takes a heck of a lot longer than 10 minutes in my kitchen. Truthfully, I didn't use 40 cloves. I have neither the time nor the patience to peel that much garlic. I just bought two bulbs of garlic and used that plus what I had on hand. The rest of the prep was fast and easy. The chicken smelled so good while it was cooking that even my cat, who loves chicken, was clamoring for some. The taste was every bit as good as it smelled.

Verdict: Yum! This one's a keeper.


Garlic Clove Chicken
(Source: Taste of Home )


1 roasting chicken (5 to 6 pounds)
1 small onion, quartered
40 garlic cloves, peeled
1/4 cup vegetable oil
1-1/2 teaspoons salt
1 teaspoon dried parsley flakes
1/2 teaspoon dried celery flakes
1/2 teaspoon each dried tarragon, thyme and rosemary, crushed
1/4 teaspoon pepper

Place chicken, breast side up, on a rack in a shallow roasting pan. Place onion in chicken; tie drumsticks together. Arrange galic cloves around chicken. In a small bowl, combine the remaining ingredients. Drizzle over chicken and garlic.

Cover and bake at 350F for 1-3/4 hours. Uncover; bake 30-45 minutes longer or until a meat thermometer reads 180F, basting occasionally. Cover and let stand for 10 minutes before slicing.

Yield: 6 servings

Recycle: vegetable oil bottle

Compost: onion and garlic skins

Monday, October 03, 2005

Bread Sticks

Soup put me in the mood for bread sticks. I vaguely remember making bread sticks once. I recall that they were soft and chewy rather than cracker-like. I went on a hunt through my cookbooks to find the recipe. I found it in a cookbook that I had forgotten that I owned: Beard on Bread. Remember when James Beard was popular? It turns out that I own a two book set, Beard on Bread and Beard on Pasta. The recipe looked familiar but these bread sticks are supposed to be crisp.

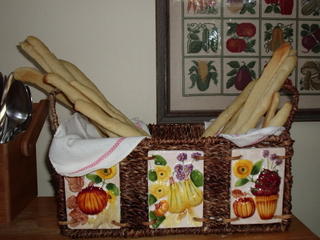
The dough was very easy to make and came together just as described. The recipe recommends setting aside 1/2 cup of flour for kneading. I ended using more for other reasons. Once I had shaped the dough into the 20" roll, I found that while the exterior of the dough was not sticky, the interior was making it difficult to cut. Putting some flour on the knife solved that problem. Shaping the bread sticks was not nearly as easy as described in the recipe. First, I needed to flour my hands to prevent the dough from sticking to them. Then rolling it between my palms just didn't work for me. I found that squeezing and stretching the dough into long, thin strips was the best I could do. The end result was not the nice round sticks I was aiming for. However, since artisan bread is so popular, I just called them "artisan bread sticks", very rustic and homemade looking.

Actually baking them is where I ran into trouble. The recipe calls for a slow 300F oven. Baking for the recommended 30 minutes resulted in soft, chewy bread sticks. I didn't want to leave them in any longer for fear of burning them. I think a hotter oven would have given me the crispness I was seeking. Regardless of the texture, the taste was delicious. And there is nothing wrong with bread instead of crackers with soup.

Verdict: Not bad, but I don't think I will be making this again.


Bread Sticks

(Source: Beard on Bread)

2 packages active dry yeast

1 tablesppon granulated sugar

2 teaspoons salt

1/4 cup olive oil

1 1/2 cups warm water (100F to 115F, approximately)

3 to 3 1/2 cups all-purpose flour

1 egg white beaten with 1 tablespoon water

Coarse salt, sesame seeds, poppy seeds (optional)

In a large mixing bowl combine the yeast, sugar, and salt. Add the oil and 1/4 cup of the water. Beat this mixture well with a wooden spoon for about 3 minutes. Add 1/2 cup of the flour and continue beating with the wooden spoon. Aternately add flour, 1 cup at a time, and water until you have a fairly soft dough, reserving approximately 1/2 cup flour for kneading. Remove the dough to a floured surface, and knead for several minutes until it springs back very briskly when you press your fingers in. It must be smooth and satiny, and all the flour on the board should be absorbed.

Let the dough rest on the board, covered with a towel, for about 5 minutes, then shape it into a roll about 20 to 22 inches long. With a very sharp knife cut it into at least 20 equal pieces. Rest the dough again for 3 or 4 minutes, then, using the palms of your hands, roll out each piece as long as the baking sheet or sheets you will use. (Or roll them any size you like and cut them.) Oil or butter the baking sheet, sprinkle lightly with sesame or poppy seeds, and arrange the bread sticks on it about 1 inch apart. Let them sit about 20 minutes, until they just barely begin to rise. Just before putting them in the oven, brush them lightly with the egg and water mixture and sprinkle with coarse salt, sesame seeds, or poppy seeds. Bake in a slow oven (300F) for about 30 minutes, depending upon the size of the bread sticks. They should be nicely browned and very crisp.

NOTE These will stay crisp for several days, stored in an airtight container.

Recycle: olive oil bottle

Compost: eggshell

Friday, September 30, 2005

Chef Bill's Beef-Barley Soup

The weather and the calendar finally agree that it's fall. The cooler weather has put me in the mind for soup. Good thing too, because BHG.com recently featured a recipe for beef barley soup that sounded yummy.

You do have to put aside plenty of time to make this soup. There are a lot of veggies to chop. Don't be afraid of the 12 cloves of garlic. I guarantee you won't taste it because the coriander is overwhelming. You really can't taste anything except the coriander which is too bad. There are a lot of wonderful flavors in this soup: the veggies, the wine, the thyme, the barley and the fresh parsley and basil.

Despite what the recipe says, you shouldn't eat this soup right away. After it cooks for the specified 20 to 25 minutes, it's still too watery. I was making this ahead of time and so put it in the fridge for about 8 hours. When I took it out again, the barley had absorbed nearly all of the liquid making for a thick, hearty soup. Just what I was looking for. Too bad the taste was spoiled by the overpowering coriander.

Verdict: What were they thinking???


Chef Bill's Beef-Barley Soup

(Source: BHG.com )


1 pound beef tenderloin roast, cut into 3/4-inch cubes
1/4 cup olive oil
2 cups chopped carrot
1 cup finely chopped celery
1 cup finely chopped onion
2 tablespoons minced garlic (12 cloves)
6 cups beef stock or beef broth
1/2 cup tomato puree
1/4 cup Cabernet Sauvignon or dry red wine
1 tablepoon snipped fresh thyme or 1 teaspoon dried thyme, crushed
1-1/2 teaspoons ground coriander
1 teaspoon freshly ground black pepper
1/2 teaspoon salt
1 cup quick-cooking barley
1/4 cup snipped fresh flat-leaf parsley
2 tablespoons snipped fresh basil

1. In a 4-quart Dutch oven, brown half of the meat in hot oil over medium-high heat; remove meat from Dutch oven. Add remaining meat, carrot, celery, onion, and garlic to Dutch oven. Cook and stir until meat is brown and onion is tender. Return all meat to Dutch oven.

2. Stir in beef stock, tomato puree, wine, dried thyme, if using, coriander, black pepper, and salt. Bring to boiling; stir in barley. Reduce heat. Cook, covered, for 20 to 25 minutes or until meat and vegetables are tender. Stir in parsley, basil, and fresh thyme, if using. Makes 8 servings (10 cups).

Recycle: wine and olive oil bottles, tomato puree can

Compost: carrot peels, celery leaves, onion and garlic skins, parsley stems

Friday, September 23, 2005

East Meets West Sushi Salad

The second hottest summer on record has been followed by the warmest September on record. We haven't had a single day below 80F. Not too warm to cook, but I'm definitely in the mood for something light. The sushi salad recipe on the back of the Nishiki Rice package sounded like it would fill the bill nicely.

I had a problem with this recipe before I even got into the kitchen. It calls for a medium avocado. All the avocadoes at my local grocery store were the same size. I've never cooked with an avocado before so I have no idea what a "medium" avocado looks like. My next problem is obvious in the picture. 1/2 pound of shrimp is not nearly enough. Fortunately my last problem turned out not to be a problem at all. When I added the vinegar, the smell was overpowering. I was sure it was too much. It's not. It's just perfect.

This recipe is lacking something. I can't put my finger on it. It does suggest you serve it with toasted sesame seeds and wasabi powder, neither of which I had on hand. Both of those ingredients would add more flavor, but more texture is needed also.

Verdict: Not bad, but I probably won't be making this one again

East Meets West Sushi Salad
(Source: the back of the Nishiki Rice package)

3 cups cooked, cooled Nishiki Rice*

3/4 cup thinly sliced celery

1/2 pound small, shelled, cooked shrimp

1/4 cup chopped green onions & tops

1/4 cup Marukan Seasoned Gourmet Rice Vinegar

5 large butter head or other leaf lettuce leaves

1 medium avocado

Combine rice, celery, shrimp, green onions & tops and vinegar. Regrigerate until ready to serve. To serve, arrange a lettuce leaf on each of 5 individual serving plates. Top with about 3/4 cup rice mixture. Remove peel and seed from avocado. Thinly slice avocado and divide among the 5 plates. Sprinkle lightly with toasted sesame seeds and serve with Hime Japanese Horseradish Powder (Wasabi), prepared, if desired. Makes 4 to 5 servings.

*Combine 1-1/4 cups Nishiki Rice and 1-3/4 cups water in medium saucepan. Bring to a soft boil. Reduce heat to low. Cover and simmer 20 minutes, or until liquid is absorbed. Remove from heat. Let stand covered, 10 minutes. Makes about 3 cups cooked rice.

Recycle: vinegar bottle

Compost: celery leaves and avocado peel

Monday, September 19, 2005

Deluxe Devil's Food Cake

I had most of a quart of buttermilk left over after making the Blackberry Jam cake. I hate wasting anything so I went in search of a recipe that used buttermilk. The answer was already in my baking cupboard on the back of the Softasilk Cake Flour box. Deluxe Devil's Food Cake. I had made this recipe once already. The cake part was delicious but while the almond extract was perfect with the chocolate, it was completely overwhelming in the buttercream frosting. I wanted to try it again minus the almond extract in the frosting.

Mindful of the fiasco with the icing for the Blackberry Jam cake, when 4 tablespoons of milk wasn't enough, I only added one more. That still made it a little runny. Hence, the cake is not a thing of beauty as you can see in the picture. I should have increased the amount of vanilla. All I could taste was the sugar, no butter, no vanilla.

I know that most people look down on Betty Crocker recipes but you have to give them credit. Those recipes always work. You really have to try to mess them up. I've been making her buttercream frostings literally since I was a child and, other than learning early on not to frost cakes in very hot weather, I have never had the problems with Betty Crocker frostings that I have experienced with other frostings. I keep trying other recipes but always go back to Betty Crocker both for taste and because they are foolproof.

Verdict: split decision. Cake: Yum! This one's a keeper. Frosting: Not bad, but I don't think I'll be making this one again.

Deluxe Devil's Food Cake

(Source: the back of the Softasilk Cake Flour box)


2 cups sugar
1 cup (2 sticks) butter or margaine, softened
1 teaspoon vanilla
3/4 teaspoon almond extract
2 eggs
2 1/2 cups Softasilk Cake Flour
1 cup baking cocoa
2 teaspoons baking soda
1/2 teaspoon salt
2 1/4 cups buttermilk
Buttercream Frosting (below)
Chocolate curls, if desired
White chocolate curls, if desired

Heat oven to 350F. Grease and flour three 9-inch round cake pans.

Beat sugar, butter, vanilla and almond extract in large bowl with electric mixer on medium speed until light and fluffy. Beat in eggs, one at a time. Mix cake flour, cocoa, baking soda and salt; beat into sugar micture alternately with buttermilk on medium speed. Beat 1 minute longer. Pour into pans.

Bake 30 to 35 minutes or until toothpick inseted in center comes out clean. Cool 10 minutes; remove from pans to wire rack. Cool completely. Fill layers and frost cake with Buttercream Frosting. Garnish with chocolate curls.

Buttercream Frosting
6 cups powdered sugar
1 cup (2 sticks) butter or margarine, softened
4 to 6 tablespoons milk
1 1/2 teaspoons vanilla
3/4 teaspoon almond extract

Beat all ingredients on medium speed until light and fluffy.

Here's how to assemble a three-layer cake:

1. Brush any loose crumbs from cooled layers. Place first layer, rounded side down, on plate. Spread with filling or frosting to within 1/4 inch of edge.
2. Top with second layer, rounded side down. Spread with filling or frosting.
3. Top with third layer, rounded side up. Coat side of cake with very thin layer of frosting to seal in crumbs. Frost side and top of cake.

Recycle: vanilla and almond extract bottles, cardboard cake flour box

Compost: eggshells

Friday, September 16, 2005

Rustic Garlic Chicken

I love garlic. I love spicy food in general, but anything with lots of garlic in it has my vote. So you can imagine my delight when I happened upon a recipe that called for three heads of garlic. Here's the description: "Yes, three heads of garlic. You don't have to peel the cloves first. They soften during cooking and take on a subtle sweetness. Each person squeezes the garlic out of its skin onto the plate to eat with the chicken". Sounds like heaven to me!

This is supposed to be made in a Dutch oven. I don't own a Dutch oven. Truthfully, I have no idea what a Dutch oven is. I used my favorite sauce pan for the stovetop cooking and transferred the chicken and garlic to my favorite baking dish for the oven cooking. The recipe calls for moving the chicken in and out of the Dutch oven so you would end up using two pots anyways.

The only significant change I made was to use boneless, skinless chicken breasts instead of the whole chicken cut into 8 pieces it called for. Chicken breasts were on special today. This recipe was very easy to make. Every step happened exactly as described, but I was disappointed with the taste. I like my garlic to bite back. This was too mellow for me. If you prefer your garlic to be mild, I would definitely recommend this recipe.

Verdict: not bad, but I probably won't be making this again.

Rustic Garlic Chicken


2 tablespoons cooking oil
1 chicken (about 3 to 3 1/2 pounds), cut into 8 pieces
1 teaspoon salt
1/4 teaspoon fresh-ground black pepper
3 heads garlic, cloves separated
2 tablespoons flour
1 cup dry white wine
1 cup canned low-sodium chickn broth or homemade stock
2 tablespoons butter
2 tablespoons chopped fresh parsley

1. Heat the oven to 400F. In a Dutch oven, heat the oil over moderately high heat. Sprinkle the chicken with 1/2 teaspoon of the salt and the pepper. Cook the chicken until well browned, turning, about 8 minutes in all, and remove from the pot. Reduce the heat to moderate, add the garlic, and saute until it is starting to brown, about 3 minutes. Sprinkle the flour over the garlic and stir until combined. Return the chicken to the pot, cover, and bake for 15 minutes.

2. Remove the pot from the oven and put it on a burner. Remove the chicken pieces from the pot. Over moderately high heat, whisk in the wine and simmer for 1 minute. Whisk in the broth and the remaining 1/2 teaspoon salt and simmer until starting to thicken, about 3 minutes. Turn the heat off, whisk in the butter, and pour the sauce over the chicken. Sprinkle with the parsley.

Recycle: wine bottle

Compost: garlic core and excess skin

Monday, September 12, 2005

Blackberry Jam Cake

It's not enough that I have literally dozens of cookbooks or that I have access to untold numbers of recipe sites on the internet, I also subscribe to several email newletters featuring recipes. All summer as the various berries came into season, delicious-sounding recipes landed in my mailbox. We were also experiencing the second hottest summer on record and I don't have air conditioning so there was no way I was going to turn on my stove and try out any of the recipes. I could only gaze longingly at the gorgeous berries when I did my weekly grocery shopping.

One recipe did catch my eye and get saved in my "Recipes to Try" folder, Blackberry Jam Cake. I can buy blackberry jam year-round. Which I did this week and baked the cake. Thanks to the cocoa and spices, the batter was initially a pleasant tan color. Then I added the jam and it turned lavender. Uh, oh. When you bake anything lavender, it becomes gray. I popped it into the oven with much trepidation.

The fragrance while it was baking was absolutely wonderful. Then it came out of the oven a lovely brown, not gray. I was also glad to see that it cooked all the way through. After last week's quiche fiasco, I was concerned that maybe my oven was too hot. The only problem I had with this recipe was the icing. It calls for 1 to 2 tablespoons of milk. One tablespoon was too little and two tablespoons was too much. It became runny as you can see in the picture. Nevertheless, both the icing and the cake are delicious.

Verdict: Yum! This one's a keeper.

Blackberry Jam Cake
(Source: MomsMenu.com )


1/4 cup butter or margarine

1 cup white sugar

2 egg yolks

1 teaspoon baking soda

1 cup buttermilk

2 cups all-purpose flour

1 teaspoon baking powder

1/2 teaspoon salt

1 teaspoon cocoa

1 teaspoon ground cinnamon

1/2 teaspoon allspice

1 cup blackberry jam

1 cup sifted confectioners sugar

1 to 2 tablespoons milk

1 tablespoon butter or margarine, softened

1/2 teaspoon vanilla extract

Combine flour, baking powder, salt, cocoa, cinnamon, and allspice. Dissolve soda in buttermilk, stirring well. Cream butter or margarine and sugar, beating well. Add egg yolks, beating mixture well. Mix flour mixture into the creamed mixture alternately with the buttermilk mixture, beginning and ending with flour mixture. Fold in blackberry jam. Pour batter into a greased and floured 10 inch Bundt pan. Bake at 350 degrees for 45 to 50 minutes, or until cake tests done. Cool in pan for 15 minutes. Remove from pan, and cool completely. Combine confectioners sugar, milk, butter or margarine, and vanilla. Beat until mixture is smooth. Spoon over cooled cake.

Recycle: jam and vanilla extract bottles

Compost: eggshells

Friday, September 09, 2005

Ham and Swiss Quiche

Remember when quiche was popular? I ate a lot of really bad quiche served by well-meaning home cooks following the latest trend. I never ate it in restaurants or made it at home because I don't like being trendy. Fortunately, quiche has gone the way of fondue and jello molds and it is safe for me to eat out again. I came across this recipe one day and decided to try making quiche, just for giggles. I'm a sucker for ham and swiss and thyme is one of my favorite seasonings.

Everything was going well until I poured it into the pie crust and it overflowed. I thought maybe I had put in too much ham. I didn't measure it, I just threw in as much as I had on hand. I put a pan under it in the oven to catch the overflow as it cooked. I didn't test for "doneness" as recommended because after 50 minutes, it looked done (see photo). If I cooked it any longer, it was going to burn. It was cooked on the outside, but when I cut into it, it was an ooey-gooey mess inside. Too much liquid. It didn't solidify correctly.

What else was wrong with it? I used a ready-made crust because I don't have a deep pie dish. I don't recommend this for anything other than desserts because the crust was sweet. The green onions were probably used for color. They tasted terrible. I would use regular onions. There was too much thyme and too much salt. I don't use a lot of salt so the salt in the cheese and the ham would probably have been enough for me.

Recipes like this leave me scratching my head and wondering if anyone actually tested them before publishing.

Verdict: What were they thinking???


Ham and Swiss Quiche
(Source: AllRecipes.com )


1 (9 inch) unbaked (4-cup volume) deep-dish pie shell
1 (12 fluid ounce) can Nestle Carnation Evaporated Milk
3 large eggs
1/4 cup all-purpose flour
1 cup shredded Swiss cheese
1/2 cup cubed cooked ham
1/4 cup sliced green onions
1/2 teaspoon dried thyme
1/4 teaspoon salt
1/8 teaspoon ground black pepper

PREHEAT oven to 350 F
WHISK together evaporated milk, eggs and flour in large bowl. Stir in 1/2 cup cheese, ham, green onions, thyme, salt and pepper. Pour mixture into pie shell; sprinkle with remaining cheese.
BAKE for 45 to 50 minutes or until knife inserted near center comes out clean. Cool on wire rack for 5 to 7 minutes before serving.
VARIATION. For a lattice top quiche, use ready-made pie pastry for single crust pie. Cut pastry into 1/2-inch-wide strips. Lay pastry strips over filling in lattice-fashion, turning pastry over outside edge of dish. Bake as directed above.

Recycle: evaporated milk can

Compost: eggshells and tops of green onions

Monday, September 05, 2005

Swirled Turtle Brownies

I noticed a new product the other day in the baking aisle of my local grocery store. Nestle Swirled Milk Chocolate & Caramel Morsels. I automatically checked the package for recipes. There was the standard Tollhouse cookie recipe using these morsels instead of the usual semi-sweet chocolate morsels and a recipe for Swirled Turtle Brownies. It called for caramel sauce. I love caramel almost as much as I love chocolate so I grabbed a bag of Swirled Milk Chocolate & Caramel morsels and a jar of caramel sauce and headed home to bake.
At first, I thought this was going to be one of those recipes that doesn't work. The batter was so stiff, it was virtually impossible to spread it in the pan. I resorted to using a knife dipped in water. With a lot of effort, I managed to spread the batter more or less evenly in the pan. When it came out of the oven, the brownie portion appeared to have cooked perfectly.
Then I tried to "drizzle" the caramel sauce artistically. It all ran together forming a caramel glaze. The recipe on the package said to drizzle before cutting. When I checked the website (Nestle VeryBestBaking.com), it said you could drizzle the caramel sauce either before or after cutting. I was pleased to see that their picture looked no more appetizing than mine.
The taste, however, is wonderful despite the brownie portion being a bit dry for my tastes. I think the next time I make this, I will use my very own "OldRoses Melt In Your Mouth Brownies" recipe.
Verdict: Yum! This one's a keeper.
Swirled Turtle Brownies
(Source: the back of the morsels package)

1 1/3 cups all-purpose flour

3/4 cup Nestle Toll House Baking Cocoa

1/2 tsp baking soda

1/4 tsp salt

3/4 cup ( 1 1/2 sticks) butter, softened

1 1/2 cups packed brown sugar

2 tsp vanilla extract

2 large eggs

1 2/3 cups (10-oz pkg) Nestle Toll House Swirled Milk Chocolate & Caramel Morsels, divided

1 cup chopped pecans, divided

1/3 cup caramel sauce

Preheat oven to 325F. Grease 13 x 9-inch baking pan.

Combine flour, cocoa, baking soda and salt in small bowl. Beat butter, sugar and vanilla extract in large mixer bowl until creamy. Add eggs, one at a time, beating well after each addition. Gradually beat in flour mixture. Stir in 3/4 cup Swirled Morsels and 1/2 cup nuts. Spread into prepared baking pan. Sprinkle remaining Swirled Morsels and remaining nuts over top.

Bake for 25 to 30 minutes or until toothpick inserted 2 inches from outer edge comes out clean. Cool completely in pan on wire rack. Drizzle with caramel sauce before cutting into squares.

Makes 20 brownies

Recycle: vanilla extract bottle

Compost: eggshells

Friday, September 02, 2005

Mushroom and Chicken Teriyaki

The thermometer has dipped below 90 degrees and the kitchen is now open. I can finally try the recipes I have been collecting all summer in my "Recipes To Try" folder. Whenever I find a good recipe on the internet or in a newsletter, I save it in that folder on my computer. I found this recipe one day when I was searching the internet for recipes using teriyaki sauce. I was attracted to this particular one because it calls for two types of mushrooms. Unfortunately, my local grocery store didn't have shiitake mushrooms today, so I was only able to use one kind. Rather than the thin strips as directed in the recipe, I cut the chicken up into bite-sized pieces to make it easier to eat and served it on rice rather than the Chinese cabbage or bok choy. Two things stand out: it takes longer than 5 minutes for the mushroom liquid to evaporate and I found the sauce too sweet probably from all the ginger.

Verdict: Not bad, but I probably won't be making this one again.

Mushroom and Chicken Teriyaki
1/4 cup teriyaki sauce
1 teaspoon cornstarch
1 teaspoon ground ginger
2 teaspoons vegetable oil
12 ounces of fresh white mushrooms sliced (about 4 1/2 cups)
4 ounces of fresh shiitake mushrooms, stems removed and sliced (about 1 1/2 cups)
1 large sweet red bell pepper, thinly sliced (about 1 cup)
4 green onions (scallions), sliced (about 1/3 cup)
2 teaspoons sliced garlic
1 1/2 cups cooked chicken, cut in thin strips (about 6 ounces)
4 Chinese cabbage or bok choy leaves
In a small bowl, combine teriyaki sauce, cornstarch, ginger and 1/2 cup water; set aside. In a large skillet, over medium-high heat, heat oil. Add mushrooms; cook and stir until they release their liquid, about 3 minutes. Add bell pepper, green onions and garlic; cook and stir until mushroom liquid evaporates and garlic begins to brown, about 5 minutes. Add chicken. Stir teriyaki mixture and add to the skillet mixture; cook and stir until slightly thickened, about 3 minutes. Arrange cabbage leaves on four plates; spoon mushroom-chicken mixture on top, dividing evenly.
Yield: 4 servings
Recycle: Glass teriyaki jar
Compost: tops of green onions, garlic skins, membranes and seeds from bell pepper

Thursday, September 01, 2005

My Own Collection of Recipes

These are links to recipes that have been reviewed on this blog that I cook regularly, sometimes for decades. If you don't see what you are looking for, email me . If I have a recipe for the dish you are seeking, I will post it. If I don't have a recipe, I'll look for one to trial. Recipes that are designated "OldRoses" recipes are either my own invention or have been altered significantly and become my own.

Blueberry Muffins

Golden Crescents

Sticky Buns

Cream of Mushroom Soup

French Onion Soup

Potato Soup

Marinated Artichoke Hearts

Blue Cheese Dressing

Blackened Chicken

Chicken Marsala with Mushrooms

Chicken Pot Pies

Chicken Fried Rice

Rosemary Chicken and Vegetables

Homemade Shake-and-Bake Chicken

Chicken Stir Fry

Meatballs

Fettuccine Alfredo

Macaroni and Cheese

Meat Filled Jumbo Shells

Brownies

Ultimate Chocolate Brownies

Bonnie Butter Cake with French Silk Frosting

Dinette Cake

Special Dark Picnic Cake

Bacardi Rum Cake

Chocolate Butter Frosting

Apple Pie

Blueberry Pie

Pumpkin Pie

Oatmeal Scotchies

Valentine Cookies