Showing posts with label Valentine's Day. Show all posts

Thursday, September 09, 2010

Orange-Scented Bittersweet Chocolate Cake

Obviously dessert for the Valentine dinner had to involve chocolate. That was a given. And the theme was “pairings”, so it had to be chocolate-something. I considered chocolate-raspberry, but raspberries aren’t in season now, so I decided on chocolate-orange instead. This recipe sounded good, but not difficult to put together. Frankly, after the Buche de Noel, I wanted something simple. (The original recipe includes a blood orange compote served on the side, but I skipped that.)

The ingredients don’t require comment, except for the chocolate. The recipe specifically states that the chocolate should not exceed 61% cacao. After perusing the available options at the grocery, I decided to go all out and get the Ghirardelli 60% cacao. Unfortunately, I had written on my shopping list the one pound of chocolate required for the cake, but forgot to add to that the additional 6 oz needed for the glaze. Realizing this on the morning of the dinner, I opted to make the glaze out of ordinary chocolate chips. Oh, and light rather than dark corn syrup. I don’t use corn syrup very often as it is, and really can’t see keeping two bottles of the stuff.

This recipe goes together really easily. You don’t even need a mixer, just a couple bowls and a spoon or whisk. Also you can just melt the chocolate/butter mixture in the microwave.

The recipe calls for a 10” cake pan with 2” high sides. I just used my 9” springform pan. You do want high sides because this recipe makes quite a bit; my pan was full. I’m wondering whether a 10” pan may be essential in this case. I did bake it until the tester came out with “moist crumbs attached”, which turned out to be over an hour (although I have doubts about my oven’s thermostat). But the cake was dry on the outer edges and maybe a little bit underdone in the middle. Which is not entirely a bad thing, because the middle was moist and fudgy.

I’m not sure why the recipe suggests applying the glaze only in the center. I would apply it all over, like a frosting.

The flavor was absolutely out of this world. It totally blew me away. It also blew away my coworkers, when I took the leftovers in the next week. Cut the pieces small, because it is heavy and rich. Very chocolatey without being too sweet. It also freezes beautifully. I don’t see anything wrong with making the glaze from regular semisweet chocolate chips. Whether the cake itself would be as good made with regular chocolate chips, I don’t know. I may have to do some research on this point…

Verdict: Yum! This one's a keeper!

Orange-Scented Bittersweet Chocolate Cake
(source: Epicurious.com)


Cake:

2 cups all purpose flour
3/4 teaspoon baking powder
1/2 teaspoon salt
1 pound bittersweet chocolate (do not exceed 61% cacao), chopped
1 cup (2 sticks) unsalted butter, cut into 8 pieces
1 1/4 cups sugar
1 cup (packed) golden brown sugar
1 tablespoon Grand Marnier or other orange-flavored liqueur
2 teaspoons finely grated orange peel
4 large eggs
3/4 cup sour cream


Glaze:

6 ounces bittersweet chocolate (do not exceed 61% cacao), chopped
1/2 cup (1 stick) unsalted butter, cut into 4 pieces
2 tablespoons dark corn syrup

For cake:
Position rack in center of oven and preheat to 325°F. Lightly butter 10-inch-diameter cake pan with 2-inch-high sides. Line bottom of pan with parchment paper; butter parchment.

Whisk flour, baking powder, and salt in medium bowl to blend. Combine chocolate and butter in large metal bowl. Set bowl over saucepan of simmering water; stir until chocolate-butter mixture is melted and smooth. Remove bowl from over water; add both sugars, orange liqueur, and orange peel and whisk until blended (mixture will look grainy). Add eggs, 2 at a time, and whisk until just blended after each addition. Whisk in sour cream. Add flour mixture and stir in with rubber spatula just until incorporated. Transfer batter to prepared pan; spread evenly.

Bake cake until tester inserted into center comes out with moist crumbs attached, about 50 minutes. Cool cake in pan on rack 30 minutes. Run small knife around sides of cake to loosen. Invert cake onto rack; peel off parchment. Cool cake completely (center may sink slightly).

For glaze:
Combine chocolate and butter in small metal bowl. Set bowl over saucepan of simmering water; stir until chocolate-butter mixture is melted and smooth. Whisk in corn syrup. Cool glaze until barely warm but still pourable, about 10 minutes.

Pour glaze onto center of cake. Using small offset spatula, spread glaze over top of cake, leaving 1/2-inch plain border around top edge. Let stand at room temperature until glaze sets, about 2 hours. DO AHEAD: Can be made 2 days ahead. Cover with cake dome and store at room temperature.

Recycle: liqueur bottle, sour cream carton, corn syrup bottle

Compost: eggshells

Sunday, April 04, 2010

Lemon-Ginger Chicken

I was trying to come up with a main dish for our “Pairings” dinner when one day “Lemon-Ginger Chicken” popped into my head. I have no idea where that came from. I don’t believe I’ve ever made, or even eaten, it before. But it sounded good. Maybe because it was winter and spicier foods were more appealing just then.

As with the Ginger Carrot soup, I had a little trouble finding a recipe in which lemon and ginger were the only main flavor components, but finally found one on the Betty Crocker website. In honor of the occasion, I decided to buy real gingerroot instead of just using the powdered stuff. I’d never used it before, and was pleasantly surprised at the lemony fragrance that arose as I was grating it. Ah, now I see why this is paired with lemon….this pair has a lot in common! Hmmm, I thought, I wonder if this stuff tastes lemony too….YYAAAHHH!!! I’d momentarily forgotten about things like ginger beer…Okay, so this couple has some differences too…

Both the chicken and the sauce proved to be very quick and easy to put together. Especially when you don’t bother to flatten the chicken breasts first. In this case, however, you do need to be sure you cook the chicken long enough that it’s cooked through. Following the suggestions of some of the reviewers at the original website, I doubled the sauce recipe.

The chicken itself proved disappointing. I couldn’t taste the lemon or ginger at all, and I did taste an off-flavor that I thought might have come from the oil. The sauce was good, though.

A day or two later, when I had the leftovers for lunch, the off-flavor was gone, but I still couldn’t taste the lemon or ginger on the chicken itself. Maybe I should have applied the breading more heavily; there was a fair amount of it left over. The sauce had so much cornstarch in it that it had thickened to about the consistency of aspic, even after reheating, and the lemon flavor in it now seemed too strong. Also, there was really more of it than was necessary.

Although I think the lemon-ginger combination has serious potential for a good long-term relationship, this particular dish doesn’t show them off to best advantage.

Verdict: What were they thinking?

Lemon-Ginger Chicken
(source: bettycrocker.com)


Chicken
4 boneless skinless chicken breasts (1 1/4 lb)
1/2 cup Original Bisquick® mix
1/4 cup Progresso® plain bread crumbs
1 tablespoon grated lemon peel
1/2 teaspoon grated gingerroot
1/2 cup water
3 tablespoons vegetable oil

Lemon Ginger Sauce
1/4 cup lemon juice
1/4 cup water
3 tablespoons sugar
1 tablespoon cornstarch
1/4 teaspoon grated gingerroot
1 drop yellow food color
Lemon slices, if desired

Between pieces of plastic wrap or waxed paper, place each chicken breast smooth side down; gently pound with flat side of meat mallet or rolling pin until about 1/4 inch thick.

In shallow bowl, mix Bisquick mix, bread crumbs, lemon peel and gingerroot. Pour 1/2 cup water into another shallow bowl. Dip chicken into water, then coat with Bisquick mixture.

In 12-inch nonstick skillet, heat oil over medium heat. Cook chicken in oil 8 to 10 minutes, turning once, until juice of chicken is clear when center of thickest part is cut (170°F).

Meanwhile, in 1-quart saucepan, mix lemon juice, 1/4 cup water, the sugar, cornstarch, gingerroot and food color. Cook over medium heat, stirring occasionally, until thickened and bubbly. Pour sauce over chicken. Garnish with lemon slices.

High Altitude (3500-6500 ft):
Cook chicken in oil 11 to 13 minutes or until meat thermometer inserted in center of chicken reads 170°F.

Recycle: oil bottle

Compost: rest of lemon

Friday, March 12, 2010

Carrot with Ginger Soup

I still have some carrots from this year’s (or, more accurately, last year’s) garden, and I thought a good use for them would be to make a carrot soup for the Valentine’s dinner. Since the theme this year was “pairings”, we came up with ginger-carrot soup. But at first I had trouble finding a recipe. There are quite a few out there, but they all seemed to have one of two problems. Either they included so many other ingredients that they were actually “ginger-carrot-and-fifteen-other-things soup” and thus didn’t really fit the theme, or they had just a few ingredients but the reviews indicated that they were “bland”, “boring”, etc. Finally I found a recipe that contained few other flavor components, and that got good reviews.

As a bonus, this recipe contains detailed instructions about pureeing the soup. Follow these and you should avoid the type of disaster OldRoses suffered last Thanksgiving.

The ingredients were pretty much as in the recipe, except that I used light cream instead of whipping cream; in a recipe like this, I doubt many people would notice the difference. I also sprang for real ginger, since I also needed it for the chicken dish (more on that here).

The recipe calls for 2 pounds of carrots. I wasn’t sure I had enough of my home-grown ones, so I bought a one-pound bag and used a pound of my own. Now, I should explain that the ones I grew are a purple variety. So when the carrots were simmered, the purple color leached out into the broth. When it was all pureed (without accident, I might add - I used a blender rather than a food processor), the whole thing took on a mauve color, which was perfect for Valentine’s Day. Oh, and the garnish in the picture is a particularly pretty carrot slice that I reserved for this purpose.

When I first tasted this soup, I was disappointed. The chicken broth flavor came out more strongly than I had expected, and I didn’t detect the ginger at all. But, by a day or two later, things had improved. The chicken broth flavor had receded and a lemony flavor from the ginger was present now. If you didn’t know there was ginger in it, you might think it was lemon instead, yet there’s the hint of a bite to it. I’m wondering whether the ginger level should be upped just a bit…

Verdict: Not bad...I might make this one again.

Ginger Carrot Soup
(source: foodnetwork.com)

2 tablespoons sweet cream butter
2 onions, peeled and chopped
6 cups chicken broth
2 pounds carrots, peeled and sliced
2 tablespoons grated fresh ginger
1 cup whipping cream
Salt and white pepper
Sour cream
Parsley sprigs, for garnish

In a 6-quart pan, over medium high heat, add butter and onions and cook, stirring often, until onions are limp. Add broth, carrots, and ginger. Cover and bring to a boil. Reduce heat and simmer until carrots are tender when pierced.

Remove from heat and transfer to a blender. Don't fill the blender more than half way, do it in batches if you have to. Cover the blender and then hold a kitchen towel over the top of the blender*. Be careful when blending hot liquids as the mixture can spurt out of the blender. Pulse the blender to start it and then puree until smooth. Return to the pan and add cream, stir over high heat until hot. For a smoother flavor bring soup to a boil, add salt and pepper, to taste.

Ladle into bowls and garnish with dollop sour cream and parsley sprigs.

*When blending hot liquids: Remove liquid from the heat and allow to cool for at least 5 minutes. Transfer liquid to a blender or food processor and fill it no more than halfway. If using a blender, release one corner of the lid. This prevents the vacuum effect that creates heat explosions. Place a towel over the top of the machine, pulse a few times then process on high speed until smooth.

Recycle: broth can, sour cream tub

Compost: veggie peelings/trimmings


Sunday, February 14, 2010

Valentine’s Day at The Wooden Spoon


Orange-scented Bittersweet Chocolate Cake

We thought that our Honey themed Valentine’s dinner was going to be a hard act to follow but thanks to a colleague of A, BioBabe, who suggested a theme of “Harmonious Pairings” honoring traditional Valentine’s Day couples, we had a wide range of recipes to choose from. For each dish, we looked for a recipe with a “pair” of ingredients. We also made sure to have some holiday red with red potatoes, red pearl onions, beet bread an, thanks to A’s ingenious use of purple carrots, even the soup was a dark pink.

I think it’s safe to say that this year’s dinner easily surpasses our first menu. Thanks BioBabe!

Sunday, February 12, 2006

OldRoses' Chocolate-Dipped Valentine Heart Cookies

Your wish is my command. Susan requested my "regular" Valentine cookie recipe. It's a two parter. I saw the idea in that same "First Magazine" that I found so many recipes that became staples in my kitchen. This one was from the February 10, 1992 edition. I like to keep things simple, so I eliminated the white chocolate and assorted colored sugars, sprinkles tinted coconut, etc. that were suggested as toppings. I also doubled the amount of chocolate chips and shortening so there would be enough to cover all the cookies. Then I substituted my favorite sugar cookie recipe from my favorite cookbook, Betty Crocker, for the one used in the magazine. That one called for zest from 2 oranges. I wasn't thrilled with the thought of orange-flavored cookies. And I tinted the dough pink in honor of Valentine's Day. No pictures this time. You just have to imagine the Half-Hearted Valentine Cookies in pink!

Verdict: Yum! This one's a keeper.
OldRoses' Chocolate-Dipped Valentine Heart Cookies
(Source: OldRoses)
1 recipe Deluxe Sugar Cookies
Red food coloring
2 cups semi-sweet chocolate chips (12 ounces)
4 tablespoons shortening
Mix cookie dough as directed. Using red food coloring, tint dough pink. Cut out with heart shaped cookie cutters and bake as directed.
Melt chocolate chips and shortening in micro-wave in a deep bowl. Dip 1 side of each cookie into the chocolate and let excess drip off. Scrape bottom edge against bowl to remove last of the excess chocolate. Put on sheets of waxed paper to set.
Deluxe Sugar Cookies
(Source: Betty Crocker Cookbook)
1 cup butter or magarine, softened
1 1/2 cups confectioners' sugar
1 egg
1 teaspoon vanilla
1/2 teaspoon almond extract
2 1/2 cups all-purpose flour
1 teaspoon soda
1 teaspoon cream of tartar
Mix thoroughly butter, confectioners' sugar, egg, vanilla and almond extract. Blend in flour, soda and cream of tartar. Cover, chill 2 to 3 hours or overnight.
Heat oven to 375F. Divide dough in half. Roll each half 3/16 inch thick on lightly floured pastry cloth. Cut into desired shapes. Place on lightly greased baking sheet. Bake 7 to 8 minutes or until light brown on edge.
About 5 dozen 2 to 2 1/2 inch cookies
Recycle: vanilla extract bottle, almond extract bottle, food coloring bottle
Compost: eggshell

Monday, February 06, 2006

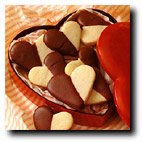
Half-Hearted Valentine Cookies

I have a recipe for Valentine cookies that I have used for years. It's just a sugar cookie recipe that I tint pink, cut out with a heart-shaped cookies cutter and dip in a chocolate glaze. But I'm always on the lookout for new recipes and this one seemed an interesting variation. I was a bit leery of the peppermint extract and the plain color didn't appear terribly appetizing. I forged ahead anyways.

The cookie part of the recipe went fine other than the strong smell of peppermint. I ran into trouble with the glaze. The glaze I normally make is chocolate chips and shortening. This one is chocolate chips and butter. Richer (which is good!) but also thicker, which as it turns out, was not good. I broke a few cookies trying to scrape off the excess off of the back of them. I also ran out of glaze before I was halfway through because it was so thick. The thinner glaze that I normally use goes much further. I made another batch of glaze and soldiered on.

These cookies have to be refrigerated for the chocolate to set correctly. To accomplish this feat you need three to four cookie sheets covered with waxed paper and a nearly empty refrigerator. I'm fortunate. I live alone so my refrigerator is pretty empty most of the time. I can't imagine how a normal family with a full refrigerator could possibly fit that many cookie sheets in without emptying it out.

In the end, I felt it wasn't worth the effort. I just didn't care for peppermint cookies although the glaze was pretty good. I was rushing to finish these because I wanted to bring them to a meeting. I forgot to take pictures before I left. No matter, I could take pictures there. But I forgot my camera. No problem, I could take pictures of the leftovers when I got home. But there were no leftovers. Some of the attendees liked the cookies so much, they eagerly took home all of the leftovers. One woman even requested the recipe! I found the picture below on the Lane O Lakes website. I also noticed that they have changed the recipe for the glaze from butter to shortening.

Verdict: I didn't care for them, but other people loved them.

Half-Hearted Valentine Cookies
(Source: Favorite Brand Name Cookie Collection)

Cookies

3/4 cup sugar

1 cup Land O Lakes butter, softened

1 package (3 ounces) cream cheese, softened

1 egg

1 teaspoon peppermint extract

3 cups all-purpose flour

Glaze

1 cup semi-sweet real chocolate chips

1/4 cup Land O Lakes butter

For Cookies, in large mixer bowl, combine sugar, butter, cream cheese, egg and peppermint extract. Beat at medium speed, scraping bowl often, until light and fluffy. Add flour; beat until mixed. Divide dough into halves. Wrap in waxed paper. Refrigerate until firm, at least 2 hours.

Preheat oven to 375F. Roll out dough on lightly floured surface to 1/4-inch thickness. Cut out with floured heart-shaped cutters. Place 1 inch apart on ungreased cookie sheets. Bake for 7 to 10 minutes, or until edges are very lightly browned. Remove immediately; cool completely on wire racks.

For Glaze, in small saucepan, melt chocolate and butter, stirring occasionally, over low heat until melted, 4 to 6 minutes. Dip half of each heart into chocolate. Refrigerate on waxed paper-lined cookie sheet until chocolate is firm. Store, covered, in refrigerator.

Makes about 3 1/2 dozen cookies

Recycle: peppermint extract bottle

Compost: eggshell