Friday, December 30, 2005

Crockpot Beef Sandwiches

I'm a little behind in my email. June, to be exact. So the recipe newsletter I was reading from one of my all time favorite sites, Old Fashioned Living , was offering crockpot dinners for hot summer evenings that didn't heat up the kitchen. Not having air conditioning myself, I like that idea very much. I decided to give the beef sandwiches a try.

The recipe calls for a 3 to 4 pound beef roast. I bought a cheap pot roast. Probably not one of my better ideas. The meat ended up being very tough. It also calls for seasoned salt, not something I have on hand. I used regular salt. It was still delicious. I'm going to be making this one again, just with a different cut of meat. I think this could be an all-season dish. Add a nice cup of hot soup and it would make a lovely, warm meal for colder weather also.

Verdict: Yum! This one's a keeper.


Crockpot Beef Sandwiches


3-4 pound beef roast
1 tsp. seasoned salt
1 tsp. ground black pepper
1/2 tbsp. dry mustard
1 tbsp. Worcestershire sauce
1/2 tbsp. garlic powder or granules
1 large sweet onion, very thinly sliced and halved
1/4 cup beef broth
French bread or submarine buns

Put first 8 ingredients in crock pot, cover and cook on low for 8-10 hours or high for 4-5. Remove the beef to cut or shred and return to the crock pot. Stir and serve on the bread or buns. Add mayonnaise, lettuce, and tomato if you wish.

Recycle: Worcestershire sauce bottle

Compost: onion skins

Monday, December 26, 2005

Sticky Buns

Christmas mornings at my grandmother's house were a very regimented affair. We children had to wait until the adults got up before we could leave our bedroom. Then we were allowed to "open" our stockings. Next was breakfast and then, finally we could dive into Santa's bounty. Looking back now, I can understand that the adults got up much earlier than usual, allowed us into our stockings to mollify us long enough so that they could have breakfast and much needed coffee before getting down to the business of opening gifts.

Those long ago breakfasts were a real treat for me because it was the only time I got to indulge in sticky buns. There was an excellent bakery near my grandmother's house thanks to which I was able to sample "exotic" baked goods such as apple kuchen and sticky buns, a far cry from the Hostess cupcakes and Twinkies served in my parents' house. Once I began baking myself, I searched and searched for a recipe similar to the sticky buns at my grandmother's house. I finally found one that was even better in First magazine, the same source for the chicken pot pies I posted earlier.

The problem I have found with most recipes for sticky buns is that the "bun" part is just too heavy. The "bun" part of this recipe is buttery and light. The sticky part is just heavenly. Again, the taste and texture is superior to other recipes. I thought I used a 9-inch pan as called for in the recipe, but I must have grabbed one of my 8-inch ones by accident because they overflowed the pan. So please don't be put off by the picture. They taste wonderful. To me, they taste like Christmas.

Verdict: Yum! This one's a keeper.

Sticky Buns
(Source: First magazine, 3/9/92)
12 Tbs. butter
1 pkg. (2 3/4 tsp.) active dry yeast
3/4 cup granulated sugar
3/4 tsp. salt
3 egg yolks
1/2 cup milk
3 to 3 1/2 cups flour
3/4 + 1/3 cup light-brown sugar
2 Tbs. corn syrup 3/4 cup pecan halves
1/2 tsp. cinnamon
Melt 6 Tbs. of the butter and let cool. Dissolve yeast in 1/4 cup lukewarm water. Stir in granulated sugar, salt, yolks, milk, 4 Tbs. of the cooled butter and 2 1/2 cups of the flour.
Turn out onto a lightly floured work surface. Knead until dough is smooth and elastic, about 5 minutes, working in enough of the remaining flour so that the dough is no longer sticky.
Put in a buttered bowl, cover with plastic wrap and let rise until doubled in bulk, about 45 minutes. To test, press dough with your finger tips. If an imprint remains, the dough has doubled.
Butter a 9" baking pan. In a saucepan, combine 6 Tbs. butter, 3/4 cup brown sugar and the corn syrup. Stir over low heat until smooth. Pour into prepared pan and strew 1/2 cup of the pecan halves on top.
Combine the 1/3 cup brown sugar with the cinnamon. Chop remaining 1/4 cup pecans.
Punch dough down. On a lightly floured work surface, shape into an approximately 18' x 9" rectangle. Brush with the remaining 2 Tbs. melted butter. Sprinkle with the brown sugar and cinnamon and the chopped pecans. Roll up dough starting with a long side.
Cut into 9 slices and put in the prepared pan. Cover and let rise until doubled, about 40 minutes.
Heat oven to 375F. Bake until browned and bubbly, 30 to 35 minutes. Let cool in the pan 5 minutes. Invert onto a serving plate and let stand about 30 seconds before removing pan. Cool slightly before serving.
Compost: eggshells

Friday, December 23, 2005

Wild Basmati Pilaf

There are some real advantages to being an empty-nester. After I clean, my house actually stays clean. I don't have to fight for time on the computer. And I can cook whatever I want. Cooking for a picky eater is no fun. Every new recipe has to have the ingredients vetted to make sure none of them are on the list of things the picky eater won't eat which is much longer than the list of things that she will eat. Best of all, once the recipe is made, I don't have to coax anyone to eat it. "Just try a little bit. It has mushrooms in it. You like mushrooms".

Now I can look at a recipe and say "Hmmm . . . brown basmati rice. Never heard of it. Should be fun to try". Or "Vegetable broth! I've never used that. I wonder what's in it?". Even if in the end I don't like it, I can "play" with it and see if I can come up with a version that I do like. As in this case. I didn't read this recipe closely. The rice takes over an hour to cook (!). Secondly, it has way too many reductions. I don't like recipes that have lots of complicated steps. Ideally, I want to be able to walk into the kitchen at 5:00 PM and have dinner on the table in time for the news at 6:00 PM.

After all that effort, I just didn't like the way it tasted. But I think I can fix it! I didn't like the vegetable broth and all that parsley. And reducing onions and garlic in water is way too bland for me. I want to make this again with chicken broth instead of the vegetable broth, use butter to cook the onions and garlic, no reductions please, and leave out the celery and parsley. I loved the combination of the thyme, marjoram, black pepper and salt. It's the only thing that saved this recipe for me.

Verdict: Not bad, but I don't think I'll be making this one again (as written).


Wild Basmati Pilaf

1/4 cup wild rice
1 - 15 oz. can Swanson's vegetable broth
3/4 cup brown basmati rice
1 onion, finely chopped
3 garlic cloves, minced
2 cups thinly sliced mushrooms
2 stalks celery, thinly sliced
1/2 teaspoon thyme
1/2 teaspoon marjoram
1/4 teaspoon black pepper
1/4 teaspoon salt
1/3 cup finely chopped parsley
Rinse wild rice and place it in a saucepan with the vegetable broth and 1/2 cup water. Stir to mix, then cover & simmer for 20 minutes. At the end of this time, add the basmati rice. Cover and continue cooking until both varieties of rice are tender, about 50 minutes. Heat 1/2 cup water in a large pot or skillet. Add onion and garlic & cook until all the water has evaporated and browned bits of onion begin to stick to the pan. Add another 1/4 cup water, scrape the pan, and cook until the onions begin to stick again. Repeat this process of adding water and cooking the onion until they are nicely browned. This will take about 15 minutes. Stir in the mushrooms, celery, & seasonings. Cook, stirring frequently, for 5 minutes, then add the cooked rice and finely chopped parsley. Cook over low heat, turning gently, until the mixture is very hot.
Serves 6.
Recycle: broth can
Compost: garlic skins

Monday, December 19, 2005

Gingersnaps

I have loved spicy food since I was a child. A very small child. As a toddler, I'm told my favorite foods were salami sandwiches and gingersnaps. There is also an anecdote, perhaps apocryphal, that at one point I ate so many gingersnaps that I developed an allergy to them and broke out in hives. Apocryphal or not, I still love gingersnaps and have spent years looking for a good recipe for them.

Everyone has a website these days. Even the spice makers, McCormick, have a website. And on that website they have recipes. One of them, not surprisingly, is for gingersnaps. I decided to give it a try but I didn't think anything this simple could be any good. Wrong! They are simple to make and delicious. And very, very spicy.

For the record, I still love salami.

Verdict: Yum! This one's a keeper.

Gingersnaps


3/4 cup shortening
1 cup sugar
1/4 cup molasses
1 egg
2 cups all-purpose flour
2 teaspoons baking soda
1/2 teaspoon salt
1 tablespoon McCormick Ground Ginger
1 teaspoon McCormick Ground Cinnamon
Sugar for rolling

Preheat oven to 350F. Place shortening and sugar in large mixer bowl and cream until light and fluffy. Add molasses and egg and beat well.

Combine flour, baking soda, salt, and spices. Gradually add to shortening mixture and mix well.

Shape dough into 1-inch balls and roll in sugar. Place 2 inches apart on ungreased cookie sheets. Bake 12 minutes.

Remove from cookie sheets and place cookies on wire racks to cool.

Recycle: molasses bottle

Compost: eggshell

Friday, December 16, 2005

Quick Chicken Moo Shu

I think this recipe should take some kind of prize for longest gestation. I cut it out of the newspaper last spring. I had planned on setting it aside until fall when I would get to the Asian food market for hoisin sauce. Over the summer, I found hoisin sauce in my local grocery store. I bought it and put it aside because it was too hot to cook. When I was at the Asian food market in November buying tofu for the turkey stir fry I spotted frozen moo shu pancakes. I bought them and stuck them in the freezer. Here it is December and I'm finally getting around to making it! I'm happy to report that it was worth the wait.

This recipe calls for fresh ginger. Instead of substituting ground ginger as I normally would, I have decided to try out an idea I have heard from other cooks. If you don't use a lot of fresh ginger, I'm told that you can freeze it and just break off a piece when you need it. I'll let you know how that works out. It also calls for shredded cabbage. I didn't have time or energy to shred cabbage, so I cheated and bought a cole slaw mix. You only need one cup, but in the future, I will definitely be doubling that. This recipe is excellent but could use more "crunch". I will also be substituting flour tortillas for the moo shu pancakes. I don't know if it is the particular ones I bought or if frozen ones are not a good idea, but they just didn't work out for me. They didn't taste good and they were too stiff to wrap around the chicken.

Verdict: Yum! This one's a keeper.

Quick Chicken Moo Shu
(Source: The Star Ledger )

2 tablespoons vegetable or peanut oil
1 tablespoon fresh ginger, minced
1 teaspoon garlic, minced
1 bunch scallions, trimmed and cut into 1/2-inch lengths
1 cup cabbage, shredded
4 cups cooked chicken, shredded
1 tablespoon sesame oil
1 cup hoisin sauce
8 to 12 small, soft flour tortillas

In a wok or large saute pan over high heat, heat oil until hot and stir-fry ginger, garlic, scallions and cabbage, about 90 seconds. Add chicken and stir-fry until hot.

Remove from heat and drizzle sesame oil and hoisin sauce over stir-fry mixture. Toss to coat with glaze of oil and hoisin.

Serve immediately with warm, soft tortillas or steamed Mandarin pancakes, additional hoisin suce and chopped scallions, if desired.

Recycle: oil bottles, hoisin sauce bottle

Compost: ginger and garlic skins, unused parts of scallions and cabbage

Monday, December 12, 2005

Ultimate Chocolate Brownies

There were a few raised eyebrows in my office when I baked brownies for our Hamburg office. I had to remind my co-workers that I bake for the office Christmas party so they shouldn't feel slighted. In an effort to mollify them, I promised to make better brownies for them than I did for Hamburg.

I work in an IT department. My fellow employees come from many different countries and backgrounds. For the Christmas party each year, everyone is encouraged to bring a dish that is traditional in their country/culture/family and an ornament for the departmental Christmas tree. And their families too! The kids have a blast decorating the tree while the parents enjoy the incredible buffet. The Scottish Shortbread that I baked last year was a a big hit and I had been racking my brains trying to figure out how to equal or surpass it this year. Ultimate Chocolate Brownies were the perfect answer.

I only make these brownies when I have to bring a dish to an event. I don't particularly like them. I think it's the cocoa I find objectionable. And I don't care for the combination with the chocolate chips. About the only thing I like about this recipe is the frosting! Everyone else seems to like them, so I keep making them.

Here are two things you might want to do when you make these brownies. I've never actually tried this, but I've read in several places that if you want your brownies to come out of the pan looking as perfect as in photos, line the pan with aluminum foil. After they are baked, you lift the brownies out in the aluminum foil rather than trying to pry them out with a knife. The second idea is one I do use. The recipe calls for 1 cup of chocolate chips. I always buy the 12 oz package which yields 2 cups of chips. One cup I add to the batter as directed and the remaining chips I sprinkle on top of the frosting.

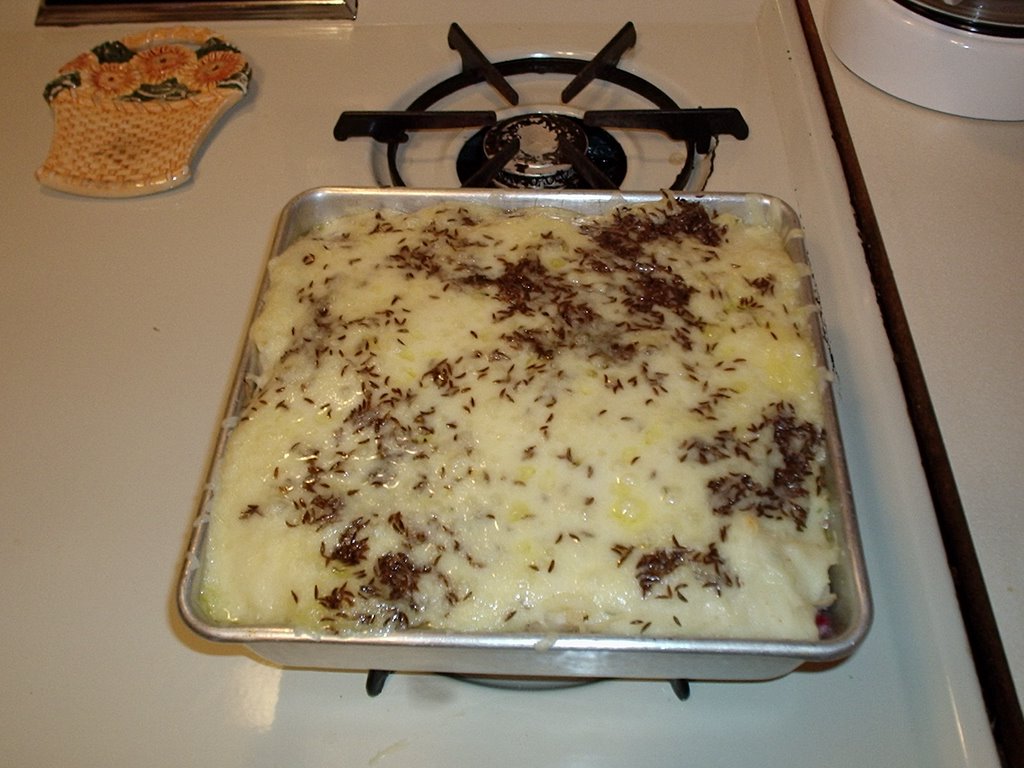
Picture Credit: For the party, I arranged the brownies on a holiday platter with doilies. They were very pretty but I was in such a rush that I forgot to take pictures so you will have to settle for a photo I stole from the Hershey's website. My brownies didn't look this perfect, but my presentation was better! Further Note: Apparently Blogger didn't like the picture either and is refusing to allow me to post it. Please use your imagination instead.

Verdict: Yum! This one's a keeper.

Ultimate Chocolate Brownies
(Source: Favorite Brand Name Cookie Collection)
3/4 cup Hershey's Cocoa
1/2 teaspoon baking soda
2/3 cup butter or magarine, melted and divided
1/2 cup boiling water
2 cups sugar
2 eggs
1-1/3 cups all-purpose flour
1 teaspoon vanilla extract
1/4 teaspoon salt
1 cup Hershey's Semi-Sweet Chocolate Chips
One-Bowl Buttercream Frosting (recipe follows)
Heat oven to 350F. Grease 13x9x2-inch baking pan or two 8-inch square pans.
Stir together cocoa and baking soda in large bowl; stir in 1/3 cup butter. Add boiling water; stir until mixture thickens. Stir in sugar, eggs and remaining 1/3 cup butter; stir until smooth. Add flour, vanilla and salt; blend completely. Stir in chocolate chips. Pour into prepared pan.
Bake 35 to 40 minutes for rectangular pan, 30 to 35 minutes for square pans or until brownies begin to pull away from sides of pan. Cool completely in pan on wire rack. Frost with One-Bowl Buttercream Frosting. Cut into squares. About 36 brownies.
One-Bowl Buttercream Frosting
6 tablespoons butter or margarine, softened
2-2/3 cups powdered sugar
1/2 cup Hershey's Cocoa
1/3 cup milk
1 teaspoon vanilla extract
Beat butter in medium bowl. Add powdered sugar and cocoa alternately with milk, beating to spreading consistency (additional milk may be needed). Stir in vanilla. About 2 cups frosting.
Recycle: vanilla extract bottle
Compost: eggshells

Friday, December 09, 2005

Reuben Casserole

I haven't posted in a while because I've been studying for an exam for my Master Gardeners' class. I didn't do as well as I wanted but I'm pretty sure I at least passed. In the meantime, I have been cooking. I will try to post a recipe every day until I'm caught up.

This one is a real departure for me. I saw it in a newsletter from BettyCrocker.com . It uses instant mashed potatoes, something I normally abhor. But I've always been a sucker for reuben sandwiches and I was curious as to how this would taste with mashed potatoes rather than the usual rye bread.

It was very easy to make. The only problem I had was with the canned sauerkraut. I rinsed and drained it in a colander but it was still too wet. I should have mashed it down good to get all of the liquid out of it. The resulting casserole was surprisingly good even with the instant mashed potatoes. I especially liked the caraway seed on the top. If you like reubens and don't mind instant mashed potatoes, give this one a try.

Verdict: Not bad, but I probably won't be making this one again.

Reuben Casserole
(Source: BettyCrocker.com )


3 cups hot water
1 cup milk
1/4 cup margarine or butter
1 tablespoon yellow mustard
1 package (7.2 ounces) Betty Crocker roasted garlic mashed potatoes
1 package (6 ounces) sliced corned beef, cut into 1/2-inch pieces
1 can (14 1/2 ounces) sauerkraut, rinsed well and drained
2 cups shredded Swiss cheese (8 ounces)
1 tablespoon caraway seed, if desired

Heat oven to 350F. Grease square baking dish, 8x8x2 inches.

Heat hot water, milk and margarine to rapid boil in 3-quart saucepan; remove from heat. Stir in mustard. Stir in 2 pouches Potatoes and Seasoning just until moistened. Let stand about 1 minute or until liquid is absorbed. Whip with fork until smooth.

Spread 1 1/2 cups of the potatoes in baking dish. Top with corned beef. Spread sauerkraut over corned beef. Spoon remaining potatoes over top; spread gently. Sprinkle potatoes with cheese and caraway seed.

Bake uncovered about 20 minutes or until cheese is golden brown.

Recycle: mustard bottle, sauerkraut can

Monday, December 05, 2005

Date Bars

I have a "three-strike" rule. I like to try things three times before I give up on them. In my garden, that means planting something in three different places before deciding I just can't grow it. With cookbooks, it means trying three different recipes before consigning them (permanently) to the bookshelf. So, despite the crumb cake fiasco, I wanted to try another recipe from the Nestle VeryBestBaking Holiday 2005 leaflet that I received in the mail.

I've had my eye on the Date Bars recipe for a while. I've never made date bars. I thought it would be something different for me. Being a confirmed chocoholic, I have a very bad tendency to only make chocolate cakes/cookies/bars etc. I try to force myself to try other flavors.

My first problem with this recipe was that my grocery store doesn't sell chopped dates. I had to buy whole ones and chop them myself, a rather sticky business. Then I made the crust. Uh, oh. Not enough liquid. It didn't come together. At all. I literally spooned the "crust" into the pan, carefully poured the filling over it and then spooned the rest of the "crust" over the top. Even as I put the pan in the oven, I knew this was going to be a disaster.

It smelled great while it baked. It didn't look too bad coming out of the oven. It was difficult getting a piece out of the pan. Then I tasted it. It was delicious. Beyond delicious. It was almost better than chocolate. I'm ordering you to drop everything, buy dates and make this. NOW. Try increasing the butter to 3/4 cup. That's what I'm going to do when I make this again. And again. And again.

Verdict: Yum! This one's a keeper.

Date Bars
(Source: Nestle VeryBestBaking Holiday 2005 leaflet)


1 pkg. (8 oz.) chopped dates
3/4 cup Nestle Carnation Evaporated Milk
2 tablespoons granulated sugar
1 teaspoon vanilla extract
1/2 cup (1 stick) butter or margarine, softened
1/2 cup packed light brown sugar
1 cup all-purpose flour
3/4 cup quick-cooking oats
1/2 teaspoon salt
1/2 teaspoon ground cinnamon

Preheat oven to 400F. Grease 8-inch-square baking pan.

Combine dates, evaporated milk, sugar and vanilla extract in medium saucepan. Cook, over medium-low heat, stirring occasionally, for 8 to 10 minutes or until thickened. Remove from heat.

Beat butter and brown sugar in large mixer bowl until creamy. Beat in flour, oats, baking soda, salt and cinnamon. With floured fingers, press half of crust mixture onto bottom of prepared baking pan. Spread date filling over crust. Top with remaining crust.

Bake for 20 to 25 minutes or until golden. Serve warm. Cut into bars.

Recycle: evaporated milk can, vanilla extract bottle

Friday, December 02, 2005

Crockpot Chinese Beef and Pea Pods

Crazygramma posted an SOS on her garden blog alerting me to a beef crockpot recipe she had posted on her new recipe site, Family Food Favorites . If you haven't already done so, I urge you to visit this site. Do it when you have some time. There are so many incredible recipes posted by Crazygramma and other fabulous cooks that you'll want to linger.

Like her other recipes that I have tried, this one is simple and delicious. I cheated and bought beef already cut into strips rather than cutting my own. And I used fresh pea pods but cooked them for only 5 minutes because I like my veggies crisp and lightly cooked.

Crazygramma notes "I also add mushrooms and bean sprouts in and use low sodium soy sauce and consomme as I found the original recipe too salty for my taste." I didn't find it too salty but I will add the mushrooms and bean sprouts next time. Finally! A crockpot recipe that I actually like. Thanks Crazygramma for another fantastic recipe.

Verdict: Yum! This one's a keeper.


Crockpot Chinese Beef and Pea Pods

1 ( 1 to 1 1/2 pound) flank steak
1 (10 1/2 oz) can beef consomme
1/4 cup soy sauce
1/4 tsp. ground ginger
1 bunch green onion, sliced
2 tbs. cornstarch
2 tbs. cold water
1 (7 oz) package frozen Chinese peas partially thawed, or fresh ones

Thinly slice flank steak diagonally across the grain. Combine strips in crock-pot with consomme, soy sauce, ginger and onions. cover and cook on low for 5-7 hours.

Turn crockpot to high, stir in cornstarch that has been dissolved in the cold water. Cook on high for 10 minutes.

Drop in pea pods the last 5 minutes, longer if using fresh peas.

Serve over hot rice.

Donate: Campbell soup labels to your local school

Recycle: soup can

Compost: unused portion of green onions, strings from pea pods